Your Debian netboot suddenly can’t do Ext4?

If, like me, you’ve just done a Debian netboot install over PXE and discovered that the partitioner suddenly seems to have no option for Ext4 filesystem (leaving only btrfs and XFS), despite the fact that it worked fine a couple of weeks ago, do not be alarmed. You aren’t losing your mind. It seems to be a bug.

As the comment says, downloading netboot.tar.gz version 20150422+deb8u3 fixes it. You can find your version in the debian-installer/amd64/boot-screens/f1.txt file. I was previously using 20150422+deb8u1 and the commenter was using 20150422+deb8u2.

Looking at the dates on the files I’m guessing this broke on 23rd January 2016. There was a Debian point release around then, so possibly you are supposed to download a new netboot.tar.gz with each one – not sure. Although if this is the case it would still be nice to know you’re doing something wrong as opposed to having the installer appear to proceed normally except for denying the existence of any filesystems except XFS and btrfs.

Oh and don’t forget to restart your TFTP daemon. tftpd-hpa at least seems to cache things (or maybe hold the tftp directory open, as I had just moved the old directory out of the way), so I was left even more confused when it still seemed to be serving 20150422+deb8u1.

Disabling the default IPMI credentials on a Supermicro server

In an earlier post I mentioned that you should disable the default ADMIN / ADMIN credentials on the IPMI controller. Here’s how.

Install ipmitool ^

ipmitool is the utility that you will use from the command line of another machine in order to interact with the IPMI controllers on your servers.

# apt-get install ipmitool

List the current users ^

$ ipmitool -I lanplus -H 192.168.1.22 -U ADMIN -a user list
Password:
ID  Name             Callin  Link Auth  IPMI Msg   Channel Priv Limit
2   ADMIN            false   false      true       ADMINISTRATOR

Here you are specifying the IP address of the server’s IPMI controller. ADMIN is the IPMI user name you will use to log in, and it’s prompting you for the password which is also ADMIN by default.

Add a new user ^

You should add a new user with a name other than ADMIN.

I suppose it would be safe to just change the password of the existing ADMIN user, but there is no need to have it named that, so you may as well pick a new name.

$ ipmitool -I lanplus -H 192.168.1.22 -U ADMIN -a user set name 3 somename
Password:
$ ipmitool -I lanplus -H 192.168.1.22 -U ADMIN -a user set password 3
Password:
Password for user 3:
$ ipmitool -I lanplus -H 192.168.1.22 -U ADMIN -a channel setaccess 1 3 link=on ipmi=on callin=on privilege=4
Password:
$ ipmitool -I lanplus -H 192.168.1.22 -U ADMIN -a user enable 3
Password:

From this point on you can switch to using the new user instead.

$ ipmitool -I lanplus -H 192.168.1.22 -U somename -a user list
Password:
ID  Name             Callin  Link Auth  IPMI Msg   Channel Priv Limit
2   ADMIN            false   false      true       ADMINISTRATOR
3   somename         true    true       true       ADMINISTRATOR

Disable ADMIN user ^

Before doing this bit you may wish to check that the new user you added works for everything you need it to. Those things might include:

  • ssh to somename@192.168.1.22
  • Log in on web interface at https://192.168.1.22/
  • Various ipmitool commands like querying power status:
    $ ipmitool -I lanplus -H 192.168.1.22 -U somename -a power status
    Password:
    Chassis power is on

If all of that is okay then you can disable ADMIN:

$ ipmitool -I lanplus -H 192.168.1.22 -U somename -a user disable 2
Password:

If you are paranoid (or this is just the first time you’ve done this) you could now check to see that none of the above things now work when you try to use ADMIN / ADMIN.

Specifying the password ^

I have not done so in these examples but if you get bored of typing the password every time then you could put it in the IPMI_PASSWORD environment variable and use -E instead of -a on the ipmitool command line.

When setting the IPMI_PASSWORD environment variable you probably don’t want it logged in your shell’s history file. Depending on which shell you use there may be different ways to achieve that.

With bash, if you have ignorespace in the HISTCONTROL environment variable then commands prefixed by one or more spaces won’t be logged. Alternatively you could temporarily disable history logging with:

$ set +o history
$ sensitive commend goes here
$ set -o history # re-enable history logging

So anyway…

$ echo $HISTCONTROL
ignoredups:ignorespace
$     export IPMI_PASSWORD=letmein
$ # ^ note the leading spaces here
$ # to prevent the shell logging it
$ ipmitool -I lanplus -H 192.168.1.22 -U somename -E power status
Chassis Power is on

Installing Debian by PXE using Supermicro IPMI Serial over LAN

Here’s how to install Debian jessie on a Supermicro server using PXE boot and the IPMI serial-over-LAN.

Using these instructions you will be able to complete an install of a remote machine, although you will initially need access to the BIOS to configure the IPMI part.

BIOS settings ^

This bit needs you to be in the same location as the machine, or else have someone who is make the required changes.

Press DEL to go into the BIOS configuration.

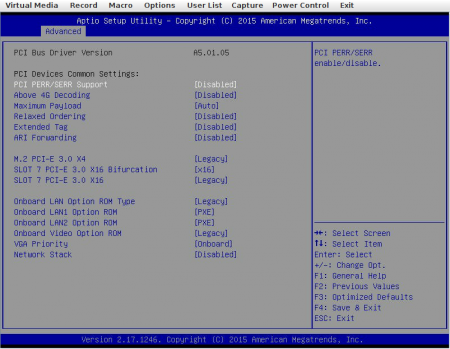
Under Advanced > PCIe/PCI/PnP Configuration make sure that the network interface through which you’ll reach your PXE server has the “PXE” option ROM set:

BIOS PSE option ROM

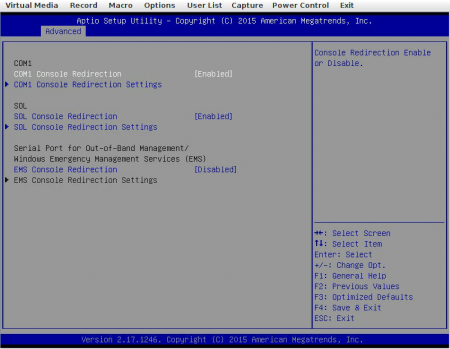
Under Advanced > Serial Port Console Redirection you’ll want to enable SOL Console Redirection.

BIOS serial console redirection

(Pictured here is also COM1 Console Redirection. This is for the physical serial port on the machine, not the one in the IPMI.)

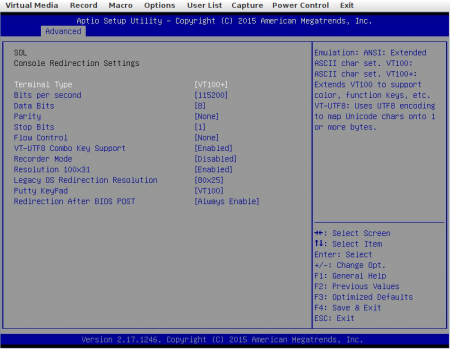
Under SOL Console Redirection Settings you may as well set the Bits per second to 115200.

BIOS SOL redirection settings

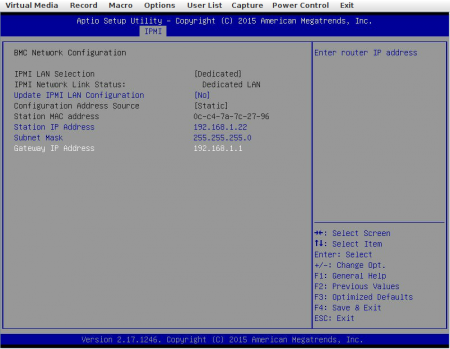
Now it’s time to configure the IPMI so you can interact with it over the network. Under IPMI > BMC Network Configuration, put the IPMI on your management network:

IPMI network configuration

Connecting to the IPMI serial ^

With the above BIOS settings in place you should be able to save and reboot and then connect to the IPMI serial console. The default credentials are ADMIn / ADMIN which you should of course change with ipmitool, but that is for a different post.

There’s two ways to connect to the serial-over-LAN: You can ssh to the IPMI controller, or you can use ipmitool. Personally I prefer ssh, but the ipmitool way is like this:

$ ipmitool -I lanplus -H 192.168.1.22 -U ADMIN -a sol activate

The ssh way:

$ ssh ADMIN@192.168.1.22
The authenticity of host '192.168.1.22 (192.168.1.22)' can't be established.
RSA key fingerprint is b7:e1:12:94:37:81:fc:f7:db:6f:1c:00:e4:e0:e1:c4.
Are you sure you want to continue connecting (yes/no)?
Warning: Permanently added '192.168.1.22,192.168.1.22' (RSA) to the list of known hosts.
ADMIN@192.168.1.22's password:
 
ATEN SMASH-CLP System Management Shell, version 1.05
Copyright (c) 2008-2009 by ATEN International CO., Ltd.
All Rights Reserved 
 
 
-> cd /system1/sol1
/system1/sol1
 
-> start
/system1/sol1
press <Enter>, <Esc>, and then <T> to terminate session
(press the keys in sequence, one after the other)

They both end up displaying basically the same thing.

The serial console should just be displaying the boot process, which won’t go anywhere.

DHCP and TFTP server ^

You will need to configure a DHCP and TFTP server on an already-existing machine on the same LAN as your new server. They can both run on the same host.

The DHCP server responds to the initial requests for IP address configuration and passes along where to get the boot environment from. The TFTP server serves up that boot environment. The boot environment here consists of a kernel, initramfs and some configuration for passing arguments to the bootloader/kernel. The boot environment is provided by the Debian project.

DHCP ^

I’m using isc-dhcp-server. Its configuration file is at /etc/dhcp/dhcpd.conf.

You’ll need to know the MAC address of the server, which can be obtained either from the front page of the IPMI controller’s web interface (i.e. https://192.168.1.22/ in this case) or else it is displayed on the serial console when it attempts to do a PXE boot. So, add a section for that:

subnet 192.168.2.0 netmask 255.255.255.0 {
}
 
host foo {
    hardware ethernet 0C:C4:7A:7C:28:40;
    fixed-address 192.168.2.22;
    filename "pxelinux.0";
    next-server 192.168.2.251;
    option subnet-mask 255.255.255.0;
    option routers 192.168.2.1;
}

Here we set the network configuration of the new server with fixed-address, option subnet-mask and option routers. The IP address in next-server refers to the IP address of the TFTP server, and pxelinux.0 is what the new server will download from it.

Make sure that is running:

# service isc-dhcp-server start

DHCP uses UDP port 67, so make sure that is allowed through your firewall.

TFTP ^

A number of different TFTP servers are available. I use tftpd-hpa, which is mostly configured by variables in /etc/default/tftp-hpa:

TFTP_OPTIONS="--secure"
TFTP_USERNAME="tftp"
TFTP_DIRECTORY="/srv/tftp"
TFTP_ADDRESS="0.0.0.0:69"

TFTP_DIRECTORY is where you’ll put the files for the PXE environment.

Make sure that the TFTP server is running:

# service tftpd-hpa start

TFTP uses UDP port 69, so make sure that is allowed through your firewall.

Download the netboot files from your local Debian mirror:

$ cd /srv/tftp
$ curl -s http://ftp.YOUR-MIRROR.debian.org/debian/dists/jessie/main/installer-amd64/current/images/netboot/netboot.tar.gz | sudo tar zxvf -
./                
./version.info    
./ldlinux.c32     
./pxelinux.0      
./pxelinux.cfg    
./debian-installer/
./debian-installer/amd64/
./debian-installer/amd64/bootnetx64.efi
./debian-installer/amd64/grub/
./debian-installer/amd64/grub/grub.cfg
./debian-installer/amd64/grub/font.pf2
…

(This assumes you are installing a device with architecture amd64.)

At this point your TFTP server root should contain a debian-installer subdirectory and a couple of links into it:

$ ls -l .
total 8
drwxrwxr-x 3 root root 4096 Jun  4  2015 debian-installer
lrwxrwxrwx 1 root root   47 Jun  4  2015 ldlinux.c32 -> debian-installer/amd64/boot-screens/ldlinux.c32
lrwxrwxrwx 1 root root   33 Jun  4  2015 pxelinux.0 -> debian-installer/amd64/pxelinux.0
lrwxrwxrwx 1 root root   35 Jun  4  2015 pxelinux.cfg -> debian-installer/amd64/pxelinux.cfg
-rw-rw-r-- 1 root root   61 Jun  4  2015 version.info

You could now boot your server and it would call out to PXE to do its netboot, but would be displaying the installer process on the VGA output. If you intend to carry it out using the Remote Console facility of the IPMI interface then that may be good enough. If you want to do it over the serial-over-LAN though, you’ll need to edit some of the files that came out of the netboot.tar.gz to configure that.

Here’s a list of the files you need to edit. All you are doing in each one is telling it to use serial console. The changes are quite mechanical so you can easily come up with a script to do it, but here I will show the changes verbosely. All the files live in the debian-installer/amd64/boot-screens/ directory.

ttyS1 is used here because this system has a real serial port on ttyS0. 115200 is the baud rate of ttyS1 as configured in the BIOS earlier.

adtxt.cfg

From:

label expert
        menu label ^Expert install
        kernel debian-installer/amd64/linux
        append priority=low vga=788 initrd=debian-installer/amd64/initrd.gz --- 
include debian-installer/amd64/boot-screens/rqtxt.cfg
label auto
        menu label ^Automated install
        kernel debian-installer/amd64/linux
        append auto=true priority=critical vga=788 initrd=debian-installer/amd64/initrd.gz --- quiet

To:

label expert
        menu label ^Expert install
        kernel debian-installer/amd64/linux
        append priority=low console=ttyS1,115200n8 initrd=debian-installer/amd64/initrd.gz --- 
include debian-installer/amd64/boot-screens/rqtxt.cfg
label auto
        menu label ^Automated install
        kernel debian-installer/amd64/linux
        append auto=true priority=critical console=ttyS1,115200n8 initrd=debian-installer/amd64/initrd.gz --- quiet
rqtxt.cfg

From:

label rescue
        menu label ^Rescue mode
        kernel debian-installer/amd64/linux
        append vga=788 initrd=debian-installer/amd64/initrd.gz rescue/enable=true --- quiet

To:

label rescue
        menu label ^Rescue mode
        kernel debian-installer/amd64/linux
        append console=ttyS1,115200n8 initrd=debian-installer/amd64/initrd.gz rescue/enable=true --- quiet
syslinux.cfg

From:

# D-I config version 2.0
# search path for the c32 support libraries (libcom32, libutil etc.)
path debian-installer/amd64/boot-screens/
include debian-installer/amd64/boot-screens/menu.cfg
default debian-installer/amd64/boot-screens/vesamenu.c32
prompt 0
timeout 0

To:

serial 1 115200
console 1
# D-I config version 2.0
# search path for the c32 support libraries (libcom32, libutil etc.)
path debian-installer/amd64/boot-screens/
include debian-installer/amd64/boot-screens/menu.cfg
default debian-installer/amd64/boot-screens/vesamenu.c32
prompt 0
timeout 0
txt.cfg

From:

default install
label install
        menu label ^Install
        menu default
        kernel debian-installer/amd64/linux
        append vga=788 initrd=debian-installer/amd64/initrd.gz --- quiet

To:

default install
label install
        menu label ^Install
        menu default
        kernel debian-installer/amd64/linux
        append console=ttyS1,115200n8 initrd=debian-installer/amd64/initrd.gz --- quiet

Perform the install ^

Connect to the serial-over-LAN and get started. If the server doesn’t have anything currently installed then it should go straight to trying PXE boot. If it does have something on the storage that it would boot then you will have to use F12 at the BIOS screen to convince it to jump straight to PXE boot.

$ ssh ADMIN@192.168.1.22
ADMIN@192.168.1.22's password:
 
ATEN SMASH-CLP System Management Shell, version 1.05
Copyright (c) 2008-2009 by ATEN International CO., Ltd.
All Rights Reserved 
 
 
-> cd /system1/sol1
/system1/sol1
 
-> start
/system1/sol1
press <Enter>, <Esc>, and then <T> to terminate session
(press the keys in sequence, one after the other)
 
Intel(R) Boot Agent GE v1.5.13                                                  
Copyright (C) 1997-2013, Intel Corporation                                      
 
CLIENT MAC ADDR: 0C C4 7A 7C 28 40  GUID: 00000000 0000 0000 0000 0CC47A7C2840  
CLIENT IP: 192.168.2.22  MASK: 255.255.255.0  DHCP IP: 192.168.2.252             
GATEWAY IP: 192.168.2.1
 
PXELINUX 6.03 PXE 20150107 Copyright (C) 1994-2014 H. Peter Anvin et al    


                 ┌───────────────────────────────────────┐
                 │ Debian GNU/Linux installer boot menu  │
                 ├───────────────────────────────────────┤
                 │ Install                               │
                 │ Advanced options                    > │
                 │ Help                                  │
                 │ Install with speech synthesis         │
                 │                                       │
                 │                                       │
                 │                                       │
                 │                                       │
                 │                                       │
                 │                                       │
                 └───────────────────────────────────────┘


              Press ENTER to boot or TAB to edit a menu entry
 
 
  ┌───────────────────────┤ [!!] Select a language ├────────────────────────┐
  │                                                                         │
  │ Choose the language to be used for the installation process. The        │
  │ selected language will also be the default language for the installed   │
  │ system.                                                                 │
  │                                                                         │
  │ Language:                                                               │
  │                                                                         │
  │                               C                                         │
  │                               English                                   │
  │                                                                         │
  │     <Go Back>                                                           │
  │                                                                         │
  └─────────────────────────────────────────────────────────────────────────┘


<Tab> moves; <Space> selects; <Enter> activates buttons

…and now the installation proceeds as normal.

At the end of this you should be left with a system that uses ttyS1 for its console. You may need to tweak that depending on whether you want the VGA console also.

Audience tickets for Stewart Lee’s Comedy Vehicle

Last night Jenny and I got the chance to be in the audience for a recording of what will become (some percentage of) four episodes of Stewart Lee’s Comedy Vehicle season 4. Once we actually got in it was a really enjoyable experience, although as usual SRO Audiences were somewhat chaotic with their ticketing procedures.

I’d heard about the chance to get priority audience tickets from the Stewart Lee mailing list, so I applied, but the tickets I got were just their standard ones. From past experience I knew this would mean having to get there really early and queue for ages and still not be sure of getting in, so for most shows on the SRO Audiences site I don’t normally bother. As I particularly like Stewart Lee I decided to persevere this time.

The instructions said they’d be greeting us from 6.20pm, so I decided getting there about an hour early would be a good idea. I know from past experience that they massively over-subscribe their tickets in order to never ever have empty seats. That makes it very difficult to guess how early to be, and I hadn’t been to a Comedy Vehicle recording before either.

The venue was The Mildmay Club in Stoke Newington which was also the venue for all previous recordings of Comedy Vehicle. A bit of a trek from Feltham – train to Richmond then most of the way along the Overground towards Stratford; a good 90 minutes door to door. Nearest station Canonbury but we decided to go early and get some food at Nando’s Dalston first.

We got to the Mildmay Club about 5.25pm and there were already about 15 people queuing outside. Pretty soon the doorman let us in, but only as far as a table just inside the doors where a guy gave us numbered wristbands and told us to come back at 7pm.

This was a bit confusing as we weren’t sure whether that meant we were definitely getting in or if we’d still have to queue (and thus should actually come back before 7). So I asked,

“does the wristband mean we’re definitely getting in?”

“We’ll do our best to get as many people in as we can. We won’t know until 7pm,”

was the non-answer. People piling up behind us and they wanted us out of the way, so off we went.

Having already eaten we didn’t really have anything else to do, so we had a bit of an aimless wander around Newington Green for half an hour or so before arriving back outside the club again, where the queue was now a crowd bustling around the entrance and trailing off in both directions along the street. We decided to get back in the queue going to the right of the club, which was slowly shrinking, with the idea of asking if we were in the right place once we got to the front. All of the people in this queue were yet to collect their wristbands.

Having got to the front of this queue it was confirmed that we should wait around outside until 7pm, though still no idea whether we would get in or by what process this would be decided. We shuffled into the other queue to the left of the club which consisted of people like us who already had wristbands.

While in this queue, we heard calls for various colours of wristband that weren’t ours (white), and eventually all people in front of us had been called into the club. By about quarter past 6 we’d watched quite a large number of people with colourful wristbands get into the building, and we were starting to seriously consider that we might not be getting into this thing, despite the fact that we were amongst the first 15 people to arrive.

At this point a different member of staff came out and told us off for queuing to the left of the club, because

“you’re not allowed to queue past the shops”

and told us to queue to the right with all the other people who still hadn’t got wristbands yet. Various grumblings on the subject of the queue being really long and how will we know what is going on were heard, to which the response was,

“it doesn’t matter where you are, your wristbands are numbered and we’ll call people in number order anyway. You can go away and come back at 7pm if you like. Nothing is happening before 7pm.”

Well, we didn’t have anything else to do for the next 45 minutes anyway, and there was lack of trust that everyone involved was giving us the same/correct information, so we decided to remain in this mostly-linear-collection-of-people-which-was-not-a-queue-because-it-would-be-called-in-number-order.

About 6.55pm a staff member popped their head out the door and shouted,

“we’re delayed by about ten minutes but we do love you and we’ll start getting you inside soon.”

And then just a minute or two later he’s back and shouting out,

“wristband numbers below 510, come this way!”

We were 506 and 507.

The exterior of the Mildmay Club isn’t in the best condition. It looks pretty shabby. Inside though it’s quite nice. We were ushered into the bar area which is pretty much the same as the bar of every working men’s club or British Legion club that you have ever seen.

Even though we were amongst the first few white wristband people in, the room was really full already. These must have been all the priority ticket people we saw going in ahead of us. Nowhere for us to sit except the edge of a low stage directly in front of a speaker pumping out blues and Hendrix. Again we started to worry that we would not be getting in to the recording.

It must have been about 7.20pm when they started calling the colourful wristband people out of the bar and in to the theatre. The room slowly drained until it seemed like there were only about ten of us left. And then,

“white wristbands numbered 508 and below please!”

We rushed into the theatre to be confronted with mostly full seating.

“You want to be sat together don’t you?”

“Yes!”

“Oh, just take those reserved seats, they’ve blown it now, they’re too late.”

Score! I prodded Jenny in the direction of a set of four previously reserved seats that were in a great position. We were amongst the last twenty or so people to get in. I think if we had shown up even ten minutes later to get the wristbands then we wouldn’t have made it.

In contrast to the outside of the building the theatre itself was really quite nice, very interesting decor, and surprisingly large compared to the impression you get from seeing it on television.

Stewart did two sets of 28 minute pieces, then a short interval and then another 2×28 minutes, so almost two hours. I believe there were recordings on three nights so that’s potentially 12 episodes worth of material, but given that

  1. All the previous series had 6 episodes.
  2. Stewart made a comment at one point about moving something on stage for continuity with the previous night’s recording.

then I assume there’s two recordings of each episode’s material from which they’ll edit together the best bits.

The material itself was great, so fans of Comedy Vehicle have definitely got something to look forward to. If you have previously attempted to consume Stewart Lee’s comedy and found the experience unpalatable then I don’t think anything is going to change for you – in fact it might upset you even more, to be honest. Other than that I’m not going to say anything about it as that would spoil it and I couldn’t do it justice anyway.

Oh, apart from that it’s really endearing to see Stew make himself laugh in the middle of one of his own rants and have to take a moment to compose himself.

As for SRO Audiences, I possibly shouldn’t moan as I have no actual experience of trying to cram hundreds of people into a free event and their first concern has got to be having the audience side of things run smoothly for the production, not for the audience. I get that. All I would say is that:

  • Being very clear with people at wristband issuing time that they will be called in by number, and giving a realistic time for when the numbers would be called, would be helpful. This wasn’t clear for us so on the one hand we hung around being in the way a bit, but on the other hand I’m glad that we didn’t leave it until 7pm to come back because our numbers were called before 7pm and we did only just get in.
  • Doing your best to turn people away early when they have no realistic chance of getting in would be good. There were loads of people with higher number wristbands than us that we did not see in the theatre later. Unsure if they got eventually sent home or if they ended up watching the recording on TV in the bar. At previous SRO Audiences recordings I’ve waited right up until show start time to be told to go home though.

Supermicro IPMI remote console on Ubuntu 14.04 through SSH tunnel

I normally don’t like using the web interface of Supermicro IPMI because it’s extremely clunky, unintuitive and uses Java in some places.

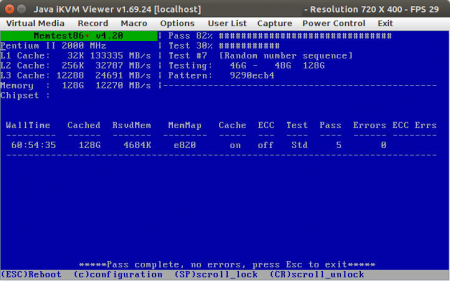
The other day however I needed to look at the console of a machine which had been left running Memtest86+. You can make Memtest86+ output to serial which is generally preferred for looking at it remotely, but this wasn’t run in that mode so was outputting nothing to the IPMI serial-over-LAN. I would have to use the Java remote console viewer.

As an added wrinkle, the IPMI network interfaces are on a network that I can’t access except through an SSH jump host.

So, I just gave it a go without doing anything special other than launching an SSH tunnel:

$ ssh me@jumphost -L127.0.0.1:1443:192.168.1.21:443 -N

This tunnels my localhost port 1443 to port 443 of 192.168.1.21 as available from the jump host. Local port 1443 used because binding low ports requires root privileges.

This allowed me to log in to the web interface of the IPMI at https://localhost:1443/, though it kept putting up a dialog which said I needed a newer JDK. Going to “Remote Control / Console Redirection” attempted to download a JNLP file and then said it failed to download.

This was with openjdk-7-jre and icedtea-7-plugin installed.

I decided maybe it would work better if I installed the Oracle Java 8 stuff (ugh). That was made easy by following these simple instructions. That’s an Ubuntu PPA which does everything for you, after you agree that you are a bad person who should feel badaccept the license.

This time things got a little further, but still failed saying it couldn’t download a JAR file. I noticed that it was trying to download the JAR from https://127.0.0.1:443/ even though my tunnel was on port 1443.

I eventually did get the remote console viewer to work but I’m not 100% convinced it was because I switched to Oracle Java.

So, basic networking issue here. Maybe it really needs port 443?

Okay, ran SSH as root so it could bind port 443. Got a bit further but now says “connection failed” with no diagnostics as to exactly what connection had failed. Still, gut instinct was that this was the remote console app having started but not having access to some port it needed.

Okay, ran SSH as a SOCKS proxy instead, set the SOCKS proxy in my browser. Same problem.

Did a search to see what ports the Supermicro remote console needs. Tried a new SSH command:

$ sudo ssh me@jumphost \
-L127.0.0.1:443:192.168.1.21:443 \
-L127.0.0.1:5900:192.168.1.21:5900 \
-L127.0.0.1:5901:192.168.1.21:5901 \
-L127.0.0.1:5120:192.168.1.21:5120 \
-L127.0.0.1:5123:192.168.1.21:5123 -N

Apart from a few popup dialogs complaining about “MalformedURLException: unknown protocol: socket” (wtf?), this now appears to work.

Supermicro IPMI remote console

Linux Software RAID and drive timeouts

All the RAIDs are breaking ^

I feel like I’ve been seeing a lot more threads on the linux-raid mailing list recently where people’s arrays have broken, they need help putting them back together (because they aren’t familiar with what to do in that situation), and it turns out that there’s nothing much wrong with the devices in question other than device timeouts.

When I say “a lot”, I mean, “more than I used to.”

I think the reason for the increase in failures may be that HDD vendors have been busy segregating their products into “desktop” and “RAID” editions in a somewhat arbitrary fashion, by removing features from the “desktop” editions in the drive firmware. One of the features that today’s consumer desktop drives tend to entirely lack is configurable error timeouts, also known as SCTERC, also known as TLER.

TL;DR ^

If you use redundant storage but may be using non-RAID drives, you absolutely must check them for configurable timeout support. If they don’t have it then you must increase your storage driver’s timeout to compensate, otherwise you risk data loss.

How do storage timeouts work, and when are they a factor? ^

When the operating system requests from or write to a particular drive sector and fails to do so, it keeps trying, and does nothing else while it is trying. An HDD that either does not have configurable timeouts or that has them disabled will keep doing this for quite a long time—minutes—and won’t be responding to any other command while it does that.

At some point Linux’s own timeouts will be exceeded and the Linux kernel will decide that there is something really wrong with the drive in question. It will try to reset it, and that will probably fail, because the drive will not be responding to the reset command. Linux will probably then reset the entire SATA or SCSI link and fail the IO request.

In a single drive situation (no RAID redundancy) it is probably a good thing that the drive tries really hard to get/set the data. If it really persists it just may work, and so there’s no data loss, and you are left under no illusion that your drive is really unwell and should be replaced soon.

In a multiple drive software RAID situation it’s a really bad thing. Linux MD will kick the drive out because as far as it is concerned it’s a drive that stopped responding to anything for several minutes. But why do you need to care? RAID is resilient, right? So a drive gets kicked out and added back again, it should be no problem.

Well, a lot of the time that’s true, but if you happen to hit another unreadable sector on some other drive while the array is degraded then you’ve got two drives kicked out, and so on. A bus / controller reset can also kick multiple drives out. It’s really easy to end up with an array that thinks it’s too damaged to function because of a relatively minor amount of unreadable sectors. RAID6 can’t help you here.

If you know what you’re doing you can still coerce such an array to assemble itself again and begin rebuilding, but if its component drives have long timeouts set then you may never be able to get it to rebuild fully!

What should happen in a RAID setup is that the drives give up quickly. In the case of a failed read, RAID just reads it from elsewhere and writes it back (causing a sector reallocation in the drive). The monthly scrub that Linux MD does catches these bad sectors before you have a bad time. You can monitor your reallocated sector count and know when a drive is going bad.

How to check/set drive timeouts ^

You can query the current timeout setting with smartctl like so:

# for drive in /sys/block/sd*; do drive="/dev/$(basename $drive)"; echo "$drive:"; smartctl -l scterc $drive; done

You hopefully end up with something like this:

/dev/sda:
smartctl 6.4 2014-10-07 r4002 [x86_64-linux-3.16.0-4-amd64] (local build)
Copyright (C) 2002-14, Bruce Allen, Christian Franke, www.smartmontools.org
 
SCT Error Recovery Control:
           Read:     70 (7.0 seconds)
          Write:     70 (7.0 seconds)
 
/dev/sdb:
smartctl 6.4 2014-10-07 r4002 [x86_64-linux-3.16.0-4-amd64] (local build)
Copyright (C) 2002-14, Bruce Allen, Christian Franke, www.smartmontools.org
 
SCT Error Recovery Control:
           Read:     70 (7.0 seconds)
          Write:     70 (7.0 seconds)

That’s a good result because it shows that configurable error timeouts (scterc) are supported, and the timeout is set to 70 all over. That’s in centiseconds, so it’s 7 seconds.

Consumer desktop drives from a few years ago might come back with something like this though:

SCT Error Recovery Control:
           Read:     Disabled
          Write:     Disabled

That would mean that the drive supports scterc, but does not enable it on power up. You will need to enable it yourself with smartctl again. Here’s how:

# smartctl -q errorsonly -l scterc,70,70 /dev/sda

That will be silent unless there is some error.

More modern consumer desktop drives probably won’t support scterc at all. They’ll look like this:

Warning: device does not support SCT Error Recovery Control command

Here you have no alternative but to tell Linux itself to expect this drive to take several minutes to recover from an error and please not aggressively reset it or its controller until at least that time has passed. 180 seconds has been found to be longer than any observed desktop drive will try for.

# echo 180 > /sys/block/sda/device/timeout

I’ve got a mix of drives that support scterc, some that have it disabled, and some that don’t support it. What now? ^

It’s not difficult to come up with a script that leaves your drives set into their most optimal error timeout condition on each boot. Here’s a trivial example:

#!/bin/sh
 
for disk in `find /sys/block -maxdepth 1 -name 'sd*' | xargs -n 1 basename`
do
    smartctl -q errorsonly -l scterc,70,70 /dev/$disk
 
    if test $? -eq 4
    then
        echo "/dev/$disk doesn't suppport scterc, setting timeout to 180s" '/o\'
        echo 180 > /sys/block/$disk/device/timeout
    else
        echo "/dev/$disk supports scterc " '\o/'
    fi
done

If you call that from your system’s startup scripts (e.g. /etc/rc.local on Debian/Ubuntu) then it will try to set scterc to 7 seconds on every /dev/sd* block device. If it works, great. If it gets an error then it sets the device driver timeout to 180 seconds instead.

There are a couple of shortcomings with this approach, but I offer it here because it’s simple to understand.

It may do odd things if you have a /dev/sd* device that isn’t a real SATA/SCSI disk, for example if it’s iSCSI, or maybe some types of USB enclosure. If the drive is something that can be unplugged and plugged in again (like a USB or eSATA dock) then the drive may reset its scterc setting while unpowered and not get it back when re-plugged: the above script only runs at system boot time.

A more complete but more complex approach may be to get udev to do the work whenever it sees a new drive. That covers both boot time and any time one is plugged in. The smartctl project has had one of these scripts contributed. It looks very clever—for example it works out which devices are part of MD RAIDs—but I don’t use it yet myself as a simpler thing like the script above works for me.

What about hardware RAIDs? ^

A hardware RAID controller is going to set low timeouts on the drives itself, so as long as they support the feature you don’t have to worry about that.

If the support isn’t there in the drive then you may or may not be screwed there: chances are that the RAID controller is going to be smarter about how it handles slow requests and just ignore the drive for a while. If you are unlucky though you will end up in a position where some of your drives need the setting changed but you can’t directly address them with smartctl. Some brands e.g. 3ware/LSI do allow smartctl interaction through a control device.

When using hardware RAID it would be a good idea to only buy drives that support scterc.

What about ZFS? ^

I don’t know anything about ZFS and a quick look gives some conflicting advice:

Drives with scterc support don’t cost that much more, so I’d probably want to buy them and check it’s enabled if it were me.

What about btrfs? ^

As far as I can see btrfs does not disable drives, it leaves it until Linux does that, so you’re probably not at risk of losing data.

If your drives do support scterc though then you’re still best off making sure it’s set as otherwise things will crawl to a halt at the first sign of trouble.

What about NAS devices? ^

The thing about these is, they’re quite often just low-end hardware running Linux and doing Linux software RAID under the covers. With the disadvantage that you maybe can’t log in to them and change their timeout settings. This post claims that a few NAS vendors say they have their own timeouts and ignore scterc.

So which drives support SCTERC/TLER and how much more do they cost? ^

I’m not going to list any here because the list will become out of date too quickly. It’s just something to bear in mind, check for, and take action over.

Fart fart fart ^

Comments along the lines of “Always use hardware RAID” or “always use $filesystem” will be replaced with “fart fart fart,” so if that’s what you feel the need to say you should probably just do so on Twitter instead, where I will only have the choice to read them in my head as “fart fart fart.”
Scrobbling to Last.fm from D-Bus

Yesterday afternoon I noticed that my music player, Banshee, had not been scrobbling to my Last.fm for a few weeks. Last.fm seem to be in the middle of reorganising their site but that shouldn’t affect their API (at least not for scrobbling). However, it seems that it has upset Banshee so no more scrobbling for me.

Banshee has a number of deficiencies but there’s a few things about it that I really do like, so I wasn’t relishing changing to a different player. It’s also written in Mono which doesn’t look like something I could learn very quickly.

I then noticed that Banshee has some sort of D-Bus interface where it writes things about what it it doing, such as the metadata for the currently-playing track… and so a hackish idea was formed.

Here’s a thing that listens to what Banshee is saying over D-Bus and submits the relevant “now playing” and scrobble to Last.fm. The first time you run it it asks you to authorise it and then it remembers that forever.

https://github.com/grifferz/dbus-scrobbler

I’ve never looked at D-Bus before so I’m probably doing it all very wrong, but it appears to work. Look, I have scrobbles again! And after all it would not be Linux on the desktop if it didn’t require some sort of lash-up that would make Heath Robinson cry his way to the nearest Apple store to beg a Genius to install iTunes, right?

Anyway it turns out that there is a standard for this remote control and introspection of media players, called MPRIS, and quite a few of them support it. Even Spotify, apparently. So it probably wouldn’t be hard to adapt this script to scrobble from loads of different things even if they don’t have scrobbling extensions themselves.

SSDs and Linux Native Command Queuing

Native Command Queueing ^

Native Command Queuing (NCQ) is an extension of the Serial ATA protocol that allows multiple requests to be sent to a drive, allowing the drive to order them in a way it considers optimal.

This is very handy for rotational media like conventional hard drives, because they have to move the head all over to do random IO, so in theory if they are allowed to optimise ordering then they may be able to do a better job of it. If the drive supports NCQ then it will advertise this fact to the operating system and Linux by default will enable it.

Queue depth ^

The maximum depth of the queue in SATA is 31 for practical purposes, and so if the drive supports NCQ then Linux will usually set the depth to 31. You can change the depth by writing a number between 1 and 31 to /sys/block/<device>/device/queue_depth. Writing 1 to the file effectively disables NCQ for that device.

NCQ and SSDs ^

So what about SSDs? They aren’t rotational media; any access is in theory the same as any other access, so no need to optimally order the commands, right?

The sad fact is, many SSDs even today have incompatibilities with SATA drivers and chipsets such that NCQ does not reliably work. There’s advice all over the place that NCQ can be disabled with no ill effect, because supposedly SSDs do not benefit from it. Some posts even go as far as to suggest that NCQ might be detrimental to performance with SSDs.

Well, let’s see what fio has to say about that.

The setup ^

  • Two Intel DC s3610 1.6TB SSDs in an MD RAID-10 on Debian 8.1.
  • noop IO scheduler.
  • fio operating on a 4GiB test file that is on an ext4 filesystem backed by LVM.
  • fio set to do a 70/30% mix of read vs write operations with 128 simultaneous IO operations in flight.

The goal of this is to simulate a busy highly parallel server load, such as you might see with a database.

The fio command line looks like this:

fio --randrepeat=1 \
    --ioengine=libaio \
    --direct=1 \
    --gtod_reduce=1 \
    --name=ncq \
    --filename=test \
    --bs=4k \
    --iodepth=128 \
    --size=4G \
    --readwrite=randrw \
    --rwmixread=70

Expected output will be something like this:

ncq: (g=0): rw=randrw, bs=4K-4K/4K-4K/4K-4K, ioengine=libaio, iodepth=128
fio-2.1.11
Starting 1 process
Jobs: 1 (f=1): [m(1)] [100.0% done] [50805KB/21546KB/0KB /s] [12.8K/5386/0 iops] [eta 00m:00s]
ncq1: (groupid=0, jobs=1): err= 0: pid=11272: Sun Aug  9 06:29:33 2015
  read : io=2867.6MB, bw=44949KB/s, iops=11237, runt= 65327msec
  write: io=1228.5MB, bw=19256KB/s, iops=4813, runt= 65327msec
  cpu          : usr=4.39%, sys=25.20%, ctx=732814, majf=0, minf=6
  IO depths    : 1=0.1%, 2=0.1%, 4=0.1%, 8=0.1%, 16=0.1%, 32=0.1%, >=64=100.0%
     submit    : 0=0.0%, 4=100.0%, 8=0.0%, 16=0.0%, 32=0.0%, 64=0.0%, >=64=0.0%
     complete  : 0=0.0%, 4=100.0%, 8=0.0%, 16=0.0%, 32=0.0%, 64=0.0%, >=64=0.1%
     issued    : total=r=734099/w=314477/d=0, short=r=0/w=0/d=0
     latency   : target=0, window=0, percentile=100.00%, depth=128
 
Run status group 0 (all jobs):
   READ: io=2867.6MB, aggrb=44949KB/s, minb=44949KB/s, maxb=44949KB/s, mint=65327msec, maxt=65327msec
  WRITE: io=1228.5MB, aggrb=19255KB/s, minb=19255KB/s, maxb=19255KB/s, mint=65327msec, maxt=65327msec
 
Disk stats (read/write):
    dm-0: ios=732755/313937, merge=0/0, ticks=4865644/3457248, in_queue=8323636, util=99.97%, aggrios=734101/314673, aggrmerge=0/0, aggrticks=0/0, aggrin_queue=0, aggrutil=0.00%
    md4: ios=734101/314673, merge=0/0, ticks=0/0, in_queue=0, util=0.00%, aggrios=364562/313849, aggrmerge=2519/1670, aggrticks=2422422/2049132, aggrin_queue=4471730, aggrutil=94.37%
  sda: ios=364664/313901, merge=2526/1618, ticks=2627716/2223944, in_queue=4852092, util=94.37%
  sdb: ios=364461/313797, merge=2513/1722, ticks=2217128/1874320, in_queue=4091368, util=91.68%

The figures we’re interested in are the iops= ones, in this case 11237 and 4813 for read and write respectively.

Results ^

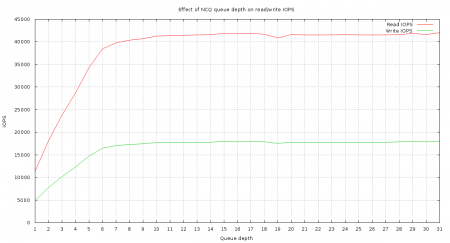
Here’s how different NCQ queue depths affected things. Click the graph image for the full size version.

Graph of the effect of NCQ queue depth on read/write IOPS

Conclusion ^

On this setup anything below a queue depth of about 8 is disastrous to performance. The aberration at a queue depth of 19 is interesting. This is actually repeatable. I have no explanation for it.

Don’t believe anyone who tells you that NCQ is unimportant for SSDs unless you’ve benchmarked that and proven it to yourself. Disabling NCQ on an Intel DC s3610 appears to reduce its performance to around 25% of what it would be with even a queue depth of 8. Modern SSDs, especially enterprise ones, have a parallel architecture that allows them to get multiple things done at once. They expect NCQ to be enabled.

It’s easy to guess why 8 might be the magic number for the DC s3610:

The top of the PCB has eight NAND emplacements and Intel’s proprietary eight-channel PC29AS21CB0 controller.

The newer NVMe devices are even more aggressive with this; while the SATA spec stops at one queue with a depth of 32, NVMe specifies up to 65k queues with a depth of up to 65k each! Modern SSDs are designed with this in mind.

systemd on Debian, reading the persistent system logs as a user

All the documentation and guides I found say that to enable a persistent journal on Debian you just need to create /var/log/journal. It is true that once you create that directory you will get a persistent journal.

All the documentation and guides I found say that as long as you are in group adm (or sometimes they say group systemd-journal) it is possible to see all system logs by just typing journalctl, without having to run it as root. Having simply done mkdir /var/log/journal I can tell you that is not the case. All you will see is logs relating to your user.

The missing piece of info is contained in /usr/share/doc/systemd/README.Debian:


Enabling persistent logging in journald
=======================================

To enable persistent logging, create /var/log/journal and set up proper permissions:

install -d -g systemd-journal /var/log/journal
setfacl -R -nm g:adm:rx,d:g:adm:rx /var/log/journal

-- Tollef Fog Heen <tfheen@debian.org>, Wed, 12 Oct 2011 08:43:50 +0200

Without the above you will not have permission to read the /var/log/journal//system.journal file, and the ACL is necessary for journal files created in the future to also be readable.

F11 and F12 over serial

I always seem to forget this one.

To pass F11 or F12 over a serial connection (either real serial or Serial-over-LAN IPMI), it’s Escape followed by ! (Shift+1) or @ (Shift+') respectively.

Note that on a US keyboard ! and @ would be next to each other above the 1 and 2 keys so that would make some vague kind of sense as alternatives to F11 and F12. But it’s literally the @ that matters and since I’m using a UK keyboard then it is Shift+'.

(╯°□°)╯︵ ┻━┻)