Building BitFolk’s Rescue VM

Overview ^

BitFolk‘s Rescue VM is a live system based on the Debian Live project. You boot it, it finds its root filesystem over read-only NFS, and then it mounts a unionfs RAM disk over that so that you can make changes (e.g. install packages) that don’t persist. People generally use it to repair broken operating systems, reset root passwords etc.

Every few years I have to rebuild it, because it’s important that it’s new enough to be able to effectively poke around in guest filesystems. Each time I have to try to remember how I did it. It’s not that difficult but it’s well past time that I document how it’s done.

Basic concept of Debian Live ^

The idea is that everything under the config/ directory of your build area is either

  • a set of configuration options for the process itself,
  • some files to put in the image,
  • some scripts to run while building the image, or
  • some scripts to run while booting the image.

Install packages ^

Pick a host running at least the latest Debian stable. It might be possible to build a live image for a newer version of Debian, but the live-build system and its dependencies like debootstrap might end up being too old.

$ sudo apt install live-build live-boot live-config

Prepare the work directory ^

$ sudo mkdir -vp /srv/lb/auto
$ cd /srv/lb

Main configuration ^

All of these config options are described in the lb_config man page.

$ sudo tee auto/config >/dev/null <<'_EOF_'
#!/bin/sh
 
set -e
 
cacher_prefix="apt-cacher.lon.bitfolk.com/debian"
mirror_host="deb.debian.org"
main_mirror="http://${cacher_prefix}/${mirror_host}/debian/"
sec_mirror="http://${cacher_prefix}/${mirror_host}/debian-security/"
 
lb config noauto \
    --architectures                     amd64 \
    --distribution                      bullseye \
    --binary-images                     netboot \
    --archive-areas                     main \
    --apt-source-archives               false \
    --apt-indices                       false \
    --backports                         true \
    --mirror-bootstrap                  "$main_mirror" \
    --mirror-chroot-security            "$sec_mirror" \
    --mirror-binary                     "$main_mirror" \
    --mirror-binary-security            "$sec_mirror" \
    --memtest                           none \
    --net-tarball                       true \
    "${@}"
_EOF_

The variables at the top just save me having to repeat myself for all the mirrors. They make both the build process and the resulting image use BitFolk’s apt-cacher to proxy the deb.debian.org mirror.

I’m not going to describe every config option as you can just look them up in the man page. The most important one is --binary-images netboot to make sure it builds an image that can be booted by network.

Extra packages ^

There’s some extra packages I want available in the rescue image. Here’s how to get them installed.

$ sudo tee config/package-lists/bitfolk_rescue.list.chroot > /dev/null <<_EOF_
pwgen
less
binutils
build-essential
bzip2
gnupg
openssh-client
openssh-server
perl
perl-modules
telnet
screen
tmux
rpm
_EOF_

Installing a backports kernel ^

I want the rescue system to be Debian 11 (bullseye), but with a bullseye-backports kernel.

We already used --backports true to make sure that we have access to the backports package mirrors but we need to run a script hook to actually install the backports kernel in the image while it’s being built.

$ sudo tee config/hooks/live/9000-install-backports-kernel.hook.chroot >/dev/null <<'_EOF_'
#!/bin/sh
 
set -e
 
apt -y install -t bullseye-backports linux-image-amd64
apt -y purge -t bullseye linux-image-amd64
apt -y purge -t bullseye 'linux-image-5.10.*'
_EOF_

Set a static /etc/resolv.conf ^

This image will only be booted on one network where I know what the nameservers are, so may as well statically override them. If you were building an image to use on different networks you’d probably instead want to use one of the public resolvers or accept what DHCP gives you.

$ sudo tee config/includes.chroot/etc/resolv.conf >/dev/null <<_EOF_
nameserver 85.119.80.232
nameserver 85.119.80.233
_EOF_

Set an explanatory footer text in /etc/issue.footer ^

The people using this rescue image don’t necessarily know what it is and how to use it. I take the opportunity to put some basic info in the file /etc/issue.footer in the image, which will later end up in the real /etc/issue

$ sudo tee config/includes.chroot/etc/issue.footer >/dev/null <<_EOF_
BitFolk Rescue Environment - https://tools.bitfolk.com/wiki/Rescue
 
Blah blah about what this is and how to use it
_EOF_

Set a random password at boot ^

By default a Debian Live image has a user name of “user” and a password of “live“. This isn’t suitable for a networked service that will have sshd active from the start, so we will install a hook script that sets a random password. This will be run near the end of the image’s boot process.

$ sudo tee config/includes.chroot/lib/live/config/2000-passwd >/dev/null <<'_EOF_'
#!/bin/sh
 
set -e
 
echo -n " random-password "
 
NEWPASS=$(/usr/bin/pwgen -c -N 1)
printf "user:%s\n" "$NEWPASS" | chpasswd
 
RED='\033[0;31m'
NORMAL='\033[0m'
 
{
    printf "****************************************\n";
    printf "Resetting user password to random value:\n";
    printf "\t${RED}New user password:${NORMAL} %s\n" "$NEWPASS";
    printf "****************************************\n";
    cat /etc/issue.footer
} >> /etc/issue
_EOF_

This script puts the random password and the footer text into the /etc/issue file which is displayed above the console login prompt, so the user can see what the password is.

Fix initial networking setup ^

This one’s a bit unfortunate and is a huge hack, but I’m not sure enough of the details to report a bug yet.

The live image when booted is supposed to be able to set up its network by a number of different ways. DHCP would be the most sensible for an image you take with you to different networks.

The BitFolk Rescue VM is only ever booted in one network though, and we don’t use DHCP. I want to set static networking through the ip=…s syntax of the kernel command line.

Unfortunately it doesn’t seem to work properly with live-boot as shipped. I had to hack the /lib/live/boot/9990-networking.sh file to make it parse the values out of the kernel command line.

Here’s a diff. Copy /lib/live/boot/9990-networking.sh to config/includes.chroot/usr/lib/live/boot/9990-networking.sh and then apply that patch to it.

It’s simple enough that you could probably edit it by hand. All it does is comment out one section and replace it with some bits that parse IP setup out of the $STATICIP variable.

Fix the shutdown process ^

Again this is a horrible hack and I’m sure there is a better way to handle it, but I couldn’t work out anything better and this works.

This image will be running with its root filesystem on NFS. When a shutdown or halt command is issued however, systemd seems extremely keen to shut off the network as soon as possible. That leaves the shutdown process unable to continue because it can’t read or write its root filesystem any more. The shutdown process stalls forever.

As this is a read-only system with no persistent state I don’t care how brutal the shutdown process is. I care more that it does actually shut down. So, I have added a systemd service that issues systemctl –force –force poweroff any time that it’s about to shut down by any means.

$ sudo tee config/includes.chroot/etc/systemd/system/always-brutally-poweroff.service >/dev/null <<_EOF_
[Unit]
Description=Every kind of shutdown will be brutal poweroff
DefaultDependencies=no
After=final.target
 
[Service]
Type=oneshot
ExecStart=/usr/bin/systemctl --force --force poweroff
 
[Install]
WantedBy=final.target
_EOF_

And to force it to be enabled at boot time:

$ sudo tee config/includes.chroot/etc/rc.local >/dev/null <<_EOF_
#!/bin/sh
 
set -e
 
systemctl enable always-brutally-poweroff
_EOF_

Build it ^

At last we’re ready to build the image.

$ sudo lb clean && sudo lb config && sudo lb build

The “lb clean” is there because you probably won’t get this right first time and will want to iterate on it.

Once complete you’ll find the files to put on your NFS server in binary/ and the kernel and initramfs to boot on your client machine in tftpboot/live/

$ sudo rsync -av binary/ my.nfs.server:/srv/rescue/

Booting it ^

The details of exactly how I boot the client side (which in BitFolk’s case is a customer VM) are out of scope here, but this is sort of what the kernel command line looks like on the client (normally all on one line):

root=/dev/nfs
ip=192.168.0.225:192.168.0.243:192.168.0.1:255.255.248.0:rescue
hostname=rescue
nfsroot=192.168.0.243:/srv/rescue
nfsopts=tcp
boot=live
persistent

Explained:

root=/dev/nfs
Get root filesystem from NFS.
ip=192.168.0.225:192.168.0.243:192.168.0.1:255.255.248.0:rescue
Static IP configuration on kernel command line. Separated by colons:

  • Client’s IP
  • NFS server’s IP
  • Default gateway
  • Netmask
  • Host name
hostname=rescue
Host name.
nfsroot=192.168.0.243:/srv/rescue
Where to mount root from on NFS server.
nfsopts=tcp
NFS client options to use.
boot=live
Tell live-boot that this is a live image.

persistent
Look for persistent data.

In action ^

Here’s an Asciinema of this image in action.

Improvements ^

There’s a few things in here which are hacks. What I have works but no doubt I am doing some things wrong. If you know better please do let me know in comments or whatever. Ideally I’d like to stick with Debian Live though because it’s got a lot of problems solved already.
btrfs compression wins

Some quite good btrfs compression results from my backup hosts (which back up customer data).

Type       Perc     Disk Usage   Uncompressed Referenced
TOTAL       64%       68G         105G         1.2T
none       100%       24G          24G         434G
zlib        54%       43G          80G         797G
Type       Perc     Disk Usage   Uncompressed Referenced
TOTAL       74%       91G         123G         992G
none       100%       59G          59G         599G
lzo         50%       32G          63G         393G
Type       Perc     Disk Usage   Uncompressed Referenced
TOTAL       73%       16G          22G         459G
none       100%       12G          12G         269G
lzo         40%      4.1G          10G         190G
Type       Perc     Disk Usage   Uncompressed Referenced
TOTAL       71%      105G         148G         1.9T
none       100%       70G          70G         910G
zlib        40%       24G          60G         1.0T
lzo         58%       10G          17G          17G

So that’s 398G that takes up 280G, a 29.6% reduction.

The “none” type is incompressible files such as media that’s already compressed. I started off with lzo compression but I’m switching to zlib now as it compresses more and this data is rarely accessed so I’m not too concerned about performance. I need newer kernels on these before I can try zstd.

I’ve had serious concerns about btrfs before based on issues I’ve had using it at home, but these were mostly around multiple device usage. Here they get a single block device that has redundancy underneath so the only remotely interesting thing that btrfs is doing here is the compression.

Might try some offline deduplication next.

Intel may need me to sign an NDA before I can know the capacity of one of their SSDs

Apologies for the slightly clickbaity title! I could not resist. While an Intel employee did tell me this, they are obviously wrong.

Still, I found out some interesting things that I was previously unaware of.

I was thinking of purchasing some “3.84TB” Intel D3-S4610 SSDs for work. I already have some “3.84TB” Samsung SM883s so it would be good if the actual byte capacity of the Intel SSDs were at least as much as the Samsung ones, so that they could be used to replace a failed Samsung SSD.

To those with little tech experience you would think that two things which are described as X TB in capacity would be:

  1. Actually X TB in size, where 1TB = 1,000 x 1,000 x 1,000 x 1,000 bytes, using powers of ten SI prefixes. Or;
  2. Actually X TiB in size, where 1TiB = 1,024 x 1,024 x 1,024 x 1,024 bytes, using binary prefixes.

…and there was a period of time where this was mostly correct, in that manufacturers would prefer something like the former case, as it results in larger headline numbers.

The thing is, years ago, manufacturers used to pick a capacity that was at least what was advertised (in powers of 10 figures) but it wasn’t standardised.

If you used those drives in a RAID array then it was possible that a replacement—even from the same manufacturer—could be very slightly smaller. That would give you a bad day as you generally need devices that are all the same size. Larger is okay (you’ll waste some), but smaller won’t work.

So for those of us who like me are old, this is something we’re accustomed to checking, and I still thought it was the case. I wanted to find out the exact byte capacity of this Intel SSD. So I tried to ask Intel, in a live support chat.

Edgar (22/02/2021, 13:50:59): Hello. My name is Edgar and I’ll be helping you today.

Me (22/02/2021, 13:51:36): Hi Edgar, I have a simple request. Please could you tell me the exact byte capacity of a SSD-SSDSC2KG038T801 that is a 3.84TB Intel D3-S4610 SSD

Me (22/02/2021, 13:51:47): I need this information for matching capacities in a RAID set

Edgar (22/02/2021, 13:52:07): Hello, thank you for contacting Intel Technical Support. It is going to be my pleasure to help you.

Edgar (22/02/2021, 13:53:05): Allow me a moment to create a ticket for you.

Edgar (22/02/2021, 13:57:26): We have a calculation to get the decimal drive sectors of an SSD because the information you are asking for most probably is going to need a Non-Disclousre Agreement (NDA)

Yeah, an Intel employee told me that I might need to sign an NDA to know the usable capacity of an SSD. This is obviously nonsense. I don’t know whether they misunderstood and thought I was asking about the raw capacity of the flash chips or what.

Me (22/02/2021, 13:58:15): That seems a bit strange. If I buy this drive I can just plug it in and see the capacity in bytes. But if it’s too small then that is a wasted purchase which would be RMA’d

Edgar (22/02/2021, 14:02:48): It is 7,500,000,000

Edgar (22/02/2021, 14:03:17): Because you take the size of the SSD that is 3.84 in TB, in Byte is 3840000000000

Edgar (22/02/2021, 14:03:47): So we divide 3840000000000 / 512 which is the sector size for a total of 7,500,000,000 Bytes

Me (22/02/2021, 14:05:50): you must mean 7,500,000,000 sectors of 512byte, right?

Edgar (22/02/2021, 14:07:45): That is the total sector size, 512 byte

Edgar (22/02/2021, 14:08:12): So the total sector size of the SSD is 7,500,000,000

Me (22/02/2021, 14:08:26): 7,500,000,000 sectors is only 3,750GB so this seems rather unlikely

The reason why this seemed unlikely to me is that I have never seen an Intel or Samsung SSD that was advertised as X.Y TB capacity that did not have a usable capacity of at least X,Y00,000,000,000 bytes. So I would expect a “3.84TB” device to have at least 3,840,000,000,000 bytes of usable capacity.

Edgar was unable to help me further so the support chat was ended. I decided to ask around online to see if anyone actually had one of these devices running and could tell me the capacity.

Peter Corlett responded to me with:

As per IDEMA LBA1-03, the capacity is 1,000,194,048 bytes per marketing gigabyte plus 10,838,016 bytes. A marketing terabyte is 1000 marketing gigabytes.

3840 * 1000194048 + 10838016 = 3840755982336. Presumably your Samsung disk has that capacity, as should that Intel one you’re eyeing up.

My Samsung ones do! And every other SSD I’ve checked obeys this formula, which explains why things have seemed a lot more standard recently. I think this might have been standardised some time around 2014 / 2015. I can’t tell right now because the IDEMA web site is down!

So the interesting and previously unknown to me thing is that storage device sizes are indeed standardised now, albeit not to any sane definition of the units that they use.

What a relief.

Also that Intel live support sadly can’t be relied upon to know basic facts about Intel products. 🙁

Booting the CentOS/RHEL installer under Xen PVH mode

CentOS/RHEL and Xen ^

As of the release of CentOS 8 / RHEL8, Red Hat disabled kernel support for running as a Xen PV or PVH guest, even though such support is enabled by default in the upstream Linux kernel.

As a result—unlike with all previous versions of CentOS/RHEL—you cannot boot the installer in Xen PV or PVH mode. You can still boot it in Xen HVM mode, or under KVM, but that is not very helpful if you don’t want to run HVM or KVM.

At BitFolk ever since the release of CentOS 8 we’ve had to tell customers to use the Rescue VM (a kind of live system) to unpack CentOS into a chroot.

Fortunately there is now a better way.

Credit ^

This method was worked out by Jon Fautley. Jon emailed me instructions and I was able to replicate them. Several people have since asked me how it was done and Jon was happy for me to write it up, but this was all worked out by Jon, not me.

Overview ^

The basic idea here is to:

  1. take the installer initrd.img
  2. unpack it
  3. shove the modules from a Debian kernel into it
  4. repack it
  5. use a Debian kernel and this new frankeninitrd as the installer kernel and initrd
  6. switch the installed OS to kernel-ml package from ELRepo so it has a working kernel when it boots

Detailed process ^

I’ll go into enough detail that you should be able to exactly replicate what I did to end up with something that works. This is quite a lot but it only needs to be done each time the real installer initrd.img changes, which isn’t that often. The resulting kernel and initrd.img can be used to install many guests.

Throughout the rest of this article I’ll refer to CentOS, but Jon initially made this work for RHEL 8. I’ve replicated it for CentOS 8 and will soon do so for RHEL 8 as well.

Extract the CentOS initrd.img ^

You will find this in the install ISO or on mirrors as images/pxeboot/initrd.img.

$ mkdir /var/tmp/frankeninitrd/initrd
$ cd /var/tmp/frankeninitrd/initrd
$ xz -dc /path/to/initrd.img > ../initrd.cpio
$ # root needed because this will do some mknod/mkdev.
$ sudo cpio -idv < ../initrd.cpio

Copy modules from a working Xen guest ^

I’m going to use the Xen guest that I’m doing this on, which at the time of writing is a Debian buster system running kernel 4.19.0-13. Even a system that is not currently running as a Xen guest will probably work, as they usually have modules available for everything.

At the time of writing the kernel version in the installer is 4.18.0-240.

If you’ve got different, adjust filenames accordingly.

$ sudo cp -r /lib/modules/4.19.0-13-amd64 lib/modules/
$ # You're not going to use the original modules
$ # so may as well delete them to save space.
$ sudo rm -vr lib/modules/4.18*

Add dracut hook to copy fs modules ^

$ cat > usr/lib/dracut/hooks/pre-pivot/99-move-modules.sh <<__EOF__
#!/bin/sh
 
mkdir -p /sysroot/lib/modules/$(uname -r)/kernel/fs
rm -r /sysroot/lib/modules/4.18*
cp -r /lib/modules/$(uname -r)/kernel/fs/* /sysroot/lib/modules/$(uname -r)/kernel/fs
cp /lib/modules/$(uname -r)/modules.builtin /sysroot/lib/modules/$(uname -r)/
depmod -a -b /sysroot
 
exit 0
__EOF__
$ chmod +x usr/lib/dracut/hooks/pre-pivot/99-move-modules.sh

Repack initrd ^

This will take a really long time because xz -9 is sloooooow.

$ sudo find . 2>/dev/null | \
  sudo cpio -o -H newc -R root:root | \
  xz -9 --format=lzma > ../centos8-initrd.img

Use the Debian kernel ^

Put the matching kernel next to your initrd.

$ cp /boot/vmlinuz-4.19.0-13-amd64 ../centos8-vmlinuz
$ ls -lah ../centos*
-rw-r--r-- 1 andy andy  81M Feb  1 04:43 ../centos8-initrd.img
-rw-r--r-- 1 andy andy 5.1M Feb  1 04:04 ../centos8-vmlinuz

Boot this kernel/initrd as a Xen guest ^

Copy the kernel and initrd to somewhere on your dom0 and create a guest config file that looks a bit like this:

name       = "centostest"
# CentOS 8 installer requires at least 2.5G RAM.
# OS will run with a lot less though.
memory     = 2560
vif        = [ "mac=00:16:5e:00:02:39, ip=192.168.82.225, vifname=v-centostest" ]
type       = "pvh"
kernel     = "/var/tmp/frankeninitrd/centos8-vmlinuz"
ramdisk    = "/var/tmp/frankeninitrd/centos8-initrd.img"
extra      = "console=hvc0 ip=192.168.82.225::192.168.82.1:255.255.255.0:centostest:eth0:none nameserver=8.8.8.8 inst.stage2=http://www.mirrorservice.org/sites/mirror.centos.org/8/BaseOS/x86_64/os/ inst.ks=http://example.com/yourkickstart.ks"
disk       = [ "phy:/dev/vg/centostest_xvda,xvda,w",
               "phy:/dev/vg/centostest_xvdb,xvdb,w" ]

Assumptions in the above:

  • vif and disk settings will be however you usually do that.
  • “extra” is for the kernel command line and here gives the installer static networking with the ip=IP address::default gateway:netmask:hostname:interface name:auto configuration type option.
  • inst.stage2 here goes to a public mirror but could be an unpacked installer iso file instead.
  • inst.ks points to a minimal kickstart file you’ll have to create (see below).

Minimal kickstart file ^

This kickstart file will:

  • Automatically wipe disks and partition. I use xvda for the OS and xvdb for swap. Adjust accordingly.
  • Install only minimal package set.
  • Switch the installed system over to kernel-ml from EPEL.
  • Force an SELinux autorelabel at first boot.

The only thing it doesn’t do is create any users. The installer will wait for you to do that. If you want an entirely automated install just add the user creation stuff to your kickstart file.

url --url="http://www.mirrorservice.org/sites/mirror.centos.org/8/BaseOS/x86_64/os"
text
 
# Clear all the disks.
clearpart --all --initlabel
zerombr
 
# A root filesystem that takes up all of xvda.
part /    --ondisk=xvda --fstype=xfs --size=1 --grow
 
# A swap partition that takes up all of xvdb.
part swap --ondisk=xvdb --size=1 --grow
 
bootloader --location=mbr --driveorder=xvda --append="console=hvc0"
firstboot --disabled
timezone --utc Etc/UTC --ntpservers="0.pool.ntp.org,1.pool.ntp.org,2.pool.ntp.org,3.pool.ntp.org"
keyboard --vckeymap=gb --xlayouts='gb'
lang en_GB.UTF-8
skipx
firewall --enabled --ssh
halt
 
%packages
@^Minimal install
%end 
 
%post --interpreter=/usr/bin/bash --log=/root/ks-post.log --erroronfail
 
# Switch to kernel-ml from EPEL. Necessary for Xen PV/PVH boot support.
rpm --import https://www.elrepo.org/RPM-GPG-KEY-elrepo.org
yum -y install https://www.elrepo.org/elrepo-release-8.el8.elrepo.noarch.rpm
yum --enablerepo=elrepo-kernel -y install kernel-ml
yum -y remove kernel-tools kernel-core kernel-modules
 
sed -i -e 's/DEFAULTKERNEL=.*/DEFAULTKERNEL=kernel-ml/' /etc/sysconfig/kernel
grub2-mkconfig -o /boot/grub2/grub.cfg
 
# Force SELinux autorelabel on first boot.
touch /.autorelabel
%end

Launch the guest ^

$ sudo xl create -c /etc/xen/centostest.conf

Obviously this guest config can only boot the installer. Once it’s actually installed and halts you’ll want to make a guest config suitable for normal booting. The kernel-ml does work in PVH mode so at BitFolk we use pvhgrub to boot these.

A better way? ^

The actual modifications needed to the stock installer kernel are quite small: just enable CONFIG_XEN_PVH kernel option and build. I don’t know the process to build a CentOS or RHEL installer kernel though, so that wasn’t an option for me.

If you do know how to do it please do send me any information you have.

Fun With SpamAssassin Meta Rules

I’ve got a ticketing system. Let’s say you open a ticket by emailing support@example.com. You then get an automated response confirming that you’ve opened a ticket, and on my side people get bothered by a notification about this support ticket that needs attention.

A problem here is that absolutely anyone or anything emailing that will open a ticket. And it’s pretty easy to find that email address.

As a result lots of scum of the earthenterprising individuals seem to be passing that email address around to other enterprising individuals who decide to add it to their email marketing mailshots.

A reasonable response to this would perhaps be to move away from email to a web form, and put it behind a login so that only existing, authenticated customers could submit new tickets. Thing is, I still have to have a way for previously-unknown people to create tickets by email, and I kind of like email. So I persevere.

One thing I can do though is block all kinds of newsletters. There is no scenario where people who send newsletters should be trying to open support tickets. I’m prepared to disallow any email from MailJet or SendGrid being sent to my ticketing system, for example.

But how to do it?

Well, I am already able to identify emails from MailJet and SendGrid because I use the ASN plugin. This inserts a header in the email to say which Autonomous System it came from.

MailJet’s ASN is 200069 and SendGrid’s is 11377. I know that because I’ve seen mail from them before, and the ASN plugin put a header in with those numbers.

You can add some custom rules to match mails from these ASNs:

header   LOCAL_ASN_MAILJET X-ASN =~ /\b200069\b/
score    LOCAL_ASN_MAILJET 0.001
describe LOCAL_ASN_MAILJET Sent by MailJet (ASN200069)

What this will do is check the header that the ASN plugin added and if it matches it will add this label LOCAL_ASN_MAILJET with a score of 0.001 to the list of SpamAssassin scores.

Scores that are very close to zero (but not actually zero!) are typically used just to annotate an email. You can’t use zero exactly because that disables the rule entirely.

Now, if you really didn’t want any email from MailJet at all you could crank that score up and it would all be rejected. But my users do actually get quite a lot of wanted email from the likes of MailJet and SendGrid. These senders are sadly too big to block. They know this, and this probably contributes to their noted preference for taking spammers’ money, but that is a rant for another day.

Back to the original goal: I only want to reject mail from these companies if it is destined for my ticketing system. So how to identify mail that’s for the support queue? Well that’s pretty simple:

header   LOCAL_TO_SUPPORT ToCc:addr =~ /^support\@example\.com$/i
score    LOCAL_TO_SUPPORT 0.001
describe LOCAL_TO_SUPPORT Recipient is support queue

This checks just the address part(s) of the To and Cc headers to see if any match support@example.com. The periods (‘.’) and the at symbol (‘@’) need escaping because this is a Perl regular expression. If there’s a match then the LOCAL_TO_SUPPORT tag will be added.

Now all that remains is to make a new rule that only fires if both of these conditions are true, and assigns a real score to that:

meta     LOCAL_MAILSHOT_TO_SUPPORT (LOCAL_TO_SUPPORT && (LOCAL_ASN_MAILJET || LOCAL_ASN_SENDGRID))
score    LOCAL_MAILSHOT_TO_SUPPORT 10.0
describe LOCAL_MAILSHOT_TO_SUPPORT Mailshot sent to support queue

There. Now the support queue will never get emails from these companies, but the rest of my users still can.

Of course you don’t have to match those mails by ASN. There are many other indicators of senders that just shouldn’t be opening support tickets, and if you can find any other sort of rule that matches them reliably then you can chain that with other rules that identify the support queue recipient.

Another way to do it would be to run the support queue as its own SpamAssassin user with its own per-user rules. I have a fairly simple SpamAssassin setup though with only a global set of rules so I didn’t want to do that just for this.

Getting LWP to use a newer OpenSSL

Something broke ^

Today I had a look at a customer’s problem. They had a Perl application that connects to a third party API, and as of sometime today it had started failing to connect, although the remote site API still seemed to be responding in general.

The particular Perl module for this service (doesn’t really matter what it was) wasn’t being very verbose about what was going on. It simply said:

Failed to POST to https://api.example.com/api/v1/message.json

I started by writing a small test program using LWP::UserAgent to do a POST to the same URI, and this time I saw:

500 Can’t connect to api.example.com:443 (SSL connect attempt failed with unknown errorerror:14094410:SSL routines:ssl3_read_bytes:sslv3 alert handshake failure)

So, it’s failing to do a TLS handshake. But this was working yesterday. Has anything changed? Yes, the remote service was under a denial of service attack today and they’ve just moved it behind a CDN. TLS connections are now being terminated by the CDN, not the service’s own backend.

And oh dear, the customer’s host is Debian squeeze (!) which comes with OpenSSL 0.9.8. This is badly out of date. Neither the OS nor the OpenSSL version is supported for security any more. It needs to be upgraded.

Unfortunately I am told that upgrading the OS is not an option at this time. So can we update Perl?

Well yes, we could build our own Perl reasonably easily. The underlying issue is OpenSSL, though. So it would be an upgrade of:

  • OpenSSL
  • Perl
  • Net::SSLeay
  • IO::Socket::SSL
  • LWP, as the app’s HTTP client is using that

It’s not actually that bad though. In fact you do not need to build a whole new Perl, you only need to build OpenSSL, Net::SSLeay and IO::Socket::SSL and then tell Perl (and the system’s LWP) to use the new versions of those.

Of course, everything else on the system still uses a dangerously old OpenSSL, so this is not really a long term way to avoid upgrading the operating system.

Building OpenSSL ^

After downloading and unpacking the latest stable release of OpenSSL, the sequence of commands for building, testing and installing it look like this:

$ ./config --prefix=/opt/openssl \
           --openssldir=/opt/openssl \
           -Wl,-rpath,'$(LIBRPATH)'
$ make
$ make test
$ sudo make install

The rpath thing is so that the binaries will find the libraries in the alternate path. If you were instead going to add the library path to the system’s ld.so.conf then you wouldn’t have to have that bit, but I wanted this to be self-contained.

When I did this the first time, all the tests failed and at the install step it said:

ar: /opt/openssl/lib/libcrypto.so: File format not recognized

This turned out to be because the system’s Text::Template Perl module was too old. Version 1.46 or above is required, and squeeze has 1.45.

Installing a newer Text::Template ^

So, before I could even build OpenSSL I needed to install a newer Text::Template. Cpanminus to the rescue.

$ sudo mkdir /opt/perl
$ cd /opt/perl
$ sudo cpanm --local-lib=./cpanm Text::Template

That resulted in me having a newer Text::Template in /opt/perl/cpanm/lib/perl5/. So to make sure every future invocation of Perl used that:

$ export PERL5LIB=/opt/perl/cpanm/lib/perl5/
$ perl -e 'use Text::Template; print $Text::Template::VERSION,"\n";'
1.58

Repeating the OpenSSL build steps from above then resulted in an OpenSSL install in /opt/openssl that passed all its own tests.

Installing newer Net::SSLeay and IO::Socket::SSL ^

Cpanminus once again comes to the rescue, with a twist:

$ cd /opt/perl
$ OPENSSL_PREFIX=/opt/openssl cpanm --local-lib=./cpanm Net::SSLeay IO::Socket::SSL

The OPENSSL_PREFIX is part of Net::SSLeay’s build instructions, and then IO::Socket::SSL uses that as well.

Using the result ^

Ultimately the customer’s Perl application needed to be told to use these new modules. This could be done with either the PERL5LIB environment variable or else by putting:

use lib '/opt/perl/cpanm/lib/perl5';

At the top of the main script.

The application was then once more able to talk TLS to the CDN and it all worked again.

Other recommendations ^

The customer could maybe consider putting the application into a container on a new install of the operating system.

That way, the kernel and whole of the OS would be modern and supported, but just this application would be running with a terribly outdated userland. Over time, more of the bits inside the container could be moved out to the modern host (or another container), avoiding having to do everything at once.

Fail2Ban, iptables and config management

Fail2Ban ^

Fail2Ban is a piece of software which can watch log files and take an arbitrary action when a certain number of matches are found.

It is most commonly used to read logs from an SSH daemon in order to insert a firewall rule against hosts that repeatedly fail to log in. Hence Fail → Ban.

Wherever possible, it is best to require public key and/or multi-factor authentication for SSH login. Then, it does not matter how many times an attacker tries to guess passwords as they should never succeed. It’s just log noise.

Sadly I have some hosts where some users require password authentication to be available from the public Internet. Also, even on the hosts that can have password authentication disabled, it is irritating to see the same IPs trying over and over.

Putting SSH on a different port is not sufficient, by the way. It may cut down the log noise a little, but the advent of services that scan the entire Internet and then sell the results has meant that if you run an SSH daemon on any port, it will be found and be the subject of dictionary attacks.

So, Fail2Ban.

iptables ^

The usual firewall on Linux is iptables. By default, when Fail2Ban wants to block an IP address it will insert a rule and then when the block expires it will remove it again.

iptables Interaction With Configuration Management ^

I’ve had all my hosts in configuration management for about 10 years now, and that includes the firewall setup. First it was Puppet but these days it is Ansible.

That worked great when the firewall rules were only managed in the config management, but Fail2Ban introduces firewall changes itself.

Now, it’s been many years since I moved on from Puppet so perhaps a way around this has been found there now. At the time though, I was using the Puppetlabs firewall module and it really did not like seeing changes from outside itself. It would keep reverting them.

It was possible to tell it not to meddle with rules that it didn’t add, but it never did work completely correctly. I would still see changes at every run.

Blackholes To The Rescue ^

I never did manage to come up with a way to control the firewall rules in Puppet but still allow Fail2Ban to add and remove its rules and chains, without there being modifications at every Puppet run.

Instead I sidestepped the problem by using the “route” action of Fail2Ban instead of the “iptables” action. The “route” action simply inserts a blackhole route, as if you did this at the command line:

# ip route add blackhole 192.168.1.1

That blocks all traffic to/from that IP address. Some people may have wanted to only block SSH traffic from those hosts but in my view those hosts are bad actors and I am happy to drop all traffic from/to them.

Problem solved? Well, not entirely.

Multiple Jailhouse Blues ^

Fail2Ban isn’t just restricted to processing logs for one service. Taken together, the criteria for banning for a given time over a given set of log files is called a jail, and there can be multiple jails.

When using iptables as the jail action this isn’t much of an issue because the rules are added to separate iptables chains named after the jail itself, e.g. f2b-sshd. You can therefore have the same IP address appearing in multiple different chains and whichever is hit first will ban it.

A common way to configure Fail2Ban is to have one jail banning hosts that have a short burst of failures for a relatively short period of time, and then another jail that bans persistent attackers for a much longer period of time. For example, there could be an sshd jail that looks for 3 failures in 3 minutes and bans for 20 minutes, and then an sshd-hourly jail that looks for 5 failures in an hour and bans for a day.

This doesn’t work with the “route” action because there is only one routing table and you can’t have duplicate routes in it.

Initially you may think you can cause the actual execution of the actions to still succeed with something like this:

actionban   = ip route add blackhole <ip> || true
actionunban = ip route del blackhole <ip> || true

i.e. force them to always succeed even if the IP is already banned or already expired.

The problem now is that the short-term jails can remove bans that the long-term jails have added. It’s a race condition as to which order the adds and removes are done in.

Ansible iptables_raw Deal ^

As I say, I switched to Ansible quite a while ago, and for firewalling here I chose the iptables_raw module.

This has the same issues with changed rules as all my earlier Puppet efforts did.

The docs say that you can set keep_unmanaged and then rules from outside of this module won’t be meddled with. This is true, but still Ansible reports changes on every host every time. It isn’t actually doing a change, it is just noting a change.

I think this is because every time iptables_raw changes the rules, it uses iptables-save to save them out to a file. Then Fail2Ban adds and removes some rules, and next time iptables_raw compares the live rule set with the save file that it saved out last time. So there’s always changes (assuming any Fail2Ban activity).

Someone did ask about the possibility of ignoring some chains, which would be ideal for ignoring all the f2b-* chains, but the response seems to indicate that this will not be happening.

So I am still looking for a way to manage Linux host firewalls in Ansible that can ignore some chains and not want to be in sole control of all rules.

Paul mentioned that from Ansible he uses ferm, which writes rules to files before actioning them, so doesn’t suffer from this problem.

That is a possibility, but if I am going to rewrite all of that I think I should probably do it with something that is going to support nftables, which ferm apparently isn’t.

The Metric System ^

All is not lost, though it is severely bodged.

Routes can have metrics. The metric goes from 0 to 9999, and the lower the number the more important the route is.

There can be multiple routes for the same destination but with different metrics; for example if you have a metric 10 route and a metric 20 route for the same destination, the metric 10 route is chosen.

That means that you can use a different metric for each jail, and then each jail can ban and unban the same IPs without interfering with other jails.

Here’s an action file for the action “route-metric”:

[Definition]
actionban   = ip route add blackhole <ip> metric <metric>
actionunban = ip route del blackhole <ip> metric <metric>

On Debian you might put that in a file called /etc/fail2ban/action.d/route-metric.conf and then in a jail definition use it like this:

[sshd-hourly]
logpath  = /var/log/auth.log
filter   = sshd
enabled  = true
action   = route-metric[metric=9998]
# 5 tries
maxretry = 5
# in one hour
findtime = 3600
# bans for 24 hours
bantime  = 86400

Just make sure to use a different metric number (9998 here) for each jail and that solves that problem.

Clearly that doesn’t solve it in a very nice way though. If you use Ansible and manage your firewall rules in it, what do you use?

Possibly this could instead be worked around by having multiple routing tables.

Experiments with RDRAND and EntropyKey

Entropy, when the shannons are gone and you can’t go on ^

The new release of Debian 10 (buster) brings with it some significant things related to entropy:

  1. systemd doesn’t trust entropy saved at last boot
  2. Many system daemons now use getrandom() which requires the CRNG be primed with good entropy
  3. The kernel by default trusts the CPU’s RDRAND instruction if it’s available

A lot of machines — especially virtual machines — don’t have access to a lot of entropy when they start up, and now that systemd isn’t accrediting stored entropy from the previous boot some essential services like ssh may take minutes to start up.

Back in 2011 or so, Intel added a CPU instruction called RDRAND which provides entropy, but there was some concern that it was an unauditable feature that could easily have been compromised, so it never did get used as the sole source of entropy on capable CPUs.

Later on, an option to trust the CPU for providing boot-time entropy was added, and this option was enabled by default in Debian kernels from 10.0 onwards.

I am okay with using RDRAND for boot-time entropy, but some people got very upset about it.

Out of interest I had a look at what effect the various kernel options related to RDRAND would have, and also what about when I use BitFolk’s entropy service.

(As of July 2019 this wiki article is in dire need of rewrite since I believe it states some untrue things about urandom, but the details of what the entropy service is and how to use it are correct)

Experiments ^

These experiments were carried out on a virtual machine which is a default install of Debian 10 (buster) on BitFolk. At package selection only “Standard system utilities” and “SSH server” were selected.

Default boot ^

SSH is available just over 1 second after boot.

[    1.072760] random: get_random_bytes called from start_kernel+0x93/0x52c with crng_init=0
[    1.138541] random: crng done (trusting CPU's manufacturer)

Don’t trust RDRAND for early entropy ^

If I tell the kernel not to trust RDRAND for early entropy by using random.trust_cpu=off on the kernel command line then SSH is available after about 4.5 seconds.

[    1.115416] random: get_random_bytes called from start_kernel+0x93/0x52c with crng_init=0
[    1.231606] random: fast init done
[    4.260130] random: systemd-random-: uninitialized urandom read (512 bytes read)
[    4.484274] random: crng init done

Don’t use RDRAND at all ^

If I completely disable the kernel’s use of RDRAND by using nordrand on the kernel command line then SSH is available after just under 49 seconds.

[    1.110475] random: get_random_bytes called from start_kernel+0x93/0x52c with crng_init=0
[    1.225991] random: fast init done
[    4.298185] random: systemd-random-: uninitialized urandom read (512 bytes read)
[    4.674676] random: dbus-daemon: uninitialized urandom read (12 bytes read)
[    4.682873] random: dbus-daemon: uninitialized urandom read (12 bytes read)
[   48.876084] random: crng init done

Use entropy service but not RDRAND ^

If I disable RDRAND but use BitFolk’s entropy service then SSH is available in just over 10 seconds. I suppose this is slower than with random.trust_cpu=off because in that case RDRAND is still allowed after initial seeding, and we must wait for a userland daemon to start.

Using the entropy service requires the network to be up so I’m not sure how easy it would be to decrease this delay, but 10 seconds is still a lot better than 49 seconds.

[    1.075910] random: get_random_bytes called from start_kernel+0x93/0x52c with crng_init=0
[    1.186650] random: fast init done
[    4.207010] random: systemd-random-: uninitialized urandom read (512 bytes read)
[    4.606789] random: dbus-daemon: uninitialized urandom read (12 bytes read)
[    4.613975] random: dbus-daemon: uninitialized urandom read (12 bytes read)
[   10.257513] random: crng init done

Use entropy service but don’t trust CPU for early seeding ^

This was no different to just random.trust_cpu=off (about 4.5s). I suspect because early seeding completed and then RDRAND supplied more entropy before the network came up and the entropy service daemon could start.

Thoughts ^

I’m glad that my CPUs have RDRAND and I’m prepared to use it for boot-time seeding of the CSPRNG, but not as the machines’ sole entropy source.

With RDRAND available, using the BitFolk entropy service probably doesn’t make that much sense as RDRAND will always be able to supply.

More paranoid customers may want to use random.trust_cpu=off but even then probably don’t need the entropy service since once the CSPRNG is seeded, RDRAND can be mixed in and away they go.

The truly paranoid may want to disable RDRAND in which case using the entropy service would be recommended since otherwise long delays at boot will happen and severe delays during times of high entropy demand could be seen.

For those who aren’t BitFolk customers and don’t have access to hardware entropy sources and don’t have a CPU with RDRAND support there are some tough choices. Every other option listed on Debian’s relevant wiki article has at least one expert who says it’s a bad choice.

Linux RAID-10 fixed on imbalanced devices?

Recap ^

In a previous article I demonstrated that Linux RAID-10 lacked an optimisation for non-rotational devices that was present in RAID-1.

In the case of imbalanced devices such as my system with one SATA SSD and one PCI NVMe, this could cause RAID-10 to perform 3 times worse than RAID-1 at random reads.

A possible fix ^

Kernel developer Guoqing Jiang contacted me to provide a patch to add the same optimisation that is present in RAID-1 to RAID-10.

Updated performance figures ^

I’ve applied Guoqing’s patch and re-run the tests for the RAID-10 targets. Figures for other targets are from the pervious post for comparison.

Sequential IO ^

Test Throughput (MiB/s)
Fast RAID-1 Fast RAID-10 Fast RAID-10 (patched) Slow RAID-1 Slow RAID-10 Slow RAID-10 (patched)
Read 1,237 1,682 2,141 198 188 211
Write 321 321 321 18 19 19

The patched RAID-10 is the clear winner for sequential IO. It even peforms about 27% faster than the unpacthed variant.

Random IO ^

Test IOPS
Fast RAID-1 Fast RAID-10 Fast RAID-10 (patched) Slow RAID-1 Slow RAID-10 Slow RAID-10 (patched)
Random Read 602,000 208,000 602,000 501 501 487
Random Write 82,200 82,200 82,200 25 21 71

The patched RAID-10 is now indistinguishable from performance of RAID-1, almost 3 times faster than without the patch!

I am unable to explain why RAID-10 writes on the slow devices (HDDs) is so much better than before.

The patch ^

Guoqing Jiang’s patch is as follows in case anyone wants to test it. Guoqing has only compile-tested it as they don’t have the required hardware. I have tested it and it seems okay, but don’t use it on any data you care about yet.

diff --git a/drivers/md/raid10.c b/drivers/md/raid10.c
index 25e97de36717..2ebe49b18aeb 100644
--- a/drivers/md/raid10.c
+++ b/drivers/md/raid10.c
@@ -745,15 +745,19 @@ static struct md_rdev *read_balance(struct r10conf *conf,
        int sectors = r10_bio->sectors;
        int best_good_sectors;
        sector_t new_distance, best_dist;
-       struct md_rdev *best_rdev, *rdev = NULL;
+       struct md_rdev *best_dist_rdev, *best_pending_rdev, *rdev = NULL;
        int do_balance;
-       int best_slot;
+       int best_dist_slot, best_pending_slot;
+       int has_nonrot_disk = 0;
+       unsigned int min_pending;
        struct geom *geo = &conf->geo;
 
        raid10_find_phys(conf, r10_bio);
        rcu_read_lock();
-       best_slot = -1;
-       best_rdev = NULL;
+       best_dist_slot = -1;
+       min_pending = UINT_MAX;
+       best_dist_rdev = NULL;
+       best_pending_rdev = NULL;
        best_dist = MaxSector;
        best_good_sectors = 0;
        do_balance = 1;
@@ -775,6 +779,8 @@ static struct md_rdev *read_balance(struct r10conf *conf,
                sector_t first_bad;
                int bad_sectors;
                sector_t dev_sector;
+               unsigned int pending;
+               bool nonrot;
 
                if (r10_bio->devs[slot].bio == IO_BLOCKED)
                        continue;
@@ -811,8 +817,8 @@ static struct md_rdev *read_balance(struct r10conf *conf,
                                        first_bad - dev_sector;
                                if (good_sectors > best_good_sectors) {
                                        best_good_sectors = good_sectors;
-                                       best_slot = slot;
-                                       best_rdev = rdev;
+                                       best_dist_slot = slot;
+                                       best_dist_rdev = rdev;
                                }
                                if (!do_balance)
                                        /* Must read from here */
@@ -825,14 +831,23 @@ static struct md_rdev *read_balance(struct r10conf *conf,
                if (!do_balance)
                        break;
 
-               if (best_slot >= 0)
+               nonrot = blk_queue_nonrot(bdev_get_queue(rdev->bdev));
+               has_nonrot_disk |= nonrot;
+               pending = atomic_read(&rdev->nr_pending);
+               if (min_pending > pending && nonrot) {
+                       min_pending = pending;
+                       best_pending_slot = slot;
+                       best_pending_rdev = rdev;
+               }
+
+               if (best_dist_slot >= 0)
                        /* At least 2 disks to choose from so failfast is OK */
                        set_bit(R10BIO_FailFast, &r10_bio->state);
                /* This optimisation is debatable, and completely destroys
                 * sequential read speed for 'far copies' arrays.  So only
                 * keep it for 'near' arrays, and review those later.
                 */
-               if (geo->near_copies > 1 && !atomic_read(&rdev->nr_pending))
+               if (geo->near_copies > 1 && !pending)
                        new_distance = 0;
 
                /* for far > 1 always use the lowest address */
@@ -841,15 +856,21 @@ static struct md_rdev *read_balance(struct r10conf *conf,
                else
                        new_distance = abs(r10_bio->devs[slot].addr -
                                           conf->mirrors[disk].head_position);
+
                if (new_distance < best_dist) {
                        best_dist = new_distance;
-                       best_slot = slot;
-                       best_rdev = rdev;
+                       best_dist_slot = slot;
+                       best_dist_rdev = rdev;
                }
        }
        if (slot >= conf->copies) {
-               slot = best_slot;
-               rdev = best_rdev;
+               if (has_nonrot_disk) {
+                       slot = best_pending_slot;
+                       rdev = best_pending_rdev;
+               } else {
+                       slot = best_dist_slot;
+                       rdev = best_dist_rdev;
+               }
        }
 
        if (slot >= 0) {

Exploring different Linux RAID-10 layouts with unbalanced devices

Background ^

In a previous article I explored the performance of different Linux RAID configurations in a situation where there are two very mismatched devices.

The two devices are a Samsung SM883 SATA SSD and a Samsung PM983 NVMe. Both of these devices are very fast, but the NVMe can be 6 times faster than the SSD for random (4KiB) reads.

The previous article established that due to performance optimisations in Linux RAID-1 targeted at non-rotational devices like SSDs, RAID-1 outperforms RAID-10 by about 3x for random reads in this unbalanced setup.

RAID-10 Layouts ^

A respondent on the linux-raid list suggested I test out different RAID-10 layouts. The default RAID-10 layout on Linux corresponds to the standard and is called near. There are also two alternative layouts, far and offset. Wikipedia has a good article on the difference between these three layouts.

Charts ^

Click on the thumbnails to see full size images.

Sequential IO ^

Reads ^


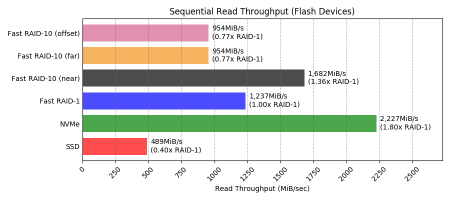
far and offset layouts perform the same: about twice the speed of a single SSD, but only ~57% of RAID-1 and interestingly only ~77% of RAID-10 near layout.

Writes ^


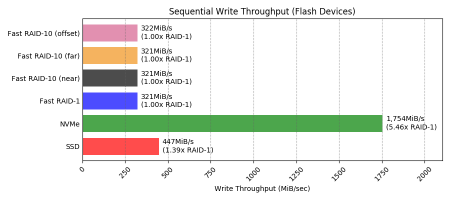
All layouts perform the same for sequential writes (the same as RAID-1).

Random IO ^

Reads ^


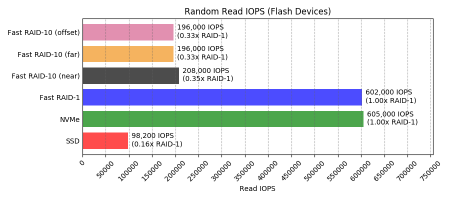
far and offset performed slightly worse than near (~94%) and still only about a third of RAID-1.

Writes ^


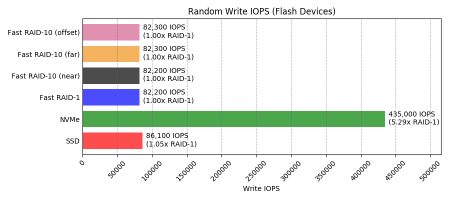
All layouts of RAID-10 perform the same as RAID-1 for random writes.

Data Tables ^

This is just the raw data for the charts above. Skip to the conclusions if you’re not interested in seeing the numbers for the things you already saw as pictures.

Sequential IO ^

Test Throughput (MiB/s)
SSD NVMe HDD Fast RAID-1 Fast RAID-10 (near) Fast RAID-10 (far) Fast RAID-10 (offset) Slow RAID-1 Slow RAID-10 (near)
Read 489 2,227 26 1,237 1,682 954 954 198 188
Write 447 1,754 20 321 321 321 322 18 19

Random IO ^

Test IOPS
SSD NVMe HDD Fast RAID-1 Fast RAID-10 (near) Fast RAID-10 (far) Fast RAID-10 (offset) Slow RAID-1 Slow RAID-10 (near)
Random Read 98,200 605,000 256 602,000 208,000 196,000 196,000 501 501
Random Write 86,100 435,000 74 82,200 82,200 82,300 82,300 25 21

Conclusions ^

I was not able to see any difference between the non-default Linux RAID-10 layouts for my devices and I think it’s likely this holds for all non-rotational devices in general.

far and offset layouts performed significantly worse than the default near layout for sequential read IO and no better than the default near layout in any other scenario.

Since layouts other than the default near restrict the reshaping options for RAID-10, I don’t recommend using them for RAID-10 composed entirely of non-rotational devices.

Additionally, if — as in my case — the devices have a big variance in performance compared to each other then it remains best to use RAID-1.

Appendix ^

Setup ^

I’ll only cover what has changed from the previous article.

Partitioning ^

I added two extra 10GiB partitions on each device; one for testing the far layout and the other for testing the offset layout.

$ sudo gdisk /dev/sdc                                                        
GPT fdisk (gdisk) version 1.0.3                                                                                                                                           
Partition table scan:                                                                
  MBR: protective                                                                   
  BSD: not present                                                                   
  APM: not present                                                                   
  GPT: present                                                                      
 
Found valid GPT with protective MBR; using GPT.                                     
 
Command (? for help): p                                                        
Disk /dev/sdc: 7501476528 sectors, 3.5 TiB                                           Model: SAMSUNG MZ7KH3T8                                            
Sector size (logical/physical): 512/4096 bytes                   
Disk identifier (GUID): 7D7DFDA2-502C-47FE-A437-5442CCCE7E6B
Partition table holds up to 128 entries                                              Main partition table begins at sector 2 and ends at sector 33                        
First usable sector is 34, last usable sector is 7501476494                         
Partitions will be aligned on 2048-sector boundaries                                
Total free space is 7438561901 sectors (3.5 TiB)                                                                                                                          
Number  Start (sector)    End (sector)  Size       Code  Name                        
   1            2048        20973567   10.0 GiB    8300  Linux filesystem          
   2        20973568        41945087   10.0 GiB    8300  Linux filesystem            
   3        41945088        62916607   10.0 GiB    8300  Linux filesystem
 
Command (? for help): n                  
Partition number (4-128, default 4):                                                
First sector (34-7501476494, default = 62916608) or {+-}size{KMGTP}:                 Last sector (62916608-7501476494, default = 7501476494) or {+-}size{KMGTP}: +10g     
Current type is 'Linux filesystem'                                                  
Hex code or GUID (L to show codes, Enter = 8300):                                   
Changed type of partition to 'Linux filesystem'                                      
 
Command (? for help): n                                                             
Partition number (5-128, default 5):                                                 
First sector (34-7501476494, default = 83888128) or {+-}size{KMGTP}:                
Last sector (83888128-7501476494, default = 7501476494) or {+-}size{KMGTP}: +10g     
Current type is 'Linux filesystem'                                             
Hex code or GUID (L to show codes, Enter = 8300):                                    Changed type of partition to 'Linux filesystem'                                
 
Command (? for help): w                                            
                                                                                     Final checks complete. About to write GPT data. THIS WILL OVERWRITE EXISTING        
PARTITIONS!!                                                                        
 
Do you want to proceed? (Y/N): y                                                     
OK; writing new GUID partition table (GPT) to /dev/sdc.                             
Warning: The kernel is still using the old partition table.                          The new table will be used at the next reboot or after you                           
run partprobe(8) or kpartx(8)                                                        
The operation has completed successfully.                                            
$ sudo gdisk /dev/nvme0n1                                                            
GPT fdisk (gdisk) version 1.0.3                                                   
 
Partition table scan:                                                                
  MBR: protective                                                              
  BSD: not present                                                             
  APM: not present                                                                   
  GPT: present                                                                
 
Found valid GPT with protective MBR; using GPT.                                     
 
Command (? for help): p                                                          
Disk /dev/nvme0n1: 7501476528 sectors, 3.5 TiB                        
Model: SAMSUNG MZQLB3T8HALS-00007                                                
Sector size (logical/physical): 512/512 bytes                                        
Disk identifier (GUID): C6F311B7-BE47-47C1-A1CB-F0A6D8C13136                        
Partition table holds up to 128 entries                                           
Main partition table begins at sector 2 and ends at sector 33                     
First usable sector is 34, last usable sector is 7501476494                          
Partitions will be aligned on 2048-sector boundaries                          
Total free space is 7438561901 sectors (3.5 TiB)                                   
 
Number  Start (sector)    End (sector)  Size       Code  Name                        
   1            2048        20973567   10.0 GiB    8300  Linux filesystem
   2        20973568        41945087   10.0 GiB    8300  Linux filesystem
   3        41945088        62916607   10.0 GiB    8300  Linux filesystem
 
Command (? for help): n
Partition number (4-128, default 4):
First sector (34-7501476494, default = 62916608) or {+-}size{KMGTP}:
Last sector (62916608-7501476494, default = 7501476494) or {+-}size{KMGTP}: +10g
Current type is 'Linux filesystem'
Hex code or GUID (L to show codes, Enter = 8300):
Changed type of partition to 'Linux filesystem'
 
Command (? for help): n
Partition number (5-128, default 5):
First sector (34-7501476494, default = 83888128) or {+-}size{KMGTP}:
Last sector (83888128-7501476494, default = 7501476494) or {+-}size{KMGTP}: +10g
Current type is 'Linux filesystem'
Hex code or GUID (L to show codes, Enter = 8300):
Changed type of partition to 'Linux filesystem'
 
Command (? for help): w
 
Final checks complete. About to write GPT data. THIS WILL OVERWRITE EXISTING
PARTITIONS!!
 
Do you want to proceed? (Y/N): y
OK; writing new GUID partition table (GPT) to /dev/nvme0n1.
Warning: The kernel is still using the old partition table.
The new table will be used at the next reboot or after you
run partprobe(8) or kpartx(8)
The operation has completed successfully.
$ sudo partprobe /dev/sdc
$ sudo partprobe /dev/nvme0n1

Array creation ^

$ sudo mdadm --create \
  --verbose \
  --assume-clean \
  /dev/md8 \
  --level=10 \
  --raid-devices=2 \
  --layout=f2 \
  /dev/sdc4 /dev/nvme0n1p4
mdadm: chunk size defaults to 512K
mdadm: size set to 10476544K
mdadm: Defaulting to version 1.2 metadata
mdadm: array /dev/md8 started.
$ sudo mdadm --create \
  --verbose \
  --assume-clean \
  /dev/md9 \
  --level=10 \
  --raid-devices=2 \
  --layout=o2 \
  /dev/sdc5 /dev/nvme0n1p5
mdadm: chunk size defaults to 512K
mdadm: size set to 10476544K
mdadm: Defaulting to version 1.2 metadata
mdadm: array /dev/md9 started.
$ cat /proc/mdstat
Personalities : [linear] [multipath] [raid0] [raid1] [raid10] [raid6] [raid5] [raid4]
 
md9 : active raid10 nvme0n1p5[1] sdc5[0]
      10476544 blocks super 1.2 512K chunks 2 offset-copies [2/2] [UU]
 
md8 : active raid10 nvme0n1p4[1] sdc4[0]
      10476544 blocks super 1.2 512K chunks 2 far-copies [2/2] [UU]
 
md7 : active raid10 sde3[1] sdd3[0]
      10476544 blocks super 1.2 2 near-copies [2/2] [UU]
 
md6 : active raid1 sde2[1] sdd2[0]
      10476544 blocks super 1.2 [2/2] [UU]
 
md5 : active raid10 nvme0n1p3[1] sdc3[0]
      10476544 blocks super 1.2 2 near-copies [2/2] [UU]
 
md4 : active raid1 nvme0n1p2[1] sdc2[0]
      10476544 blocks super 1.2 [2/2] [UU]
 
md2 : active (auto-read-only) raid10 sda3[0] sdb3[1]
      974848 blocks super 1.2 2 near-copies [2/2] [UU]
 
md0 : active raid1 sdb1[1] sda1[0]
      497664 blocks super 1.2 [2/2] [UU]
 
md1 : active raid10 sda2[0] sdb2[1]
      1950720 blocks super 1.2 2 near-copies [2/2] [UU]
 
md3 : active raid10 sda5[0] sdb5[1]
      12025856 blocks super 1.2 2 near-copies [2/2] [UU]
 
unused devices: <none>

Raw fio Output ^

Only output from the tests on the arrays with non-default output is shown here; the rest is in the previous article.

This is a lot of output and it’s the last thing in this article, so if you’re not interested in it you should stop reading now.

fast-raid10-f2_seqread: (g=0): rw=read, bs=(R) 4096B-4096B, (W) 4096B-4096B[175/9131]
B-4096B, ioengine=libaio, iodepth=32
...
fio-3.13-42-g8066f
Starting 4 processes
fast-raid10-f2_seqread: Laying out IO file (1 file / 8192MiB)
 
fast-raid10-f2_seqread: (groupid=0, jobs=4): err= 0: pid=5287: Sun Jun  2 00:18:35 20
19
  read: IOPS=244k, BW=954MiB/s (1001MB/s)(32.0GiB/34340msec)
   bw (  KiB/s): min=968176, max=984312, per=100.00%, avg=977239.00, stdev=740.55, sa
mples=272
   iops        : min=242044, max=246078, avg=244309.69, stdev=185.14, samples=272
  cpu          : usr=6.98%, sys=33.05%, ctx=738159, majf=0, minf=167
  IO depths    : 1=0.1%, 2=0.1%, 4=0.1%, 8=0.1%, 16=0.1%, 32=100.0%, >=64=0.0%
     submit    : 0=0.0%, 4=100.0%, 8=0.0%, 16=0.0%, 32=0.0%, 64=0.0%, >=64=0.0%
     complete  : 0=0.0%, 4=100.0%, 8=0.0%, 16=0.0%, 32=0.1%, 64=0.0%, >=64=0.0%
     issued rwts: total=8388608,0,0,0 short=0,0,0,0 dropped=0,0,0,0
     latency   : target=0, window=0, percentile=100.00%, depth=32
 
Run status group 0 (all jobs):
   READ: bw=954MiB/s (1001MB/s), 954MiB/s-954MiB/s (1001MB/s-1001MB/s), io=32.0GiB (3
4.4GB), run=34340-34340msec
 
Disk stats (read/write):
    md8: ios=8379702/75, merge=0/0, ticks=0/0, in_queue=0, util=0.00%, aggrios=276780
2/15, aggrmerge=1426480/64, aggrticks=618421/9, aggrin_queue=604770, aggrutil=99.93%
  nvme0n1: ios=4194304/15, merge=0/64, ticks=154683/0, in_queue=160368, util=99.93%
  sdc: ios=1341300/16, merge=2852961/64, ticks=1082160/19, in_queue=1049172, util=99.
81%
fast-raid10-o2_seqread: (g=0): rw=read, bs=(R) 4096B-4096B, (W) 4096B-4096B, (T) 4096
B-4096B, ioengine=libaio, iodepth=32
...
fio-3.13-42-g8066f
Starting 4 processes
fast-raid10-o2_seqread: Laying out IO file (1 file / 8192MiB)
 
fast-raid10-o2_seqread: (groupid=0, jobs=4): err= 0: pid=5312: Sun Jun  2 00:19:31 20
19
  read: IOPS=244k, BW=954MiB/s (1000MB/s)(32.0GiB/34358msec)
   bw (  KiB/s): min=969458, max=981640, per=100.00%, avg=976601.62, stdev=607.72, sa
mples=272
   iops        : min=242364, max=245410, avg=244150.46, stdev=151.95, samples=272
  cpu          : usr=5.91%, sys=33.95%, ctx=732590, majf=0, minf=162
  IO depths    : 1=0.1%, 2=0.1%, 4=0.1%, 8=0.1%, 16=0.1%, 32=100.0%, >=64=0.0%
     submit    : 0=0.0%, 4=100.0%, 8=0.0%, 16=0.0%, 32=0.0%, 64=0.0%, >=64=0.0%
     complete  : 0=0.0%, 4=100.0%, 8=0.0%, 16=0.0%, 32=0.1%, 64=0.0%, >=64=0.0%
     issued rwts: total=8388608,0,0,0 short=0,0,0,0 dropped=0,0,0,0
     latency   : target=0, window=0, percentile=100.00%, depth=32
 
Run status group 0 (all jobs):
   READ: bw=954MiB/s (1000MB/s), 954MiB/s-954MiB/s (1000MB/s-1000MB/s), io=32.0GiB (3
4.4GB), run=34358-34358msec
 
Disk stats (read/write):
    md9: ios=8385126/75, merge=0/0, ticks=0/0, in_queue=0, util=0.00%, aggrios=276691
0/15, aggrmerge=1427340/64, aggrticks=618657/10, aggrin_queue=606194, aggrutil=99.99%
  nvme0n1: ios=4194304/15, merge=0/64, ticks=157297/1, in_queue=163632, util=99.94%
  sdc: ios=1339516/16, merge=2854681/64, ticks=1080017/19, in_queue=1048756, util=99.
99%
fast-raid10-f2_seqwrite: (g=0): rw=write, bs=(R) 4096B-4096B, (W) 4096B-4096B, (T) 40
96B-4096B, ioengine=libaio, iodepth=32
...
fio-3.13-42-g8066f
Starting 4 processes
 
fast-raid10-f2_seqwrite: (groupid=0, jobs=4): err= 0: pid=5337: Sun Jun  2 00:21:13 2
019
  write: IOPS=82.2k, BW=321MiB/s (337MB/s)(32.0GiB/101992msec); 0 zone resets
   bw (  KiB/s): min=315288, max=336184, per=99.99%, avg=328946.06, stdev=670.42, sam
ples=812
   iops        : min=78822, max=84046, avg=82236.45, stdev=167.60, samples=812
  cpu          : usr=2.15%, sys=34.88%, ctx=973042, majf=0, minf=38
  IO depths    : 1=0.1%, 2=0.1%, 4=0.1%, 8=0.1%, 16=0.1%, 32=100.0%, >=64=0.0%
     submit    : 0=0.0%, 4=100.0%, 8=0.0%, 16=0.0%, 32=0.0%, 64=0.0%, >=64=0.0%
     complete  : 0=0.0%, 4=100.0%, 8=0.0%, 16=0.0%, 32=0.1%, 64=0.0%, >=64=0.0%
     issued rwts: total=0,8388608,0,0 short=0,0,0,0 dropped=0,0,0,0
     latency   : target=0, window=0, percentile=100.00%, depth=32
 
Run status group 0 (all jobs):
  WRITE: bw=321MiB/s (337MB/s), 321MiB/s-321MiB/s (337MB/s-337MB/s), io=32.0GiB (34.4
GB), run=101992-101992msec
 
Disk stats (read/write):                                                    [92/9131]
    md8: ios=0/8380840, merge=0/0, ticks=0/0, in_queue=0, util=0.00%, aggrios=0/83882
06, aggrmerge=0/461, aggrticks=0/704880, aggrin_queue=724510, aggrutil=100.00%
  nvme0n1: ios=0/8388649, merge=0/20, ticks=0/123227, in_queue=202792, util=100.00%
  sdc: ios=0/8387763, merge=0/902, ticks=0/1286533, in_queue=1246228, util=98.78%
fast-raid10-o2_seqwrite: (g=0): rw=write, bs=(R) 4096B-4096B, (W) 4096B-4096B, (T) 40
96B-4096B, ioengine=libaio, iodepth=32
...
fio-3.13-42-g8066f
Starting 4 processes
 
fast-raid10-o2_seqwrite: (groupid=0, jobs=4): err= 0: pid=5366: Sun Jun  2 00:22:56 2
019
  write: IOPS=82.4k, BW=322MiB/s (337MB/s)(32.0GiB/101820msec); 0 zone resets
   bw (  KiB/s): min=316248, max=420304, per=100.00%, avg=331319.30, stdev=3808.39, s
amples=807
   iops        : min=79062, max=105076, avg=82829.76, stdev=952.10, samples=807
  cpu          : usr=2.19%, sys=34.22%, ctx=975496, majf=0, minf=37
  IO depths    : 1=0.1%, 2=0.1%, 4=0.1%, 8=0.1%, 16=0.1%, 32=100.0%, >=64=0.0%
     submit    : 0=0.0%, 4=100.0%, 8=0.0%, 16=0.0%, 32=0.0%, 64=0.0%, >=64=0.0%
     complete  : 0=0.0%, 4=100.0%, 8=0.0%, 16=0.0%, 32=0.1%, 64=0.0%, >=64=0.0%
     issued rwts: total=0,8388608,0,0 short=0,0,0,0 dropped=0,0,0,0
     latency   : target=0, window=0, percentile=100.00%, depth=32
 
Run status group 0 (all jobs):
  WRITE: bw=322MiB/s (337MB/s), 322MiB/s-322MiB/s (337MB/s-337MB/s), io=32.0GiB (34.4
GB), run=101820-101820msec
 
Disk stats (read/write):
    md9: ios=0/8374085, merge=0/0, ticks=0/0, in_queue=0, util=0.00%, aggrios=0/83882
42, aggrmerge=0/442, aggrticks=0/704724, aggrin_queue=728030, aggrutil=100.00%
  nvme0n1: ios=0/8388657, merge=0/21, ticks=0/124463, in_queue=211316, util=100.00%
  sdc: ios=0/8387828, merge=0/864, ticks=0/1284985, in_queue=1244744, util=98.83%
fast-raid10-f2_randread: (g=0): rw=randread, bs=(R) 4096B-4096B, (W) 4096B-4096B, (T)
 4096B-4096B, ioengine=libaio, iodepth=32
...
fio-3.13-42-g8066f
Starting 4 processes
 
fast-raid10-f2_randread: (groupid=0, jobs=4): err= 0: pid=5412: Sun Jun  2 00:23:39 2
019
  read: IOPS=196k, BW=767MiB/s (804MB/s)(32.0GiB/42725msec)
   bw (  KiB/s): min=753863, max=816072, per=99.95%, avg=784998.94, stdev=3053.58, sa
mples=340
   iops        : min=188465, max=204018, avg=196249.72, stdev=763.40, samples=340
  cpu          : usr=4.97%, sys=25.34%, ctx=884047, majf=0, minf=161
  IO depths    : 1=0.1%, 2=0.1%, 4=0.1%, 8=0.1%, 16=0.1%, 32=100.0%, >=64=0.0%
     submit    : 0=0.0%, 4=100.0%, 8=0.0%, 16=0.0%, 32=0.0%, 64=0.0%, >=64=0.0%
     complete  : 0=0.0%, 4=100.0%, 8=0.0%, 16=0.0%, 32=0.1%, 64=0.0%, >=64=0.0%
     issued rwts: total=8388608,0,0,0 short=0,0,0,0 dropped=0,0,0,0
     latency   : target=0, window=0, percentile=100.00%, depth=32
 
Run status group 0 (all jobs):
   READ: bw=767MiB/s (804MB/s), 767MiB/s-767MiB/s (804MB/s-804MB/s), io=32.0GiB (34.4
GB), run=42725-42725msec
 
Disk stats (read/write):
    md8: ios=8371889/4, merge=0/0, ticks=0/0, in_queue=0, util=0.00%, aggrios=4191336
/15, aggrmerge=2963/1, aggrticks=1470317/6, aggrin_queue=854184, aggrutil=100.00%
  nvme0n1: ios=4194304/15, merge=0/1, ticks=317755/0, in_queue=338708, util=100.00%
  sdc: ios=4188368/16, merge=5926/2, ticks=2622880/12, in_queue=1369660, util=99.90%
fast-raid10-o2_randread: (g=0): rw=randread, bs=(R) 4096B-4096B, (W) 4096B-4096B, (T)
 4096B-4096B, ioengine=libaio, iodepth=32
...
fio-3.13-42-g8066f
Starting 4 processes
 
fast-raid10-o2_randread: (groupid=0, jobs=4): err= 0: pid=5437: Sun Jun  2 00:24:22 2
019
  read: IOPS=196k, BW=767MiB/s (804MB/s)(32.0GiB/42725msec)
   bw (  KiB/s): min=741672, max=832016, per=99.96%, avg=785051.96, stdev=4207.46, sa
mples=340
   iops        : min=185418, max=208004, avg=196262.98, stdev=1051.86, samples=340
  cpu          : usr=4.51%, sys=25.36%, ctx=886783, majf=0, minf=164
  IO depths    : 1=0.1%, 2=0.1%, 4=0.1%, 8=0.1%, 16=0.1%, 32=100.0%, >=64=0.0%
     submit    : 0=0.0%, 4=100.0%, 8=0.0%, 16=0.0%, 32=0.0%, 64=0.0%, >=64=0.0%
     complete  : 0=0.0%, 4=100.0%, 8=0.0%, 16=0.0%, 32=0.1%, 64=0.0%, >=64=0.0%
     issued rwts: total=8388608,0,0,0 short=0,0,0,0 dropped=0,0,0,0
     latency   : target=0, window=0, percentile=100.00%, depth=32
 
Run status group 0 (all jobs):
   READ: bw=767MiB/s (804MB/s), 767MiB/s-767MiB/s (804MB/s-804MB/s), io=32.0GiB (34.4
GB), run=42725-42725msec
 
Disk stats (read/write):                                                     [8/9131]
    md9: ios=8371755/4, merge=0/0, ticks=0/0, in_queue=0, util=0.00%, aggrios=4191564
/7, aggrmerge=2733/1, aggrticks=1469572/3, aggrin_queue=853154, aggrutil=100.00%
  nvme0n1: ios=4194304/7, merge=0/1, ticks=317525/0, in_queue=336088, util=100.00%
  sdc: ios=4188825/8, merge=5466/1, ticks=2621620/6, in_queue=1370220, util=99.87%
fast-raid10-f2_randwrite: (g=0): rw=randwrite, bs=(R) 4096B-4096B, (W) 4096B-4096B, (
T) 4096B-4096B, ioengine=libaio, iodepth=32
...
fio-3.13-42-g8066f
Starting 4 processes
 
fast-raid10-f2_randwrite: (groupid=0, jobs=4): err= 0: pid=5462: Sun Jun  2 00:26:04
2019
  write: IOPS=82.3k, BW=321MiB/s (337MB/s)(32.0GiB/101961msec); 0 zone resets
   bw (  KiB/s): min=318832, max=396249, per=100.00%, avg=329384.74, stdev=1762.35, s
amples=810
   iops        : min=79708, max=99061, avg=82346.02, stdev=440.57, samples=810
  cpu          : usr=2.42%, sys=34.38%, ctx=975633, majf=0, minf=39
  IO depths    : 1=0.1%, 2=0.1%, 4=0.1%, 8=0.1%, 16=0.1%, 32=100.0%, >=64=0.0%
     submit    : 0=0.0%, 4=100.0%, 8=0.0%, 16=0.0%, 32=0.0%, 64=0.0%, >=64=0.0%
     complete  : 0=0.0%, 4=100.0%, 8=0.0%, 16=0.0%, 32=0.1%, 64=0.0%, >=64=0.0%
     issued rwts: total=0,8388608,0,0 short=0,0,0,0 dropped=0,0,0,0
     latency   : target=0, window=0, percentile=100.00%, depth=32
 
Run status group 0 (all jobs):
  WRITE: bw=321MiB/s (337MB/s), 321MiB/s-321MiB/s (337MB/s-337MB/s), io=32.0GiB (34.4
GB), run=101961-101961msec
 
Disk stats (read/write):
    md8: ios=0/8383420, merge=0/0, ticks=0/0, in_queue=0, util=0.00%, aggrios=0/83886
62, aggrmerge=0/17, aggrticks=0/704633, aggrin_queue=735234, aggrutil=100.00%
  nvme0n1: ios=0/8388655, merge=0/14, ticks=0/123197, in_queue=208804, util=100.00%
  sdc: ios=0/8388669, merge=0/20, ticks=0/1286069, in_queue=1261664, util=98.75%
fast-raid10-o2_randwrite: (g=0): rw=randwrite, bs=(R) 4096B-4096B, (W) 4096B-4096B, (
T) 4096B-4096B, ioengine=libaio, iodepth=32
...
fio-3.13-42-g8066f
Starting 4 processes
 
fast-raid10-o2_randwrite: (groupid=0, jobs=4): err= 0: pid=5491: Sun Jun  2 00:27:47
2019
  write: IOPS=82.3k, BW=322MiB/s (337MB/s)(32.0GiB/101880msec); 0 zone resets
   bw (  KiB/s): min=315369, max=418520, per=100.00%, avg=330793.95, stdev=3466.64, s
amples=808
   iops        : min=78842, max=104630, avg=82698.46, stdev=866.66, samples=808
  cpu          : usr=2.21%, sys=34.38%, ctx=972875, majf=0, minf=39
  IO depths    : 1=0.1%, 2=0.1%, 4=0.1%, 8=0.1%, 16=0.1%, 32=100.0%, >=64=0.0%
     submit    : 0=0.0%, 4=100.0%, 8=0.0%, 16=0.0%, 32=0.0%, 64=0.0%, >=64=0.0%
     complete  : 0=0.0%, 4=100.0%, 8=0.0%, 16=0.0%, 32=0.1%, 64=0.0%, >=64=0.0%
     issued rwts: total=0,8388608,0,0 short=0,0,0,0 dropped=0,0,0,0
     latency   : target=0, window=0, percentile=100.00%, depth=32
 
Run status group 0 (all jobs):
  WRITE: bw=322MiB/s (337MB/s), 322MiB/s-322MiB/s (337MB/s-337MB/s), io=32.0GiB (34.4
GB), run=101880-101880msec
 
Disk stats (read/write):
    md9: ios=0/8368626, merge=0/0, ticks=0/0, in_queue=0, util=0.00%, aggrios=0/83886
67, aggrmerge=0/20, aggrticks=0/705086, aggrin_queue=732522, aggrutil=100.00%
  nvme0n1: ios=0/8388658, merge=0/19, ticks=0/123370, in_queue=209792, util=100.00%
  sdc: ios=0/8388677, merge=0/21, ticks=0/1286802, in_queue=1255252, util=98.95%