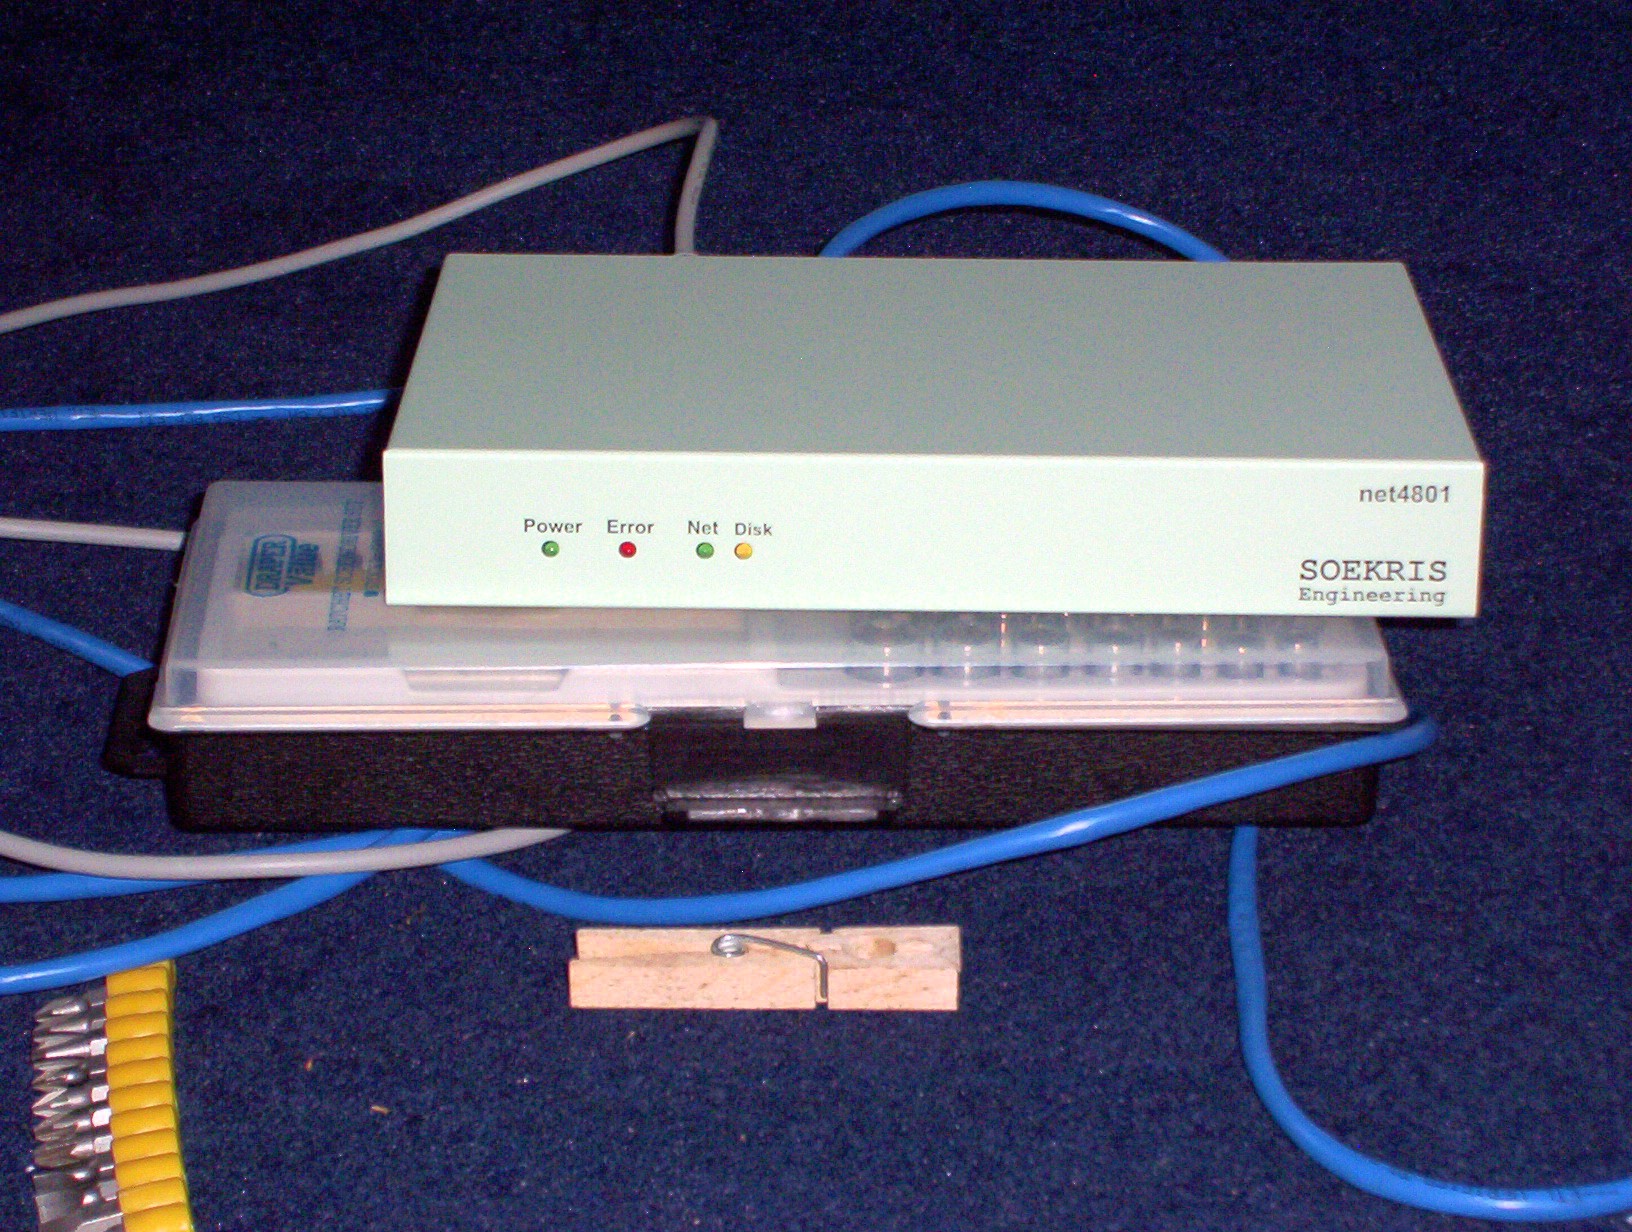
This morning I shut off the Soekris Engineering net4801 that has served as our home firewall / PPP termination box for just over 18½ years.
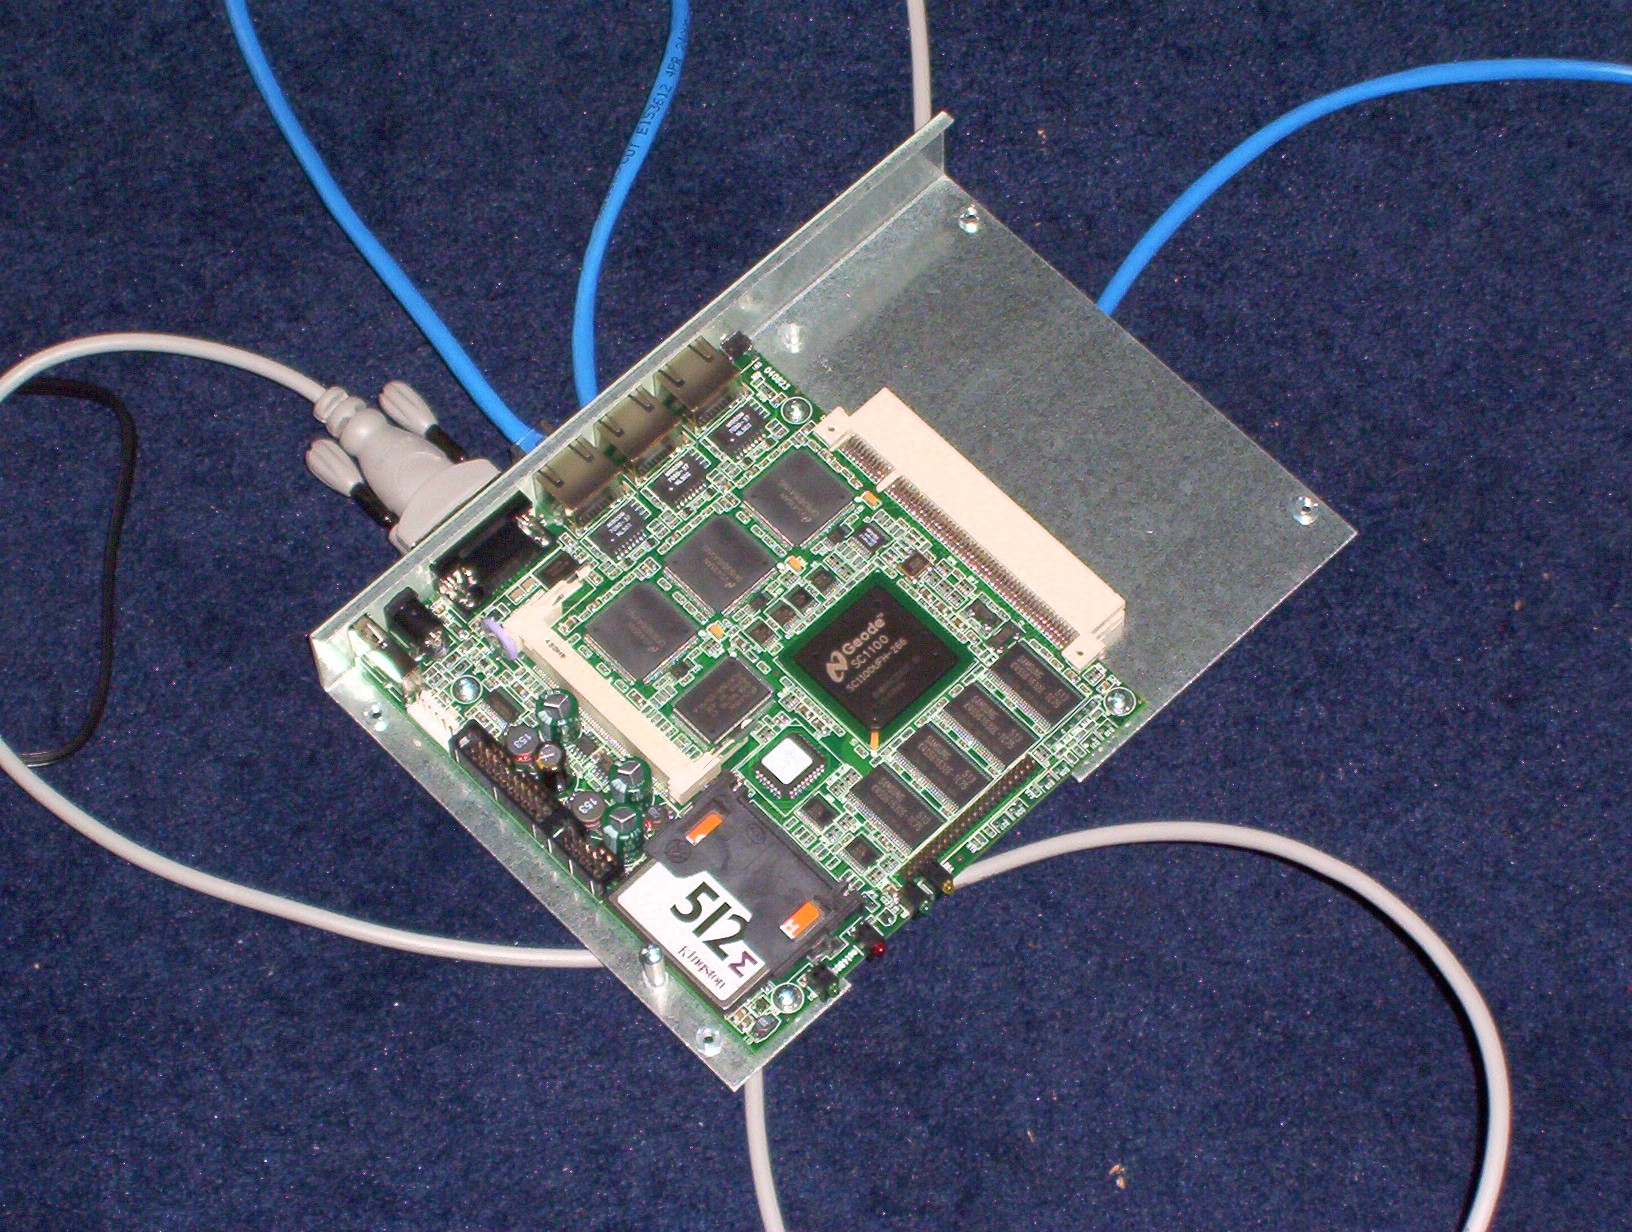
Front view of a Soekris net4801. Clothes peg for scale.Inside of a Soekris net4801.
In truth this has been long overdue. Like, at least 10 years overdue. It has been struggling to cope with even our paltry ~60Mbps VDSL (what UK calls Fibre to the Cabinet). But I am very lazy, and change is work.
In theory we can get fibre from Openreach to approach 1Gbit/s down, and I should sort that out, but see above about me being really very lazy. The poor old Soekris would certainly not be viable then.
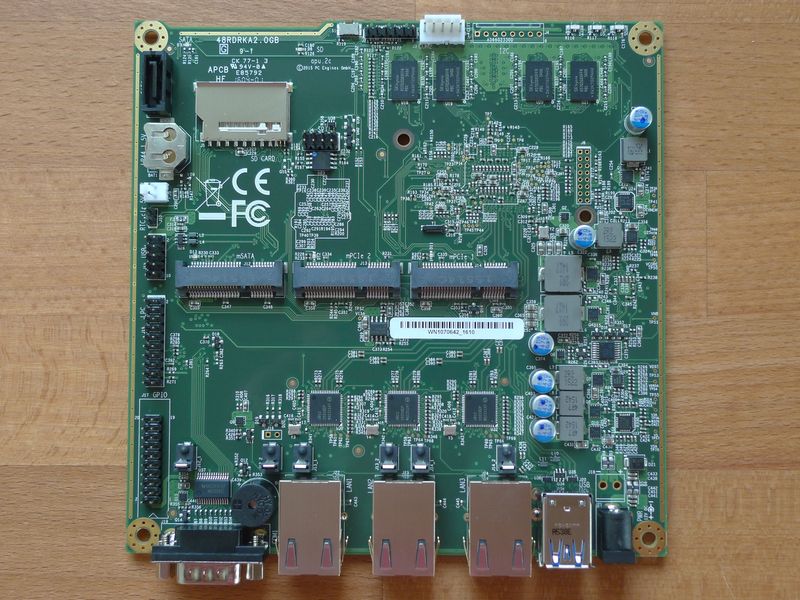
I’ve replaced it with a PC Engines APU2 (the apu2e2 model). Much like the Soekris it’s a fanless single board x86 computer with coreboot firmware so it’s manageable from the BIOS over serial.
An apu2e2 single board computer, image copyright PC Engines GmbH
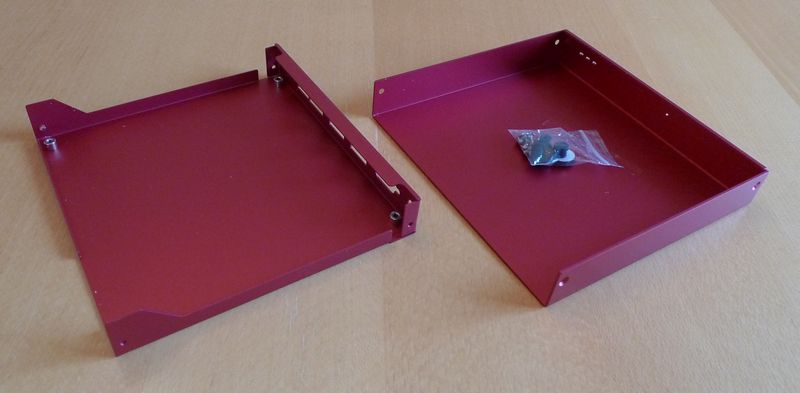
Rear view of an APU2 case1d2redu, image copyright PC Engines GmbH
Front view of an APU2 case1d2redu, image copyright PC Engines GmbH
An APU2 case1d2redu, top and bottom halves separated, image copyright PC Engines GmbH
The Soekris ran Debian and so does the APU2. Installing it over PXE was completely straightforward on the APU2; a bit simpler than it was with the net4801 back in 2005! If you have just one and it’s right there in the same building then it’s probably quicker to just boot the Debian installer off of USB though. I may be lazy but once I do get going I’m also pointlessly bloody-minded.
Anyway, completely stock Debian works fine, though obviously it has no display whatsoever — all non-Ethernet-based interaction would have to be done over serial. By default that runs at 115200 baud (8n1).
This is not “home server” material. Like the Soekris even in 2005 it’s weak and it’s expensive for what it is. It’s meant to be an appliance. I think I was right with the Soekris’s endurance, beyond even sensible limits, and I hope I will be right about the APU2.
The Soekris is still using its original 512M CompactFlash card from 2005 by the way. Although admittedly I did go to some effort to make it run on a read-only filesystem, only flipped to read-write for upgrades.
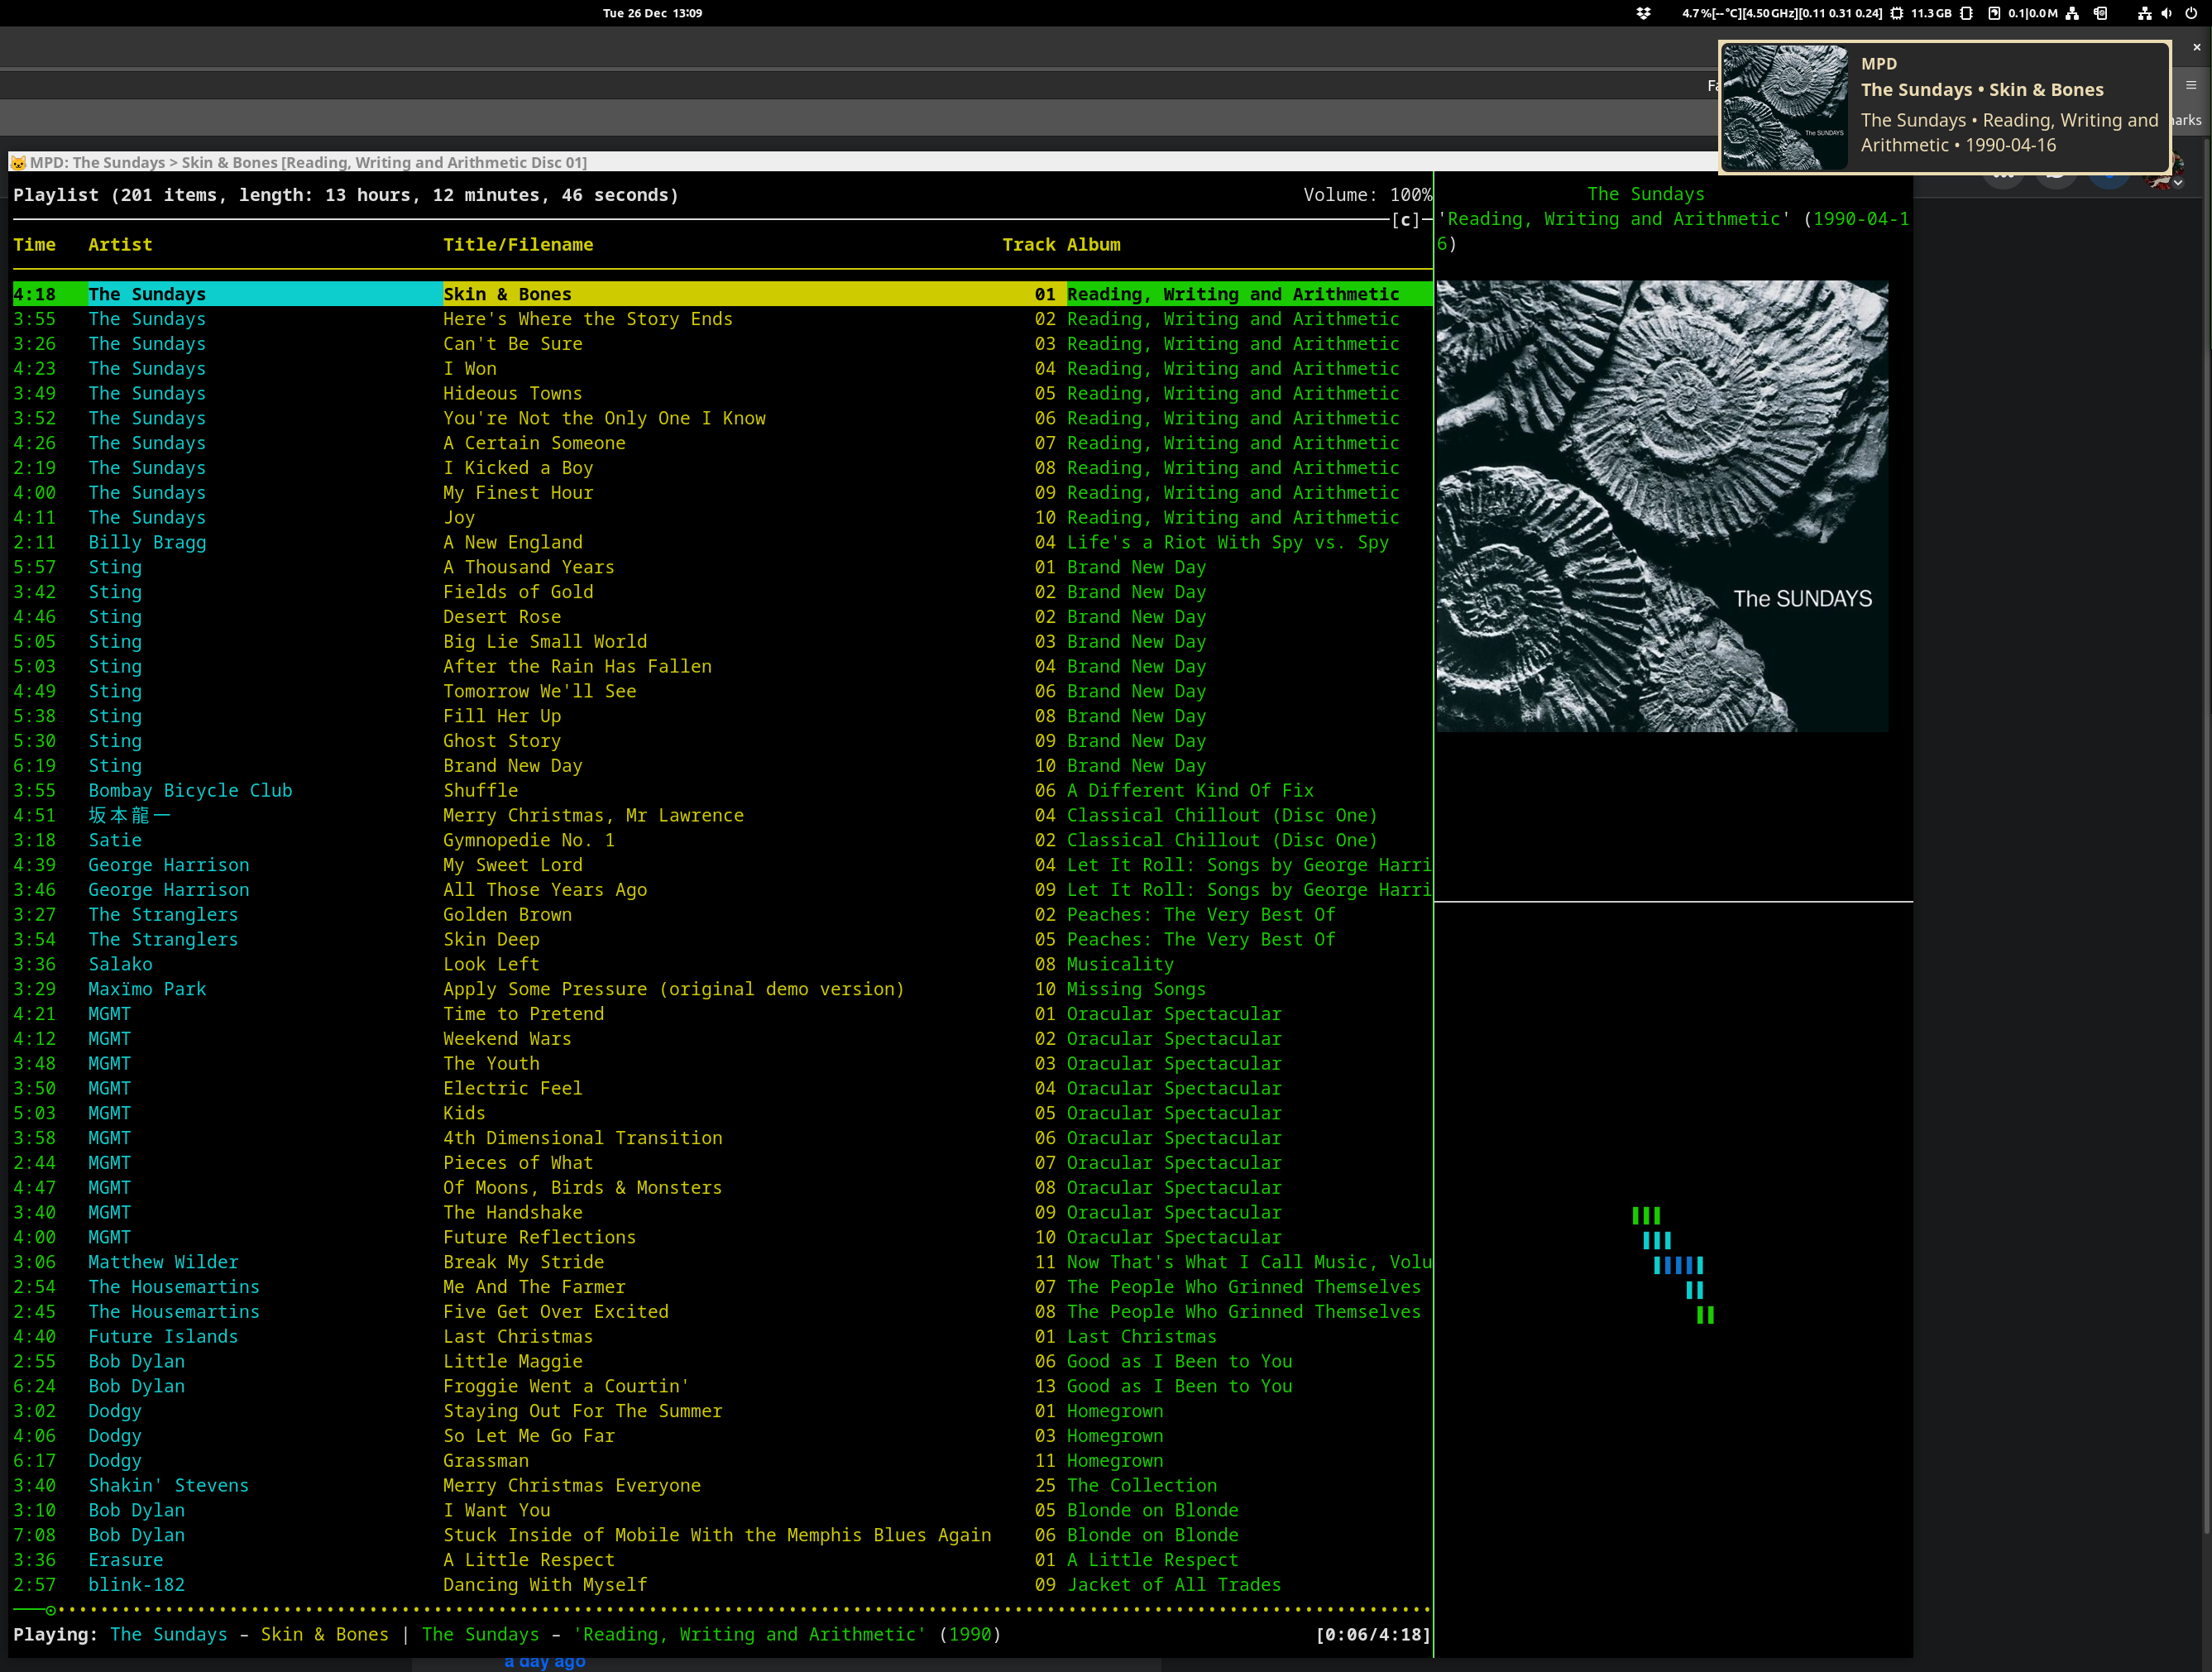
This article is about how I’ve ended up (back) on the terminal-based music player ncmpcpp on my GNOME Linux desktop and laptop. I’ll cover why it is that this has happened, and some of the finer points of the configuration. The various scripts are available at GitHub. My thing now looks like this:
A screenshot of my ncmpcpp setup running in a kitty terminal, with a track change notification visible in the top right corner
These sorts of things are inherently personal. I don’t expect that most people would have my requirements — the lack of functioning software that caters for them must indicate that — but if you do, or if you’re just interested in seeing what a modern text interface player can do on Linux, maybe you will be interested in what I came up with.
I’m one of those strange old-fashioned people who likes owning the music I regularly play, instead of just streaming everything, always. I don’t mind doing a stream search to play something on a whim or to check out new music, but if I think I’ll want to listen to it again then I want to own a copy of it. So I also need something to play music with.
Fill a play queue randomly by album, i.e. queue entire albums at once until some target number of tracks are in the queue. The sort of thing that’s often called a “dynamic playlist” or a “smart playlist” these days.
Have working media keys, i.e. when I press the Play/Pause button or the Next button on my keyboard, that actually happens.
Literally decades ago these needs were met by the likes of Winamp and Amarok; software that’s now consigned to history. Still more than a decade ago on desktop Linux I looked around and couldn’t easily find what I wanted from any of the music apps. I settled on putting my music in mpd and using an mpd client to play it, because that way it was fairly easy to write a script for a dynamic play queue that worked exactly how I wanted it to — the most important requirement.
For a while I used a terminal-based mpd client called ncmpcpp. I’m very comfortable in a Linux terminal so this wasn’t alien to me. It’s very pleasant to use, but being text-based it doesn’t come with the niceties of media key support, album cover art or desktop notifications. The mpd client that I settled upon was GNOME’s built-in gmpc. It’s a very basic player but all it had to do was show the play queue that mpd had provided, and do the media keys, album art and notifications.
Fast forward to December 2023 and I found myself desperately needing to upgrade my Ubuntu 18.04 desktop machine. I switched to Debian 12, which brought with it a new major version of GNOME as well as using Wayland instead of Xorg. And I found that gmpc didn’t work correctly any more! The media keys weren’t doing anything (they work fine in everything else), and I didn’t like the notifications.
I checked out a wide range of media players again. I’m talking Rhythmbox, Clementine, Raspberry, Quod Libet and more. Some of them clearly didn’t do the play queue thing. Others might do, but were incomprehensible to me and lacking in documentation. I think the nearest might have been Rhythmbox which has a plugin that can queue a specified number of random albums. There is an 11 year old GitHub issue asking for it to just continually queue such albums. A bit clunky without that.
I expect some reading this are now shouting at their screens about how their favourite player does actually do what I want. It’s quite possible I was too ignorant to notice it or work out how. Did I mention that quite a lot of this software is not documented at all? Seriously, major pieces of software that just have a web site that is a set of screenshots and a bulleted feature list and …that’s it. I had complained about this on Fedi and got some suggestions for things to try, which I will (and I’ll check out any that are suggested here), but the thing is… I know how shell scripts work now. 😀
Here’s the software I needed to install to make this work on Debian 12. I’m not going to particularly go into the configuration of Debian, GNOME, mpd or ncmpcpp because it doesn’t really matter how you set those up. Just first get to the point where your music is in mpd and you can start ncmpcpp to play it.
In case you weren’t aware, you can arrange for your personal mpd to be started every time you start your desktop environment like this:
$ systemctl --user enable --now mpd
$ systemctl --user enable --now mpd
The --now flag both enables the service and starts it right away.
At this point you should have mpd running and serving your music collection to any mpd client that connects. You can verify this with gmpc which is a very simple graphical mpd client.
This small Go binary listens on the user DBUS for the media keys and issues mpd commands appropriately. If you didn’t want to use this then you could lash up something very simple that executes e.g. “mpc next” or “mpc toggle” when the relevant key is pressed, but this does it all for you. Once you’ve got it from GitHub place the binary in $HOME/bin/, the mpd-mpris.service file from my GitHub at $HOME/.config/systemd/user/mpd-mpris.service and issue:
$ systemctl --user enable --now mpd-mpris
$ systemctl --user enable --now mpd-mpris
Assuming you have a running mpd and mpd client your media keys should now control it. Test that with gmpc or whatever.
Put it in $HOME/.ncmpcpp/. If you don’t like it, just substitute it with any other you like. When it comes time for timg to display it, it will scale it to fit inside the window whatever size it is on your desktop.
Put it in $HOME/.ncmpcpp/. This is a cut-down example ncmpcpp config for the visualizer pane that removes a number of UI elements. It’s just for an ncmpcpp that starts on a visualizer view so feel free to customise it however you like your visualizer to be. You will need to change mpd_music_dir to match where your music is, like in your main ncmpcpp config.
The main app displayed in the screenshot above is a kitty terminal with three windows. The leftmost 75% of the kitty terminal runs ncmpcpp defaulting to the playlist view. In the bottom right corner is a copy of ncmpcpp defaulting to the visualizer view and using the viz.conf. The top right corner is running a shell script that polls for album covert art and displays it in the terminal.
kitty is one of the newer crop of terminals that can display graphics. The timg program will detect kitty‘s graphics support and display a proper graphical image. In the absence of kitty‘s graphical protocol timg will fall back to sixel mode, which may be discernible but I wouldn’t personally want to use it.
I don’t actually use kitty as my day-to-day terminal. I use gnome-terminal and tmux. You can make a layout like this with gnome-terminal and tmux, or even kitty and tmux, but tmux doesn’t support kitty‘s graphical protocol so it would cause a fall back to sixel mode. So for this use and this use alone I use kitty and its built-in windowing support.
Album cover art for Good Vibrations: Thirty Years of The Beach Boys displayed in a kitty terminal using timg
The same cover art file displayed as sixels through tmux
If you don’t want to use kitty then pick whatever terminal you like and figure out how to put some different windows in it (tmux panes work fine, layout-wise). timg will probably fall back to sixels as even the venerable xterm supports that. But assuming you are willing to use kitty, you can start it like this:
That kitty session file is in GitHub with everything else, and it’s what lays things out in the main terminal window. You should now be able to start playing music in ncmpcpp and have everything work.
album_cover_poller.sh uses inotifywait from the inotify-tools package to watch a file in a cache directory. Any time that file changes, it uses timg to display it in the upper right window and queries mpd for the meta data of the currently-playing track.
The /path/to/your/music/dir should be the same as what you have set your music library to in your MPD config. It defaults to $HOME/Music/ if not set.
First it asks mpd for a bunch of metadata about the currently-playing track. Using that it’s able to find the directory in the filesystem where the track file lives. It assumes that if album cover art is available then it will be in this directory and named cover.jpg. If it finds such a file then it copies it to the place where album_cover_poller.sh is expecting to find it. That will trigger that script’s inotifywait to display the new image. If it doesn’t find such a file then a default generic cover art image is used.
(A consequence of this is that it expects each directory in your music library to be for an album, with the cover.jpg being the album covert art. It intentionally doesn’t try to handle layouts like Artist/Track.ogg because it hasn’t got a way to know which file would be for that album. If you use some other layout I’d be interested in hearing about it. An obvious improvement would be to have it look inside each file’s metadata for art in the absence of a cover.jpg in the directory. That would be pretty easy, but it’s not relevant for my use at the moment.)
Secondly, a desktop notification is sent using notify-send. Most modern desktops including GNOME come with support for showing such notifications. Exactly how they look and the degree to which you can configure that depends upon your desktop environment. For GNOME, the answer is “like ass“, and “not at all without changing notification daemon,” but that’s the case for every notification on the system so is a bit out of scope for this article.
A good experience relies on there being correct metadata and files in the expected directory structure. It’s pretty common for music I buy to have junk metadata, and moving things into place would be tedious even when the metadata is correct. MusicBrainz Picard to the rescue!
It’s great at fixing metadata and then moving files en masse to my chosen directory structure. It can even be told for example that if the current track artist differs from the album artist then it should save the file out to “${album_artist}/${track_number}-${track_artist}-${track title}.mp3” so that a directory listing of a large “Various Artists” compilation album looks nice.
It also finds and saves album cover art for me.
It’s packaged in Debian.
I hear good things about beets, too, but have never tried it.
Picard is pretty good at finding album cover art but sometimes it can’t manage it, or it chooses sub-par images. I like the Python app sacad which tries really hard to find good quality album art and works on masses of directories at once.
I really don’t like the default GNOME desktop notifications. On a 4K display they are tiny unless you crank up the general font size, in which case your entire desktop then looks like a toddler’s toy. Not only is their text tiny but they don’t hold much content either. When most track title notifications are ellipsized I start to wonder what the point is.
I replaced GNOME’s notification daemon with wired-notify, which is extremely configurable. I did have to clone it out of GitHub, install the rust toolchain and cargo build it, however.
My track change script that I talk about above will issue notifications that work on stock GNOME just as well as any other app’s notifications, but I prefer the wired-notify ones. Here’s an unscaled example.
If there’s any music files with tabs or newlines in any of their metadata, the scripts are going to blow up. I’m not sure of the best way to handle that one. mpc can’t format output NULL-separated like you’d do with GNU find. I’m not sure there is any character you can make it use in a format that is banned in metadata. I think worst case is simply messed up display and/or no cover art displayed, and I’d regard tabs and newlines in track metadata as a data error that I’d want to fix, so maybe I don’t care too much.
timg is supposed to scale and centre the image in the terminal, and the kitty window does resize to keep it at 25% width, 50% height, but timg is sometimes visibly a little off-centre. No ideas at the moment how to improve that.
mpd is a networked application — while by default it listens only on localhost, you can configure it to listen on any or all interfaces and be available over your local network or even the Internet. All of these scripts rely on your mpd client, in this case ncmpcpp, having direct access to the music library and its files, which is probably not going to be the case for a non-localhost mpd server. I can think of various tricky ways to handle this, but again it’s not relevant to my situation at present.
The machine these are in is a fileserver at my home. The four 320GB HDDs are what the operating system is installed on, whereas the hodge podge assortment of differently-sized HDDs and SSDs are the main storage for files.
That is not the most performant way to do things, but it’s only at home and doesn’t need best performance. It mostly just uses up discarded storage from other machines as they get replaced.
sdd has seen every release of Debian since 4.0 (etch) and several iterations of hardware, but this can’t go on much longer. The machine that the four 320GB HDDs are in now is very underpowered but any replacement I can think of won’t be needing four 3.5″ SATA devices inside it. More like 2x 2.5″ NVMe or M.2.
Then again, I’ve been saying that it must be replaced for about 5 years now, so who knows how long it will take me. sdd will definitely reach 120,000 hours barring hardware failure in the next month.
BitFolk‘s Rescue VM is a live system based on the Debian Live project. You boot it, it finds its root filesystem over read-only NFS, and then it mounts a unionfs RAM disk over that so that you can make changes (e.g. install packages) that don’t persist. People generally use it to repair broken operating systems, reset root passwords etc.
Every few years I have to rebuild it, because it’s important that it’s new enough to be able to effectively poke around in guest filesystems. Each time I have to try to remember how I did it. It’s not that difficult but it’s well past time that I document how it’s done.
Pick a host running at least the latest Debian stable. It might be possible to build a live image for a newer version of Debian, but the live-build system and its dependencies like debootstrap might end up being too old.
The variables at the top just save me having to repeat myself for all the mirrors. They make both the build process and the resulting image use BitFolk’s apt-cacher to proxy the deb.debian.org mirror.
I’m not going to describe every config option as you can just look them up in the man page. The most important one is --binary-images netboot to make sure it builds an image that can be booted by network.
I want the rescue system to be Debian 11 (bullseye), but with a bullseye-backports kernel.
We already used --backports true to make sure that we have access to the backports package mirrors but we need to run a script hook to actually install the backports kernel in the image while it’s being built.
This image will only be booted on one network where I know what the nameservers are, so may as well statically override them. If you were building an image to use on different networks you’d probably instead want to use one of the public resolvers or accept what DHCP gives you.
Set an explanatory footer text in /etc/issue.footer ^
The people using this rescue image don’t necessarily know what it is and how to use it. I take the opportunity to put some basic info in the file /etc/issue.footer in the image, which will later end up in the real /etc/issue
$ sudo tee config/includes.chroot/etc/issue.footer >/dev/null <<_EOF_
BitFolk Rescue Environment - https://tools.bitfolk.com/wiki/Rescue

Blah blah about what this is and how to use it
_EOF_
$ sudo tee config/includes.chroot/etc/issue.footer >/dev/null <<_EOF_
BitFolk Rescue Environment - https://tools.bitfolk.com/wiki/Rescue
Blah blah about what this is and how to use it
_EOF_
By default a Debian Live image has a user name of “user” and a password of “live“. This isn’t suitable for a networked service that will have sshd active from the start, so we will install a hook script that sets a random password. This will be run near the end of the image’s boot process.
$ sudotee config/includes.chroot/lib/live/config/2000-passwd >/dev/null <<'_EOF_'#!/bin/shset-eecho-n" random-password "NEWPASS=$(/usr/bin/pwgen -c-N1)printf"user:%s\n""$NEWPASS"| chpasswd
RED='\033[0;31m'NORMAL='\033[0m'{printf"****************************************\n";
printf"Resetting user password to random value:\n";
printf"\t${RED}New user password:${NORMAL} %s\n""$NEWPASS";
printf"****************************************\n";
cat/etc/issue.footer
}>>/etc/issue
_EOF_
$ sudo tee config/includes.chroot/lib/live/config/2000-passwd >/dev/null <<'_EOF_'
#!/bin/sh

set -e

echo -n " random-password "

NEWPASS=$(/usr/bin/pwgen -c -N 1)
printf "user:%s\n" "$NEWPASS" | chpasswd

RED='\033[0;31m'
NORMAL='\033[0m'

{
    printf "****************************************\n";
    printf "Resetting user password to random value:\n";
    printf "\t${RED}New user password:${NORMAL} %s\n" "$NEWPASS";
    printf "****************************************\n";
    cat /etc/issue.footer
} >> /etc/issue
_EOF_
This script puts the random password and the footer text into the /etc/issue file which is displayed above the console login prompt, so the user can see what the password is.
This one’s a bit unfortunate and is a huge hack, but I’m not sure enough of the details to report a bug yet.
The live image when booted is supposed to be able to set up its network by a number of different ways. DHCP would be the most sensible for an image you take with you to different networks.
The BitFolk Rescue VM is only ever booted in one network though, and we don’t use DHCP. I want to set static networking through the ip=…s syntax of the kernel command line.
Unfortunately it doesn’t seem to work properly with live-boot as shipped. I had to hack the /lib/live/boot/9990-networking.sh file to make it parse the values out of the kernel command line.
Here’s a diff. Copy /lib/live/boot/9990-networking.sh to config/includes.chroot/usr/lib/live/boot/9990-networking.sh and then apply that patch to it.
It’s simple enough that you could probably edit it by hand. All it does is comment out one section and replace it with some bits that parse IP setup out of the $STATICIP variable.
Again this is a horrible hack and I’m sure there is a better way to handle it, but I couldn’t work out anything better and this works.
This image will be running with its root filesystem on NFS. When a shutdown or halt command is issued however, systemd seems extremely keen to shut off the network as soon as possible. That leaves the shutdown process unable to continue because it can’t read or write its root filesystem any more. The shutdown process stalls forever.
As this is a read-only system with no persistent state I don’t care how brutal the shutdown process is. I care more that it does actually shut down. So, I have added a systemd service that issues systemctl –force –force poweroff any time that it’s about to shut down by any means.
$ sudo tee config/includes.chroot/etc/systemd/system/always-brutally-poweroff.service >/dev/null <<_EOF_
[Unit]
Description=Every kind of shutdown will be brutal poweroff
DefaultDependencies=no
After=final.target

[Service]
Type=oneshot
ExecStart=/usr/bin/systemctl --force --force poweroff

[Install]
WantedBy=final.target
_EOF_
$ sudo tee config/includes.chroot/etc/systemd/system/always-brutally-poweroff.service >/dev/null <<_EOF_
[Unit]
Description=Every kind of shutdown will be brutal poweroff
DefaultDependencies=no
After=final.target
[Service]
Type=oneshot
ExecStart=/usr/bin/systemctl --force --force poweroff
[Install]
WantedBy=final.target
_EOF_
The details of exactly how I boot the client side (which in BitFolk’s case is a customer VM) are out of scope here, but this is sort of what the kernel command line looks like on the client (normally all on one line):
There’s a few things in here which are hacks. What I have works but no doubt I am doing some things wrong. If you know better please do let me know in comments or whatever. Ideally I’d like to stick with Debian Live though because it’s got a lot of problems solved already.
The recent security update of the GRUB bootloader did not want to install on my fileserver at home:
$ sudo apt dist-upgrade
Reading package lists... Done
Building dependency tree
Reading state information... Done
Calculating upgrade... Done
The following packages will be upgraded:
  grub-common grub-pc grub-pc-bin grub2-common
4 upgraded, 0 newly installed, 0 to remove and 0 not upgraded.
Need to get 4,067 kB of archives.
After this operation, 72.7 kB of additional disk space will be used.
Do you want to continue? [Y/n]
…
Setting up grub-pc (2.02+dfsg1-20+deb10u4) ...
Installing for i386-pc platform.
grub-install: warning: your core.img is unusually large.  It won't fit in the embedding area.
grub-install: error: embedding is not possible, but this is required for RAID and LVM install.
Installing for i386-pc platform.
grub-install: warning: your core.img is unusually large.  It won't fit in the embedding area.
grub-install: error: embedding is not possible, but this is required for RAID and LVM install.
Installing for i386-pc platform.
grub-install: warning: your core.img is unusually large.  It won't fit in the embedding area.
grub-install: error: embedding is not possible, but this is required for RAID and LVM install.
Installing for i386-pc platform.
grub-install: warning: your core.img is unusually large.  It won't fit in the embedding area.
grub-install: error: embedding is not possible, but this is required for RAID and LVM install.
$ sudo apt dist-upgrade
Reading package lists... Done
Building dependency tree
Reading state information... Done
Calculating upgrade... Done
The following packages will be upgraded:
grub-common grub-pc grub-pc-bin grub2-common
4 upgraded, 0 newly installed, 0 to remove and 0 not upgraded.
Need to get 4,067 kB of archives.
After this operation, 72.7 kB of additional disk space will be used.
Do you want to continue? [Y/n]
…
Setting up grub-pc (2.02+dfsg1-20+deb10u4) ...
Installing for i386-pc platform.
grub-install: warning: your core.img is unusually large. It won't fit in the embedding area.
grub-install: error: embedding is not possible, but this is required for RAID and LVM install.
Installing for i386-pc platform.
grub-install: warning: your core.img is unusually large. It won't fit in the embedding area.
grub-install: error: embedding is not possible, but this is required for RAID and LVM install.
Installing for i386-pc platform.
grub-install: warning: your core.img is unusually large. It won't fit in the embedding area.
grub-install: error: embedding is not possible, but this is required for RAID and LVM install.
Installing for i386-pc platform.
grub-install: warning: your core.img is unusually large. It won't fit in the embedding area.
grub-install: error: embedding is not possible, but this is required for RAID and LVM install.
Four identical error messages, because this server has four drives upon which the operating system is installed, and I’d decided to do a four way RAID-1 of a small first partition to make up /boot. This error is coming from grub-install.
This system came to life in 2006, so it’s 15 years old. It’s always been Debian stable, so right now it runs Debian buster and during those 15 years it’s been transplanted into several different iterations of hardware.
Choices were made in 2006 that were reasonable for 2006, but it’s not 2006 now. Some of these choices are now causing problems.
Aside: four way RAID-1 might seem excessive, but we’re only talking about the small /boot partition. Back in 2006 I chose a ~256M one so if I did the minimal thing of only having a RAID-1 pair I’d have 2x 256M spare on the two other drives, which isn’t very useful. I’d honestly rather have all four system drives with the same partition table and there’s hardly ever writes to /boot anyway.
Here’s what the identical partition tables of the drives /dev/sd[abcd] look like:
$ sudo fdisk -u -l /dev/sda
Disk /dev/sda: 298.1 GiB, 320069031424 bytes, 625134827 sectors
Disk model: ST3320620AS
Units: sectors of 1 * 512 = 512 bytes
Sector size (logical/physical): 512 bytes / 512 bytes
I/O size (minimum/optimal): 512 bytes / 512 bytes
Disklabel type: dos
Disk identifier: 0x00000000

Device     Boot   Start       End   Sectors  Size Id Type
/dev/sda1  *         63    514079    514017  251M fd Linux raid autodetect
/dev/sda2        514080   6393869   5879790  2.8G fd Linux raid autodetect
/dev/sda3       6393870 625121279 618727410  295G fd Linux raid autodetect
$ sudo fdisk -u -l /dev/sda
Disk /dev/sda: 298.1 GiB, 320069031424 bytes, 625134827 sectors
Disk model: ST3320620AS
Units: sectors of 1 * 512 = 512 bytes
Sector size (logical/physical): 512 bytes / 512 bytes
I/O size (minimum/optimal): 512 bytes / 512 bytes
Disklabel type: dos
Disk identifier: 0x00000000
Device Boot Start End Sectors Size Id Type
/dev/sda1 * 63 514079 514017 251M fd Linux raid autodetect
/dev/sda2 514080 6393869 5879790 2.8G fd Linux raid autodetect
/dev/sda3 6393870 625121279 618727410 295G fd Linux raid autodetect
Note that the first partition starts at sector 63, 32,256 bytes into the disk. Modern partition tools tend to start partitions at sector 2,048 (1,024KiB in), but this was acceptable in 2006 for me and worked up until a few days ago.
Those four partitions /dev/sd[abcd]1 make up an mdadm RAID-1 with metadata version 0.90. This was purposefully chosen because at the time of install GRUB did not have RAID support. This metadata version lives at the end of the member device so anything that just reads the device can pretend it’s an ext2 filesystem. That’s what people did many years ago to boot off of software RAID.
The last successful update of grub-pc seems to have been done on 7 February 2021:
$ ls -la /boot/grub/i386-pc/core.img
-rw-r--r-- 1 root root 31082 Feb  7 17:19 /boot/grub/i386-pc/core.img
$ ls -la /boot/grub/i386-pc/core.img
-rw-r--r-- 1 root root 31082 Feb 7 17:19 /boot/grub/i386-pc/core.img
I’ve got 62 sectors available for the core.img so that’s 31,744 bytes – just 662 bytes more than what is required.
The update of grub-pc appears to be detecting that my /boot partition is on a software RAID and is now including MD RAID support even though I don’t strictly require it. This makes the core.img larger than the space I have available for it.
I don’t think it is great that such a major change has been introduced as a security update, and it doesn’t seem like there is any easy way to tell it not to include the MD RAID support, but I’m sure everyone is doing their best here and it’s more important to get the security update out.
Option #1 is okay short term, especially if you don’t use Secure Boot as that’s what the security update was about.
Option #2 doesn’t seem that feasible as I can’t find a way to influence how Debian’s upgrade process calls grub-install. I don’t want that to become a manual process.
Option #3 seems like the easiest thing to do, as shaving ~1MiB off the size of my /boot isn’t going to cause me any issues.
At this point I would also recommend doing a wipefs -a on each of the partitions in order to remove the MD superblocks. I didn’t and it caused me a slight problem later as we shall see.
Delete and recreate first partition on each drive ^
I chose to use parted, but should be doable with fdisk or sfdisk or whatever you prefer.
I know from the fdisk output way above that the new partition needs to start at sector 2048 and end at sector 514,079.
$ sudo parted /dev/sda
GNU Parted 3.2
Using /dev/sda
Welcome to GNU Parted! Type 'help' to view a list of commands.
(parted) unit s
(parted) rm 1
(parted) mkpart primary ext4 2048 514079s
(parted) set 1 raid on
(parted) set 1 boot on
(parted) p
Model: ATA ST3320620AS (scsi)
Disk /dev/sda: 625134827s
Sector size (logical/physical): 512B/512B
Partition Table: msdos
Disk Flags:

Number  Start     End         Size        Type     File system  Flags
 1      2048s     514079s     512032s     primary  ext4         boot, raid, lba
 2      514080s   6393869s    5879790s    primary               raid
 3      6393870s  625121279s  618727410s  primary               raid

(parted) q
Information: You may need to update /etc/fstab.
$ sudo parted /dev/sda
GNU Parted 3.2
Using /dev/sda
Welcome to GNU Parted! Type 'help' to view a list of commands.
(parted) unit s
(parted) rm 1
(parted) mkpart primary ext4 2048 514079s
(parted) set 1 raid on
(parted) set 1 boot on
(parted) p
Model: ATA ST3320620AS (scsi)
Disk /dev/sda: 625134827s
Sector size (logical/physical): 512B/512B
Partition Table: msdos
Disk Flags:
Number Start End Size Type File system Flags
1 2048s 514079s 512032s primary ext4 boot, raid, lba
2 514080s 6393869s 5879790s primary raid
3 6393870s 625121279s 618727410s primary raid
(parted) q
Information: You may need to update /etc/fstab.
Do that for each drive in turn. When I got to /dev/sdd, this happened:
Error: Partition(s) 1 on /dev/sdd have been written, but we have been unable to
inform the kernel of the change, probably because it/they are in use.  As a result,
the old partition(s) will remain in use.  You should reboot now before making further changes.
Ignore/Cancel?
Error: Partition(s) 1 on /dev/sdd have been written, but we have been unable to
inform the kernel of the change, probably because it/they are in use. As a result,
the old partition(s) will remain in use. You should reboot now before making further changes.
Ignore/Cancel?
The reason for this seems to be that something has decided that there is still a RAID signature on /dev/sdd1 and so it will try to incrementally assemble the RAID-1 automatically in the background. This is why I recommend a wipefs of each member device.
To get out of this situation without rebooting I needed to repeat my mdadm --stop /dev/md0 command and then do a wipefs -a /dev/sdd1. I was then able to partition it with parted.
My /etc/fstab didn’t need a change because it mounted by device name, i.e. /dev/md0, but if yours uses UUID or label then you’ll need to update that now, too.
You probably should reboot now to make sure it all works when you have time to fix any problems, as opposed to risking issues when you least expect it.
$ uprecords
     #               Uptime | System                                     Boot up
----------------------------+---------------------------------------------------
     1   392 days, 16:45:55 | Linux 4.7.0               Thu Jun 14 16:13:52 2018
     2   325 days, 03:20:18 | Linux 3.16.0-0.bpo.4-amd  Wed Apr  1 14:43:32 2015
->   3   287 days, 16:03:12 | Linux 4.19.0-9-amd64      Fri May 22 12:33:27 2020     4   257 days, 07:31:42 | Linux 4.19.0-6-amd64      Sun Sep  8 05:00:38 2019
     5   246 days, 14:45:10 | Linux 4.7.0               Sat Aug  6 06:27:52 2016
     6   165 days, 01:24:22 | Linux 4.5.0-rc4-specialb  Sat Feb 20 18:18:47 2016
     7   131 days, 18:27:51 | Linux 3.16.0              Tue Sep 16 08:01:05 2014
     8    89 days, 16:01:40 | Linux 4.7.0               Fri May 26 18:28:40 2017
     9    85 days, 17:33:51 | Linux 4.7.0               Mon Feb 19 17:17:39 2018
    10    63 days, 18:57:12 | Linux 3.16.0-0.bpo.4-amd  Mon Jan 26 02:33:47 2015
----------------------------+---------------------------------------------------
1up in    37 days, 11:17:07 | at                        Mon Apr 12 15:53:46 2021
no1 in   105 days, 00:42:44 | at                        Sat Jun 19 05:19:23 2021
    up  2362 days, 06:33:25 | since                     Tue Sep 16 08:01:05 2014
  down     0 days, 14:02:09 | since                     Tue Sep 16 08:01:05 2014
   %up               99.975 | since                     Tue Sep 16 08:01:05 2014
$ uprecords
# Uptime | System Boot up
----------------------------+---------------------------------------------------
1 392 days, 16:45:55 | Linux 4.7.0 Thu Jun 14 16:13:52 2018
2 325 days, 03:20:18 | Linux 3.16.0-0.bpo.4-amd Wed Apr 1 14:43:32 2015
-> 3 287 days, 16:03:12 | Linux 4.19.0-9-amd64 Fri May 22 12:33:27 2020
4 257 days, 07:31:42 | Linux 4.19.0-6-amd64 Sun Sep 8 05:00:38 2019
5 246 days, 14:45:10 | Linux 4.7.0 Sat Aug 6 06:27:52 2016
6 165 days, 01:24:22 | Linux 4.5.0-rc4-specialb Sat Feb 20 18:18:47 2016
7 131 days, 18:27:51 | Linux 3.16.0 Tue Sep 16 08:01:05 2014
8 89 days, 16:01:40 | Linux 4.7.0 Fri May 26 18:28:40 2017
9 85 days, 17:33:51 | Linux 4.7.0 Mon Feb 19 17:17:39 2018
10 63 days, 18:57:12 | Linux 3.16.0-0.bpo.4-amd Mon Jan 26 02:33:47 2015
----------------------------+---------------------------------------------------
1up in 37 days, 11:17:07 | at Mon Apr 12 15:53:46 2021
no1 in 105 days, 00:42:44 | at Sat Jun 19 05:19:23 2021
up 2362 days, 06:33:25 | since Tue Sep 16 08:01:05 2014
down 0 days, 14:02:09 | since Tue Sep 16 08:01:05 2014
%up 99.975 | since Tue Sep 16 08:01:05 2014
Sometimes you only want services to start up once there is a network configured. Most network services can handle the situation where there is initially no network, waiting until the network appears, because this is a very common situation.
Other services though may not in themselves be expecting to use the network, and so have never thought about it. Also a great thing about open source software is that it tends to be very composable, so it’s not possible to predict the ways that people will use combinations of software.
systemd will tend to start things as soon as it can. If your service is not configured to wait for the network that means it will most likely be started up before the network exists. If your service then tries to do something that requires a network it will receive an error, which it may not be prepared to handle.
As you can see there’s nothing in there that says to wait for a network.
I use a database plugin for ulogd2 that makes it log to a (remote) database. As a consequence as soon as it starts up it tries to establish a database connection, immediately fails as there is no route to any remote host, retries a few times and then bails out.
Most of the time it exhausts its retries before the network is up, so the result is that the service is in a failed state. Simply manually starting the service (or having config management do it) resolves that, but that’s a mess.
Ideally I don’t want systemd to start ulogd2 until there is a network.
If like me you know just enough about systemd to be dangerous, you figure that what you want to do is add something like this to the [Unit] section of the service unit file:
The thing about the network-online target is that it doesn’t exist unless you’re using a “modern” method of bringing up your networking, like NetworkManager or systemd-networkd.
If you’re not doing that then systemd works out that the network-online target can never be reached and ignores it as a Want.
I’m using ifupdown on servers as it still does everything I need it to. To make ifupdown support the network-online target on Debian, you should enable the ifupdown-wait-online service:
The temptation now may be to edit the ulogd2 service file that’s under /lib/systemd/system/ to contain the Want/After bits.
That will work but it isn’t the correct way because if there is a package update then your changes will be overwritten.
A better way is to place a new service file into /etc/systemd/system/. That will entirely override the distributed copy. The obvious downside there is that if there’s an improvement to the packaged service file then you’ll never use it, as you’ve entirely overridden it with your own file.
Since this was posted on 2020-09-13 there was some interest in the comments and on Hacker News and I learned some things which required updates. I’ve tried to indicate them with struck out text.
Of particular note is the re-add method of removing BBLs.
MD is the Linux kernel driver that is used for running software RAID arrays. mdadm is the software that you run to manage MD devices. They are both part of the same project.
Since about 2010, MD has had a bad blocks log (BBL) feature. When it fails to read from an underlying device it will (sometimes?) mark that block as bad and read the correct data from a different device, and then forever more redirect reads away from those bad blocks. This feature defaults to being on.
One problem with this feature is that read errors can occur for many reasons besides permanent failure of part of a storage device. For example, it could be a failure of the backplane or controller that causes many read errors on multiple devices, or the devices could be reached over a network of some sort and temporary network problems could propagate errors.
Even if the particular part of the device is unreadable, the operating system is supposed to try to write the correct data over the top. This write will either clear the problem or else be redirected to a spare sector on the drive by the drive’s firmware. The operating system is not supposed to be taking on this role, the drives are, and when the drives fail to do so then the redundancy of the array is supposed to save the day.
Even worse, there are apparently bugs somewhere in the BBL code that cause a device’s BBL to be copied onto a new device when the array is rebuilt or a device replaced. Clearly it does not make sense for a new device to get a copy of another device’s BBL because they are inherently a per-device thing. So far there has been no successful intentional reproduction of this, only people unwittingly hitting it at the worst possible moments.It has been reproduced that adding or replacing a device results in a BBL being copied. I am not aware of a formal bug report for this yet.
mdadm doesn’t even try particularly hard to warn you if a new bad block is found. Unlike when a device fails, it doesn’t send you an email. The MD driver writes in the syslog about the bad block(s). There’s also no change to /proc/mdstat. You have to examine some files in sysfs.
I’ll say right now that this story doesn’t (yet?) have a satisfying ending.
I’ve been aware of the “Bad Blocks Controversy” for about 5 years but I haven’t ever personally experienced any problems and it was always at the bottom of my list to look at. Roy’s recent thread spurred me into deciding that in future no MD array I created would have a BBL.
Currently the only way to remove a BBL from an array component is to stop the array and then assemble it with an argument like this:
There are two ways to remove the BBL from the devices of existing arrays.
Fail and re-add each device with update
It doesn’t seem to be documented anywhere, but you can fail a device out of an array and re-add it with an update to remove the BBL on that device, like this:
# mdadm --fail /dev/md0 /dev/sdb1 \
        --remove /dev/sdb1 \
        --re-add /dev/sdb1 \
        --update=no-bbl
mdadm: set /dev/sdb1 faulty in /dev/md0
mdadm: hot removed /dev/sdb1 from /dev/md0
mdadm: re-added /dev/sdb1
# mdadm --fail /dev/md0 /dev/sdb1 \
--remove /dev/sdb1 \
--re-add /dev/sdb1 \
--update=no-bbl
mdadm: set /dev/sdb1 faulty in /dev/md0
mdadm: hot removed /dev/sdb1 from /dev/md0
mdadm: re-added /dev/sdb1
This will only work if your array has a bitmap, otherwise it will refuse to re-add. Most arrays do get a bitmap, but small arrays won’t by default. Fortunately you can easily add a bitmap like this:
# mdadm --grow --bitmap=internal /dev/md0
# mdadm --grow --bitmap=internal /dev/md0
The downside of this approach is that your array will have reduced redundancy while it rebuilds. It should rebuild pretty quickly though as the bitmap will cause only changed parts to be rewritten.
The other way to remove BBL from devices is to stop the array and assemble it manually like this:
# mdadm --assemble /dev/mdX --update=no-bbl
# mdadm --assemble /dev/mdX --update=no-bbl
The big problem with this is that stopping the array obviously causes downtime for whatever is using it. If your root filesystem is on an MD array (and why wouldn’t it be, if you use MD?) then that means the entire server, and you’re having to do this from sort of rescue environment.
I have suggested that a config option be added to remove a BBL on assembly, so that this will happen the next time the machine is rebooted. This does not appear to have provoked any interest.
This method is quicker since it operates on all devices and doesn’t require a rebuild, but personally I usually find downtime more painful so I’d be inclined to schedule an “at-risk” maintenance window and do it the re-add way.
So if the BBL cannot be easily removed, at least it can be prevented from ever existing, right? When Neil Brown, the previous MD maintainer, was asked in 2016 if the feature could be defaulted to off, Neil said that putting this in the config file was as good as that:
CREATE bbl=no
CREATE bbl=no
The thing is, it’s not as good as disabling it by default when you consider what many users’ experience is of running the mdadm command: they don’t run mdadm, something else runs it for them. I’d go as far as to say that the majority of uses of mdadm are done by helper scripts and installers, not by human beings.
If it’s a program that is running mdadm for you then you are going to have to find out how to set that mdadm.conf before it reads it.
Take for example my own process of installing Debian. I do it by booting the Debian Installerby PXE. I have some pre-seeding done to answer a lot of the installer questions, but actually I do still do the disk partitioning stage in the installer’s text interface.
So there I was thinking this is actually going to be quite simple, because the Debian Installer is really lovely about letting you execute a shell and poke around. Surely all I am going to need to do is open a shell once and edit /etc/mdadm/mdadm.conf and then go back into the mdcfg menu and carry on, right? Oh dear me no.
You can read the details of my wild ride that involved me uploading a binary of strace into the d-i to run mdadm under to work out what was going on, but just the relevant discoveries are in this article for those who’d rather not.
mdadm in d-i uses a config file at /tmp/mdadm.conf
(At this point a number of people responded, “that’s because everything else will be set read-only.” That’s not the case with debian-installer which runs entirely off of a tmpfs. It’s all writeable.)
If you’re on something with multiple virtual consoles (like if you’re sitting in front of a conventional PC) then you could switch to one of those after you’ve entered the MD configuration part and modify /tmp/mdadm.conf then. I don’t have that option because I’m on a serial console.
I thought I didn’t have that option because I’m on a serial console, but it was pointed out to me that when the Debian installer detects it’s running in a serial console it runs itself under GNU Screen. So, by using the usual screen commands of ctrl+a n or ctrl+a p, one can switch backwards and forwards through the different virtual consoles. Neat!
There is also an earlier option to load an installer component that enables one to continue the installation process over SSH. If you select that then you can SSH in to the running installer system so if you do that after you’ve entered the MD configuration bit in your main console then I guess you can then edit the config file and continue.
By one of those methods of getting a shell, after you’ve already entered the array configuration part but before you’ve actually created any arrays, I think you could edit /tmp/mdadm.conf to have “CREATE bbl=no” and the installer’s mdadm binary would respect that when you switch back.
Alternatively you could just use the shell to create your arrays instead of using the Ddebian installer to do it. If it’s a simple case where you’ve just got an sda and an sdb disk identically partitioned and you want to make a bunch of arrays on them, it can be a fairly legible shell session like:
~ # mkdir -vp /etc/mdadm && echo "CREATE bbl=no" > /etc/mdadm/mdadm.conf
~ # for part in 1 2 3 5; do \
      mdadm --create \
            -v \
            --config=/etc/mdadm/mdadm.conf \
            /dev/md${part} \
            --level=1 \
            --raid-devices=2 \
            /dev/sd[ab]${part}; \
    done
~ # mkdir -vp /etc/mdadm && echo "CREATE bbl=no" > /etc/mdadm/mdadm.conf
~ # for part in 1 2 3 5; do \
mdadm --create \
-v \
--config=/etc/mdadm/mdadm.conf \
/dev/md${part} \
--level=1 \
--raid-devices=2 \
/dev/sd[ab]${part}; \
done
Do not try this until you understand exactly what it is doing.
It iterates the list 1, 2, 3, 5 (I use the 4th partition for something else) and makes arrays called mdX out of sdaX and sdbX. The mdadm binary is forced to use our config file that disables creation of a BBL.
You can verify that a BBL does not exist on any of the array components like this:
~ # mdadm --examine-badblocks /dev/sda1
No bad-blocks list configured on /dev/sda1
~ # mdadm --examine-badblocks /dev/sda1
No bad-blocks list configured on /dev/sda1
You should get identical output for every component. If a component did have a BBL it would output something like this:
~ # mdadm --examine-badblocks /dev/sda1
Bad-blocks list is empty in /dev/sda1
~ # mdadm --examine-badblocks /dev/sda1
Bad-blocks list is empty in /dev/sda1
You can then exit the d-i shell and go back to the disk partitioning section. You won’t need the MD configuration part now but even if you do go into it, it should detect all your manually-created arrays.
All of this isn’t great but at least it’s fairly easy to pause the Debian installer and take some manual action. I suspect users of other Linux distributions may not be so lucky, and so I too think it would be a good idea if this buggy feature was disabled by default, or at least if there were a way to tell mdadm to remove the BBL on assembly.
In fact I would very much like to be able to tell it to remove the BBL on assembly so that I can disable the BBL feature on all my existing servers.
mdadm actually gets called by udev from inside the initramfs in incremental assembly mode, so I think the incremental assembly code needs to look in the config file for this “remove all the BBLs” directive and do it then during assembly as if update=no-bbl had been specified on a command line.
It should be possible to write a script that:
Looks in /sys/block/md* to find device components of all arrays.
Checks each one to see if it has a BBL.
If any are found, add a bitmap if necessary.
Do the fail/remove/re-add trick on each one in turn, waiting for the array to go back into sync each time.
i.e. it should be possible to automate this and run it at the end of an install so the entire install process can remain automated, or run it on a host any time after it’s been provisioned.
A lot of machines — especially virtual machines — don’t have access to a lot of entropy when they start up, and now that systemd isn’t accrediting stored entropy from the previous boot some essential services like ssh may take minutes to start up.
Back in 2011 or so, Intel added a CPU instruction called RDRAND which provides entropy, but there was some concern that it was an unauditable feature that could easily have been compromised, so it never did get used as the sole source of entropy on capable CPUs.
Out of interest I had a look at what effect the various kernel options related to RDRAND would have, and also what about when I use BitFolk’s entropy service.
(As of July 2019 this wiki article is in dire need of rewrite since I believe it states some untrue things about urandom, but the details of what the entropy service is and how to use it are correct)
These experiments were carried out on a virtual machine which is a default install of Debian 10 (buster) on BitFolk. At package selection only “Standard system utilities” and “SSH server” were selected.
If I tell the kernel not to trust RDRAND for early entropy by using random.trust_cpu=off on the kernel command line then SSH is available after about 4.5 seconds.
[    1.115416] random: get_random_bytes called from start_kernel+0x93/0x52c with crng_init=0
[    1.231606] random: fast init done
[    4.260130] random: systemd-random-: uninitialized urandom read (512 bytes read)
[    4.484274] random: crng init done
[ 1.115416] random: get_random_bytes called from start_kernel+0x93/0x52c with crng_init=0
[ 1.231606] random: fast init done
[ 4.260130] random: systemd-random-: uninitialized urandom read (512 bytes read)
[ 4.484274] random: crng init done
If I disable RDRAND but use BitFolk’s entropy service then SSH is available in just over 10 seconds. I suppose this is slower than with random.trust_cpu=off because in that case RDRAND is still allowed after initial seeding, and we must wait for a userland daemon to start.
Using the entropy service requires the network to be up so I’m not sure how easy it would be to decrease this delay, but 10 seconds is still a lot better than 49 seconds.
Use entropy service but don’t trust CPU for early seeding ^
This was no different to just random.trust_cpu=off (about 4.5s). I suspect because early seeding completed and then RDRAND supplied more entropy before the network came up and the entropy service daemon could start.
I’m glad that my CPUs have RDRAND and I’m prepared to use it for boot-time seeding of the CSPRNG, but not as the machines’ sole entropy source.
With RDRAND available, using the BitFolk entropy service probably doesn’t make that much sense as RDRAND will always be able to supply.
More paranoid customers may want to use random.trust_cpu=off but even then probably don’t need the entropy service since once the CSPRNG is seeded, RDRAND can be mixed in and away they go.
The truly paranoid may want to disable RDRAND in which case using the entropy service would be recommended since otherwise long delays at boot will happen and severe delays during times of high entropy demand could be seen.
For those who aren’t BitFolk customers and don’t have access to hardware entropy sources and don’t have a CPU with RDRAND support there are some tough choices. Every other option listed on Debian’s relevant wiki article has at least one expert who says it’s a bad choice.
I already use a Lua script with haproxy which takes care of automatically answering http-01 ACME challenges, but to issue/renew a wildcard certificate you need to answer a dns-01 challenge. A different client/setup would be needed.
Most of the clients that support ACME v2 offer a range of integrations for DNS providers, plus a manual mode that prints out the DNS record that you need to add and then waits for you to indicate that you’ve done it. I run my own DNS infrastructure so the thing to do would be RFC2136 dynamic DNS updates.
One wrinkle here is that currently none of my DNS zones have dynamic updates enabled. At the moment I manage them as zone files (some are automatically generated by scripts though). After looking at a few of the client options I found that acme.sh supports an “alias zone”.
Basically, in your main zone you create a CNAME for the challenge record that points at another zone, and then enable dynamic updates in that other zone. The other zone is dedicated for this purpose, so the only updates which will be happening will be for the purpose of answering dns-01 ACME challenges. I made my dynamic zone a sub-zone of my main one:
These records need to be added to the main zone for this to work.
.
.
.
; sub-zone purely used for dns-01 ACME challenges.
acmesh          NS a.authns.bitfolk.co.uk.
                NS b.authns.bitfolk.com.
                NS c.authns.bitfolk.com.

; Alias the dns-01 challenge record into the dedicated zone.
_acme-challenge CNAME _acme-challenge.acmesh.strugglers.net.
.
.
.
.
.
.
; sub-zone purely used for dns-01 ACME challenges.
acmesh NS a.authns.bitfolk.co.uk.
NS b.authns.bitfolk.com.
NS c.authns.bitfolk.com.
; Alias the dns-01 challenge record into the dedicated zone.
_acme-challenge CNAME _acme-challenge.acmesh.strugglers.net.
.
.
.
The DNS server needs to know a key by which it will authenticate acme.sh‘s updates, and also needs to be told that the new zone is a dynamic zone. I use BIND, so it goes as follows.
The thing in quotes after “key” is a symbolic name for this key and can be anything that makes sense to you. The “secret” is the key from the private file. You can delete the two Kddns_update.+165+14059.* files now.
Once BIND has been reloaded the log file should indicate that the acemsh.strugglers.net zone was loaded correctly, and in my case that triggers DNS NOTIFY to my secondary servers which automatically begin zone transfers.
At this point it might be worth using the nsupdate command to check that you can do dynamic DNS updates.
Just type the nsupdate line in the shell, the > is a prompt at which you will type the updates you wish to send. We’ll add a trivial TXT record. The -k argument is the path to the file containing the key.
$ nsupdate -k /path/to/strugglers.key -v
> server a.authns.bitfolk.co.uk
> debug yes
> zone acmesh.strugglers.net.
> update add foo.acmesh.strugglers.net. 86400 TXT "bar"
> show
Outgoing update query:
;; ->>HEADER<<- opcode: UPDATE, status: NOERROR, id:      0
;; flags:; ZONE: 0, PREREQ: 0, UPDATE: 0, ADDITIONAL: 0
;; ZONE SECTION:
;acmesh.strugglers.net.         IN      SOA

;; UPDATE SECTION:
foo.acmesh.strugglers.net. 86400 IN     TXT     "bar"

> send
Sending update to 85.119.80.222#53
Outgoing update query:
;; ->>HEADER<<- opcode: UPDATE, status: NOERROR, id:  19987
;; flags:; ZONE: 1, PREREQ: 0, UPDATE: 1, ADDITIONAL: 1
;; ZONE SECTION:
;acmesh.strugglers.net.         IN      SOA

;; UPDATE SECTION:
foo.acmesh.strugglers.net. 86400 IN     TXT     "bar"

;; TSIG PSEUDOSECTION:
strugglers.             0       ANY     TSIG    hmac-sha512. 1521454639 300 64 dPndp1/ZyqzmSEn0AKIsGR62HrsplJBhntWioM4oBdPlNXUIAwg7Jwpg DGSM2S3kY+5hfGTleNqwXZrMvnBhUQ== 19987 NOERROR 0


Reply from update query:
;; ->>HEADER<<- opcode: UPDATE, status: NOERROR, id:  19987
;; flags: qr; ZONE: 1, PREREQ: 0, UPDATE: 0, ADDITIONAL: 1
;; ZONE SECTION:
;acmesh.strugglers.net.         IN      SOA

;; TSIG PSEUDOSECTION:
strugglers.             0       ANY     TSIG    hmac-sha512. 1521454639 300 64 NfH/78kvq6f+59RXnyJwC6kfFRLGjG6Rh9jdYRId7UjH0jwIbtRVpqCu xx4HToGmlJrDTUqpgbYZq2orUOZlkQ== 19987 NOERROR 0

> [Ctrl-D]
$ nsupdate -k /path/to/strugglers.key -v
> server a.authns.bitfolk.co.uk
> debug yes
> zone acmesh.strugglers.net.
> update add foo.acmesh.strugglers.net. 86400 TXT "bar"
> show
Outgoing update query:
;; ->>HEADER<<- opcode: UPDATE, status: NOERROR, id: 0
;; flags:; ZONE: 0, PREREQ: 0, UPDATE: 0, ADDITIONAL: 0
;; ZONE SECTION:
;acmesh.strugglers.net. IN SOA
;; UPDATE SECTION:
foo.acmesh.strugglers.net. 86400 IN TXT "bar"
> send
Sending update to 85.119.80.222#53
Outgoing update query:
;; ->>HEADER<<- opcode: UPDATE, status: NOERROR, id: 19987
;; flags:; ZONE: 1, PREREQ: 0, UPDATE: 1, ADDITIONAL: 1
;; ZONE SECTION:
;acmesh.strugglers.net. IN SOA
;; UPDATE SECTION:
foo.acmesh.strugglers.net. 86400 IN TXT "bar"
;; TSIG PSEUDOSECTION:
strugglers. 0 ANY TSIG hmac-sha512. 1521454639 300 64 dPndp1/ZyqzmSEn0AKIsGR62HrsplJBhntWioM4oBdPlNXUIAwg7Jwpg DGSM2S3kY+5hfGTleNqwXZrMvnBhUQ== 19987 NOERROR 0
Reply from update query:
;; ->>HEADER<<- opcode: UPDATE, status: NOERROR, id: 19987
;; flags: qr; ZONE: 1, PREREQ: 0, UPDATE: 0, ADDITIONAL: 1
;; ZONE SECTION:
;acmesh.strugglers.net. IN SOA
;; TSIG PSEUDOSECTION:
strugglers. 0 ANY TSIG hmac-sha512. 1521454639 300 64 NfH/78kvq6f+59RXnyJwC6kfFRLGjG6Rh9jdYRId7UjH0jwIbtRVpqCu xx4HToGmlJrDTUqpgbYZq2orUOZlkQ== 19987 NOERROR 0
> [Ctrl-D]
And to verify it really got added (though the status of NOERROR should be confirmation enough):
I’m going to assume you’ve installed acme.sh according to one of its supported installation methods. Personally I am not into curl | sh so I:
Create a system user that can’t log in.
git clone the source.
acme.sh --install it as that user.
acme.sh doesn’t have to be run on the primary DNS server, because it’s going to use a dynamic DNS update to do all the DNS things. It just needs access to the dynamic DNS update key file. Either you can install acme.sh on each host that will need to generate/renew certificates and copy the DNS key there, or else do all the certificate generation/renewal in one place and copy the certificate files around.
However you manage it, make sure that the user you’re going to run acme.sh as can read the dynamic DNS update key file.
The first time you issue the certificate you need to set NSUPDATE_KEY and NSUPDATE_SERVER in your environment. After the first successful issuance acme.sh will store these variables in its configuration for use in the automated renewals.
$ NSUPDATE_SERVER=a.authns.bitfolk.co.uk NSUPDATE_KEY=/path/to/strugglers.key ./acme.sh --issue -d strugglers.net -d '*.strugglers.net' --challenge-alias acmesh.strugglers.net --dns dns_nsupdate
[Mon 19 Mar 09:19:00 UTC 2018] Multi domain='DNS:strugglers.net,DNS:*.strugglers.net'
[Mon 19 Mar 09:19:00 UTC 2018] Getting domain auth token for each domain
[Mon 19 Mar 09:19:03 UTC 2018] Getting webroot for domain='strugglers.net'
[Mon 19 Mar 09:19:03 UTC 2018] Getting webroot for domain='*.strugglers.net'
[Mon 19 Mar 09:19:04 UTC 2018] Found domain api file: /path/to/acmesh/dnsapi/dns_nsupdate.sh
[Mon 19 Mar 09:19:04 UTC 2018] adding _acme-challenge.acmesh.strugglers.net. 60 in txt "WmenhbXRtenhpNLYLOBjznyHcVvFk-jjxurCVTrhWc8"
[Mon 19 Mar 09:19:04 UTC 2018] Found domain api file: /path/to/acmesh/dnsapi/dns_nsupdate.sh
[Mon 19 Mar 09:19:04 UTC 2018] adding _acme-challenge.acmesh.strugglers.net. 60 in txt "fwZPUBHijOQkJJaoOF_nIn3Z_FtuVU9R635NDVz_hPA"
[Mon 19 Mar 09:19:04 UTC 2018] Sleep 120 seconds for the txt records to take effect
At this point a DNS update has been crafted and sent so you should see your zone update and zone transfer happen to any secondary servers. If that doesn’t happen within 120 seconds then when Let’s Encrypt tries to verify the challenge it might query a DNS server that doesn’t yet have the record. Your zone transfers need to be reliable.
[Mon 19 Mar 09:21:08 UTC 2018] Verifying:strugglers.net
[Mon 19 Mar 09:21:12 UTC 2018] Success
[Mon 19 Mar 09:21:12 UTC 2018] Verifying:*.strugglers.net
[Mon 19 Mar 09:21:15 UTC 2018] Success
[Mon 19 Mar 09:21:15 UTC 2018] Removing DNS records.
[Mon 19 Mar 09:21:15 UTC 2018] removing _acme-challenge.acmesh.strugglers.net. txt
[Mon 19 Mar 09:21:16 UTC 2018] removing _acme-challenge.acmesh.strugglers.net. txt
[Mon 19 Mar 09:21:16 UTC 2018] Verify finished, start to sign.
[Mon 19 Mar 09:21:18 UTC 2018] Cert success.
-----BEGIN CERTIFICATE-----
MIIFETCCA/mgAwIBAgISAz4ZQV27n1FgemVAEhIqiUZnMA0GCSqGSIb3DQEBCwUA
MEoxCzAJBgNVBAYTAlVTMRYwFAYDVQQKEw1MZXQncyBFbmNyeXB0MSMwIQYDVQQD
.
.
.
NeAmr5I=
-----END CERTIFICATE-----
[Mon 19 Mar 09:21:18 UTC 2018] Your cert is in  /path/to/acmesh/.acme.sh/strugglers.net/strugglers.net.cer
[Mon 19 Mar 09:21:18 UTC 2018] Your cert key is in  /path/to/acmesh/.acme.sh/strugglers.net/strugglers.net.key
[Mon 19 Mar 09:21:18 UTC 2018] The intermediate CA cert is in  /path/to/acmesh/.acme.sh/strugglers.net/ca.cer
[Mon 19 Mar 09:21:18 UTC 2018] And the full chain certs is there:  /path/to/acmesh/.acme.sh/strugglers.net/fullchain.cer
[Mon 19 Mar 09:21:08 UTC 2018] Verifying:strugglers.net
[Mon 19 Mar 09:21:12 UTC 2018] Success
[Mon 19 Mar 09:21:12 UTC 2018] Verifying:*.strugglers.net
[Mon 19 Mar 09:21:15 UTC 2018] Success
[Mon 19 Mar 09:21:15 UTC 2018] Removing DNS records.
[Mon 19 Mar 09:21:15 UTC 2018] removing _acme-challenge.acmesh.strugglers.net. txt
[Mon 19 Mar 09:21:16 UTC 2018] removing _acme-challenge.acmesh.strugglers.net. txt
[Mon 19 Mar 09:21:16 UTC 2018] Verify finished, start to sign.
[Mon 19 Mar 09:21:18 UTC 2018] Cert success.
-----BEGIN CERTIFICATE-----
MIIFETCCA/mgAwIBAgISAz4ZQV27n1FgemVAEhIqiUZnMA0GCSqGSIb3DQEBCwUA
MEoxCzAJBgNVBAYTAlVTMRYwFAYDVQQKEw1MZXQncyBFbmNyeXB0MSMwIQYDVQQD
.
.
.
NeAmr5I=
-----END CERTIFICATE-----
[Mon 19 Mar 09:21:18 UTC 2018] Your cert is in /path/to/acmesh/.acme.sh/strugglers.net/strugglers.net.cer
[Mon 19 Mar 09:21:18 UTC 2018] Your cert key is in /path/to/acmesh/.acme.sh/strugglers.net/strugglers.net.key
[Mon 19 Mar 09:21:18 UTC 2018] The intermediate CA cert is in /path/to/acmesh/.acme.sh/strugglers.net/ca.cer
[Mon 19 Mar 09:21:18 UTC 2018] And the full chain certs is there: /path/to/acmesh/.acme.sh/strugglers.net/fullchain.cer
$ openssl x509 -text -noout -certopt no_subject,no_header,no_version,no_serial,no_signame,no_subject,no_issuer,no_pubkey,no_sigdump,no_aux -in /path/to/acmesh/.acme.sh/strugglers.net/strugglers.net.cer
        Validity
            Not Before: Mar 19 08:21:17 2018 GMT
            Not After : Jun 17 08:21:17 2018 GMT
        X509v3 extensions:
            X509v3 Key Usage: critical
                Digital Signature, Key Encipherment
            X509v3 Extended Key Usage:
                TLS Web Server Authentication, TLS Web Client Authentication
            X509v3 Basic Constraints: critical
                CA:FALSE
            X509v3 Subject Key Identifier:
                BF:C7:8E:F5:87:05:D0:6E:15:AC:7B:37:9F:82:05:C3:E3:11:B7:32
            X509v3 Authority Key Identifier:
                keyid:A8:4A:6A:63:04:7D:DD:BA:E6:D1:39:B7:A6:45:65:EF:F3:A8:EC:A1

            Authority Information Access:
                OCSP - URI:http://ocsp.int-x3.letsencrypt.org
                CA Issuers - URI:http://cert.int-x3.letsencrypt.org/

            X509v3 Subject Alternative Name:
                DNS:*.strugglers.net, DNS:strugglers.net
            X509v3 Certificate Policies:
                Policy: 2.23.140.1.2.1
                Policy: 1.3.6.1.4.1.44947.1.1.1
                  CPS: http://cps.letsencrypt.org
                  User Notice:
                    Explicit Text: This Certificate may only be relied upon by Relying Parties and only in accordance with the Certificate Policy found at https://letsencrypt.org/repository/
$ openssl x509 -text -noout -certopt no_subject,no_header,no_version,no_serial,no_signame,no_subject,no_issuer,no_pubkey,no_sigdump,no_aux -in /path/to/acmesh/.acme.sh/strugglers.net/strugglers.net.cer
Validity
Not Before: Mar 19 08:21:17 2018 GMT
Not After : Jun 17 08:21:17 2018 GMT
X509v3 extensions:
X509v3 Key Usage: critical
Digital Signature, Key Encipherment
X509v3 Extended Key Usage:
TLS Web Server Authentication, TLS Web Client Authentication
X509v3 Basic Constraints: critical
CA:FALSE
X509v3 Subject Key Identifier:
BF:C7:8E:F5:87:05:D0:6E:15:AC:7B:37:9F:82:05:C3:E3:11:B7:32
X509v3 Authority Key Identifier:
keyid:A8:4A:6A:63:04:7D:DD:BA:E6:D1:39:B7:A6:45:65:EF:F3:A8:EC:A1
Authority Information Access:
OCSP - URI:http://ocsp.int-x3.letsencrypt.org
CA Issuers - URI:http://cert.int-x3.letsencrypt.org/
X509v3 Subject Alternative Name:
DNS:*.strugglers.net, DNS:strugglers.net
X509v3 Certificate Policies:
Policy: 2.23.140.1.2.1
Policy: 1.3.6.1.4.1.44947.1.1.1
CPS: http://cps.letsencrypt.org
User Notice:
Explicit Text: This Certificate may only be relied upon by Relying Parties and only in accordance with the Certificate Policy found at https://letsencrypt.org/repository/
From the Subject Alternative Name we can see it is a wildcard certificate.


