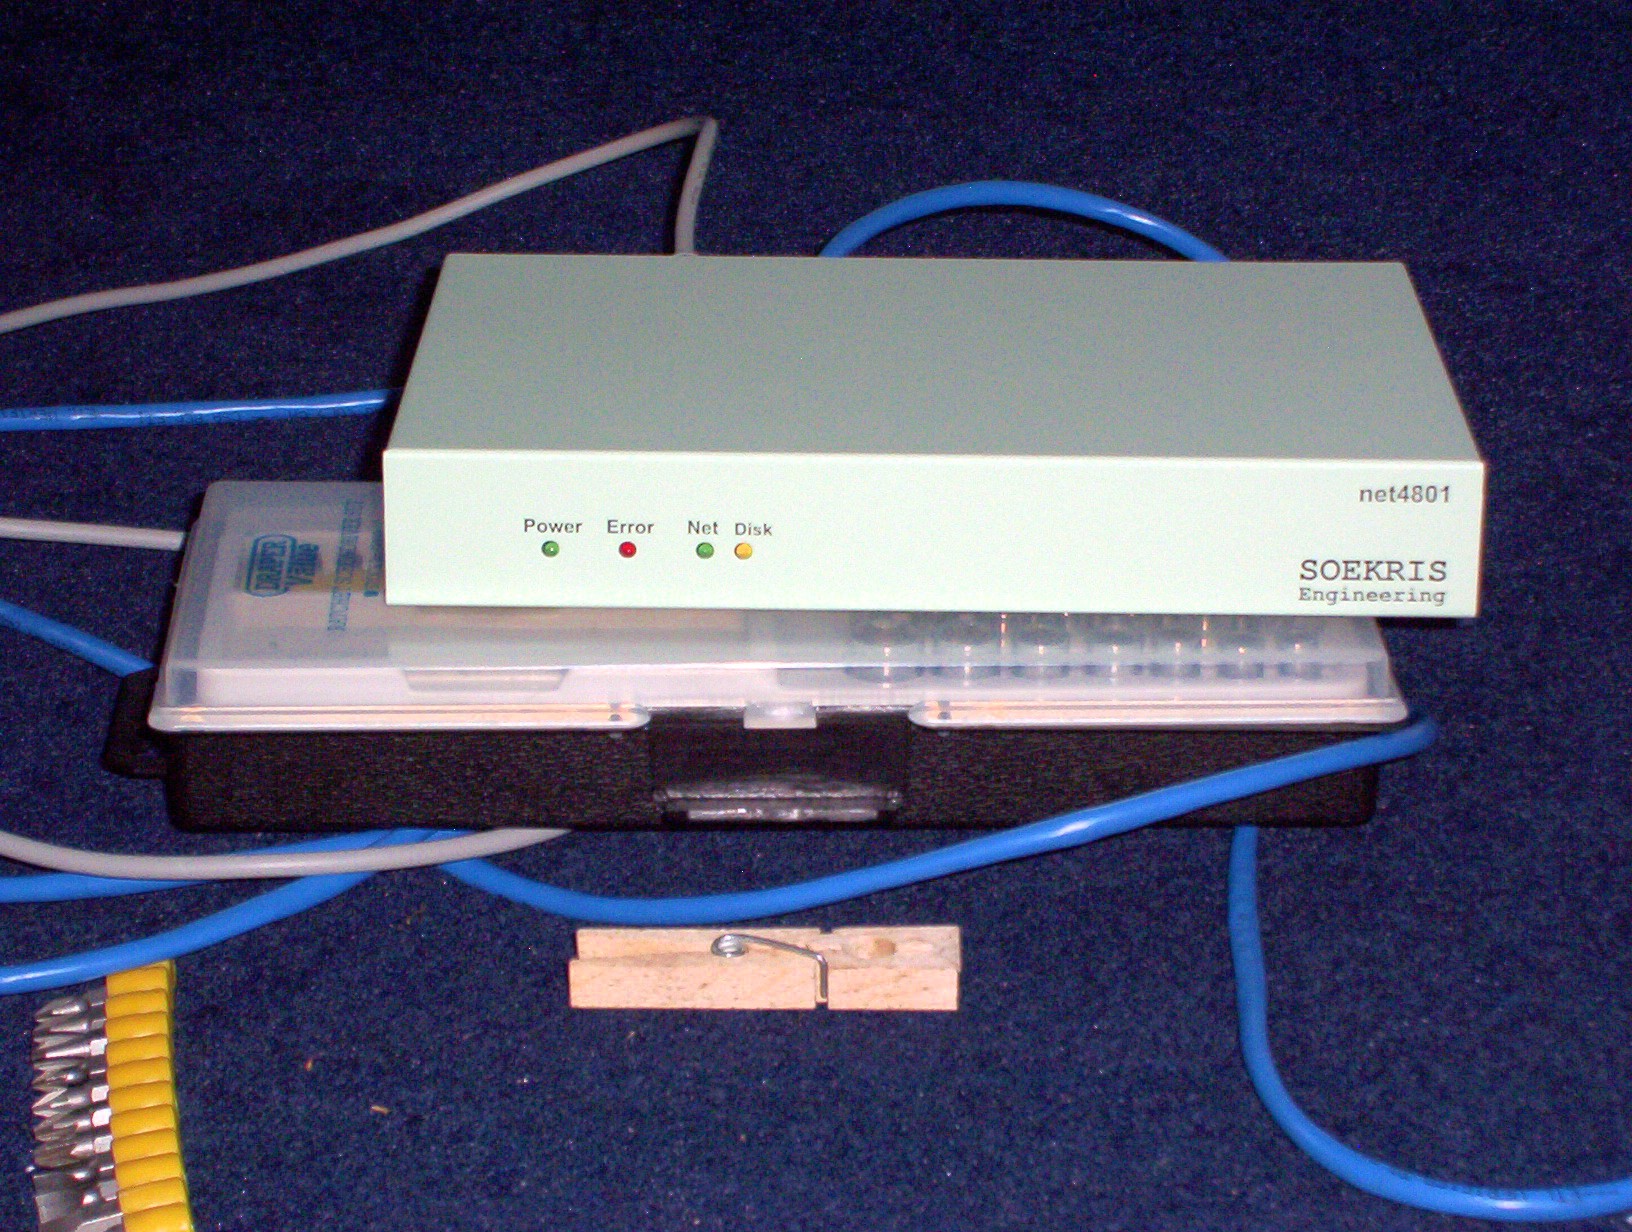
This morning I shut off the Soekris Engineering net4801 that has served as our home firewall / PPP termination box for just over 18½ years.
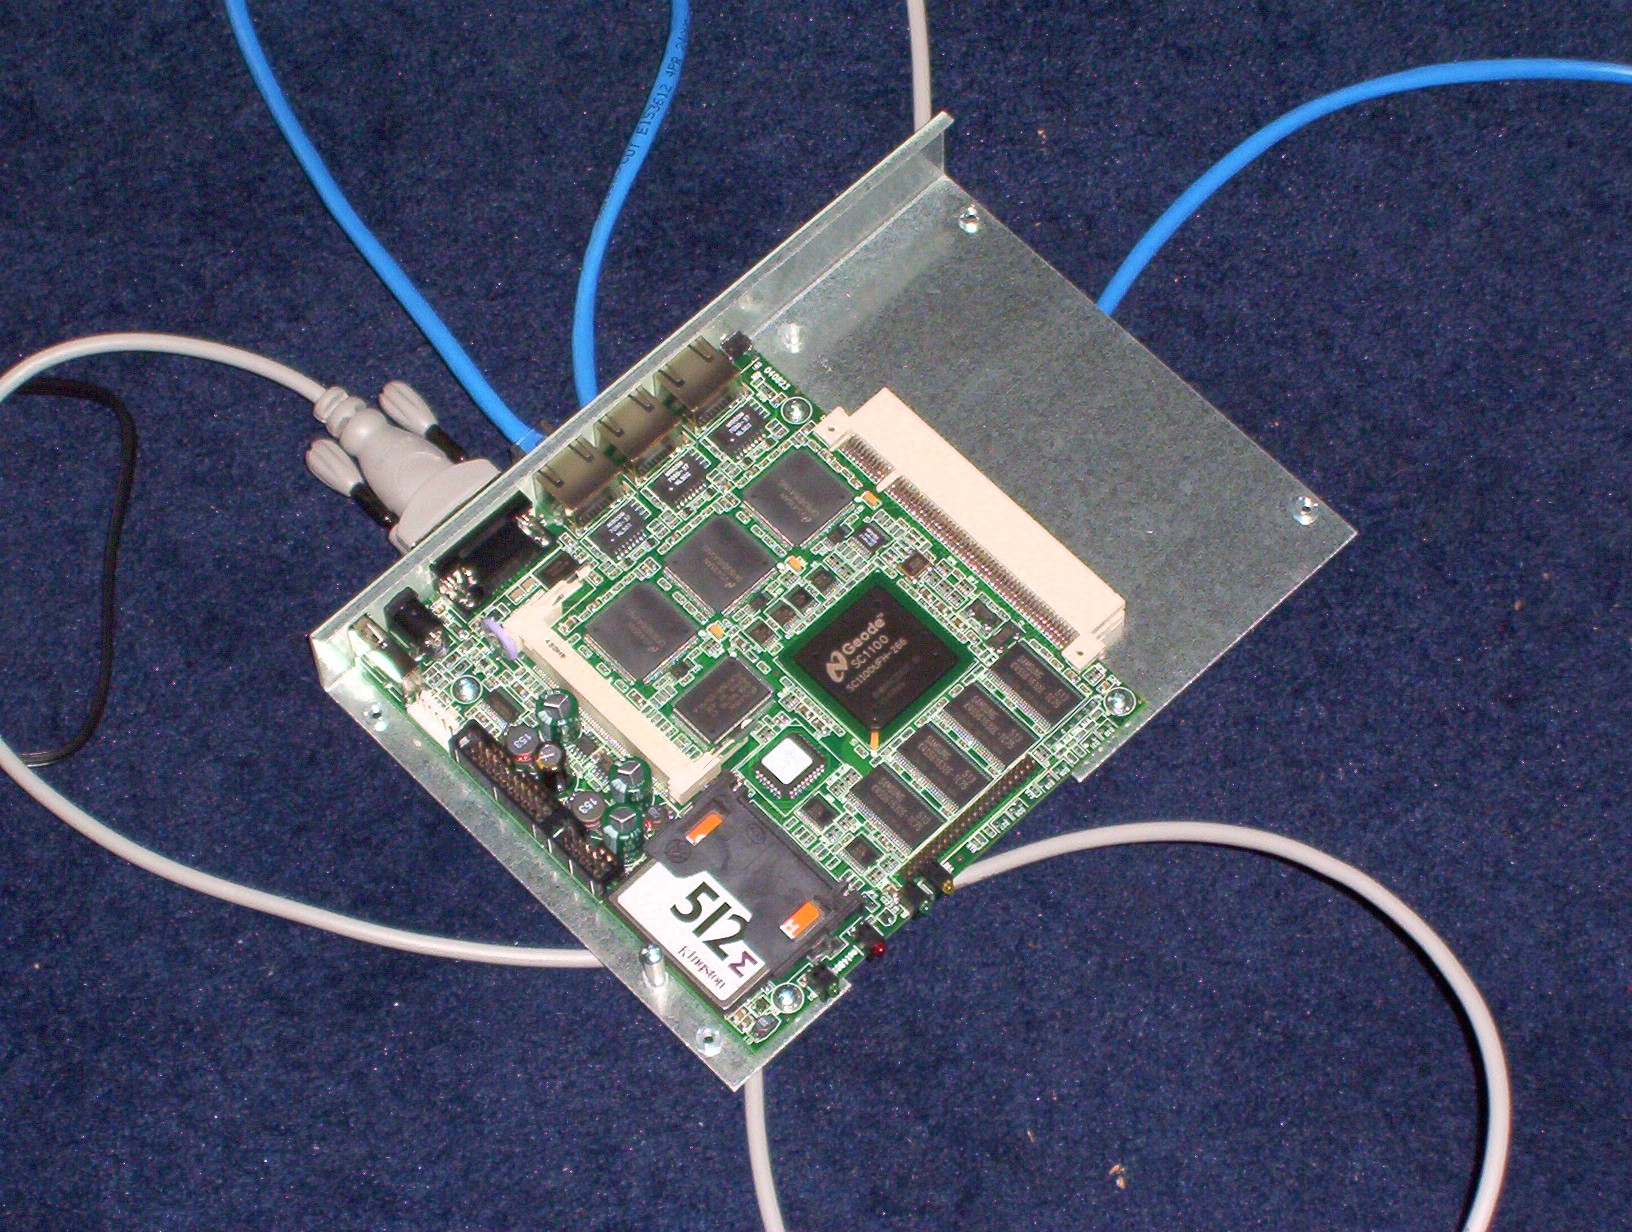
Front view of a Soekris net4801. Clothes peg for scale.Inside of a Soekris net4801.
In truth this has been long overdue. Like, at least 10 years overdue. It has been struggling to cope with even our paltry ~60Mbps VDSL (what UK calls Fibre to the Cabinet). But I am very lazy, and change is work.
In theory we can get fibre from Openreach to approach 1Gbit/s down, and I should sort that out, but see above about me being really very lazy. The poor old Soekris would certainly not be viable then.
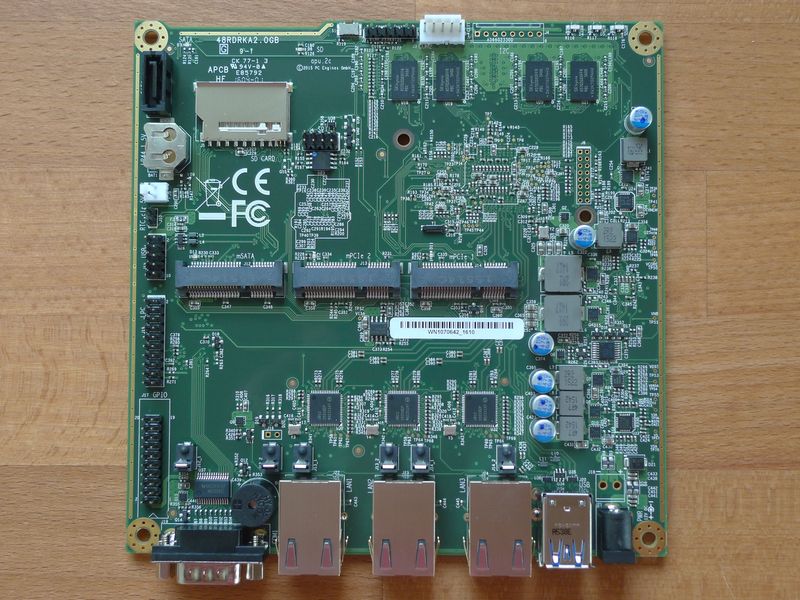
I’ve replaced it with a PC Engines APU2 (the apu2e2 model). Much like the Soekris it’s a fanless single board x86 computer with coreboot firmware so it’s manageable from the BIOS over serial.
An apu2e2 single board computer, image copyright PC Engines GmbH
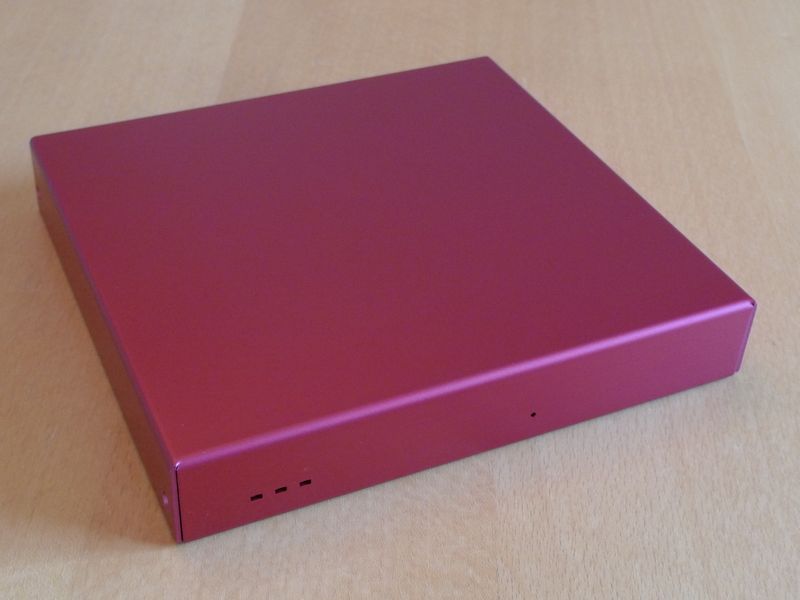
Rear view of an APU2 case1d2redu, image copyright PC Engines GmbH
Front view of an APU2 case1d2redu, image copyright PC Engines GmbH
An APU2 case1d2redu, top and bottom halves separated, image copyright PC Engines GmbH
The Soekris ran Debian and so does the APU2. Installing it over PXE was completely straightforward on the APU2; a bit simpler than it was with the net4801 back in 2005! If you have just one and it’s right there in the same building then it’s probably quicker to just boot the Debian installer off of USB though. I may be lazy but once I do get going I’m also pointlessly bloody-minded.
Anyway, completely stock Debian works fine, though obviously it has no display whatsoever — all non-Ethernet-based interaction would have to be done over serial. By default that runs at 115200 baud (8n1).
This is not “home server” material. Like the Soekris even in 2005 it’s weak and it’s expensive for what it is. It’s meant to be an appliance. I think I was right with the Soekris’s endurance, beyond even sensible limits, and I hope I will be right about the APU2.
The Soekris is still using its original 512M CompactFlash card from 2005 by the way. Although admittedly I did go to some effort to make it run on a read-only filesystem, only flipped to read-write for upgrades.
As of the release of CentOS 8 / RHEL8, Red Hat disabled kernel support for running as a Xen PV or PVH guest, even though such support is enabled by default in the upstream Linux kernel.
As a result—unlike with all previous versions of CentOS/RHEL—you cannot boot the installer in Xen PV or PVH mode. You can still boot it in Xen HVM mode, or under KVM, but that is not very helpful if you don’t want to run HVM or KVM.
At BitFolk ever since the release of CentOS 8 we’ve had to tell customers to use the Rescue VM (a kind of live system) to unpack CentOS into a chroot.
This method was worked out by Jon Fautley. Jon emailed me instructions and I was able to replicate them. Several people have since asked me how it was done and Jon was happy for me to write it up, but this was all worked out by Jon, not me.
I’ll go into enough detail that you should be able to exactly replicate what I did to end up with something that works. This is quite a lot but it only needs to be done each time the real installer initrd.img changes, which isn’t that often. The resulting kernel and initrd.img can be used to install many guests.
Throughout the rest of this article I’ll refer to CentOS, but Jon initially made this work for RHEL 8. I’ve replicated it for CentOS 8 and will soon do so for RHEL 8 as well.
You will find this in the install ISO or on mirrors as images/pxeboot/initrd.img.
$ mkdir/var/tmp/frankeninitrd/initrd
$ cd/var/tmp/frankeninitrd/initrd
$ xz -dc/path/to/initrd.img > ../initrd.cpio
$ # root needed because this will do some mknod/mkdev.
$ sudocpio-idv< ../initrd.cpio
$ mkdir /var/tmp/frankeninitrd/initrd
$ cd /var/tmp/frankeninitrd/initrd
$ xz -dc /path/to/initrd.img > ../initrd.cpio
$ # root needed because this will do some mknod/mkdev.
$ sudo cpio -idv < ../initrd.cpio
I’m going to use the Xen guest that I’m doing this on, which at the time of writing is a Debian buster system running kernel 4.19.0-13. Even a system that is not currently running as a Xen guest will probably work, as they usually have modules available for everything.
At the time of writing the kernel version in the installer is 4.18.0-240.
If you’ve got different, adjust filenames accordingly.
$ sudocp-r/lib/modules/4.19.0-13-amd64 lib/modules/
$ # You're not going to use the original modules
$ # so may as well delete them to save space.
$ sudorm-vr lib/modules/4.18*
$ sudo cp -r /lib/modules/4.19.0-13-amd64 lib/modules/
$ # You're not going to use the original modules
$ # so may as well delete them to save space.
$ sudo rm -vr lib/modules/4.18*
$ cp/boot/vmlinuz-4.19.0-13-amd64 ../centos8-vmlinuz
$ ls-lah ../centos*-rw-r--r--1 andy andy 81M Feb 1 04:43 ../centos8-initrd.img
-rw-r--r--1 andy andy 5.1M Feb 1 04:04 ../centos8-vmlinuz
$ cp /boot/vmlinuz-4.19.0-13-amd64 ../centos8-vmlinuz
$ ls -lah ../centos*
-rw-r--r-- 1 andy andy  81M Feb  1 04:43 ../centos8-initrd.img
-rw-r--r-- 1 andy andy 5.1M Feb  1 04:04 ../centos8-vmlinuz
Copy the kernel and initrd to somewhere on your dom0 and create a guest config file that looks a bit like this:
name       = "centostest"
# CentOS 8 installer requires at least 2.5G RAM.
# OS will run with a lot less though.
memory     = 2560
vif        = [ "mac=00:16:5e:00:02:39, ip=192.168.82.225, vifname=v-centostest" ]
type       = "pvh"
kernel     = "/var/tmp/frankeninitrd/centos8-vmlinuz"
ramdisk    = "/var/tmp/frankeninitrd/centos8-initrd.img"
extra      = "console=hvc0 ip=192.168.82.225::192.168.82.1:255.255.255.0:centostest:eth0:none nameserver=8.8.8.8 inst.stage2=http://www.mirrorservice.org/sites/mirror.centos.org/8/BaseOS/x86_64/os/ inst.ks=http://example.com/yourkickstart.ks"
disk       = [ "phy:/dev/vg/centostest_xvda,xvda,w",
               "phy:/dev/vg/centostest_xvdb,xvdb,w" ]
name = "centostest"
# CentOS 8 installer requires at least 2.5G RAM.
# OS will run with a lot less though.
memory = 2560
vif = [ "mac=00:16:5e:00:02:39, ip=192.168.82.225, vifname=v-centostest" ]
type = "pvh"
kernel = "/var/tmp/frankeninitrd/centos8-vmlinuz"
ramdisk = "/var/tmp/frankeninitrd/centos8-initrd.img"
extra = "console=hvc0 ip=192.168.82.225::192.168.82.1:255.255.255.0:centostest:eth0:none nameserver=8.8.8.8 inst.stage2=http://www.mirrorservice.org/sites/mirror.centos.org/8/BaseOS/x86_64/os/ inst.ks=http://example.com/yourkickstart.ks"
disk = [ "phy:/dev/vg/centostest_xvda,xvda,w",
"phy:/dev/vg/centostest_xvdb,xvdb,w" ]
Assumptions in the above:
vif and disk settings will be however you usually do that.
“extra” is for the kernel command line and here gives the installer static networking with the ip=IP address::default gateway:netmask:hostname:interface name:auto configuration type option.
inst.stage2 here goes to a public mirror but could be an unpacked installer iso file instead.
inst.ks points to a minimal kickstart file you’ll have to create (see below).
Automatically wipe disks and partition. I use xvda for the OS and xvdb for swap. Adjust accordingly.
Install only minimal package set.
Switch the installed system over to kernel-ml from EPEL.
Force an SELinux autorelabel at first boot.
The only thing it doesn’t do is create any users. The installer will wait for you to do that. If you want an entirely automated install just add the user creation stuff to your kickstart file.
url --url="http://www.mirrorservice.org/sites/mirror.centos.org/8/BaseOS/x86_64/os"
text

# Clear all the disks.
clearpart --all --initlabel
zerombr

# A root filesystem that takes up all of xvda.
part /    --ondisk=xvda --fstype=xfs --size=1 --grow

# A swap partition that takes up all of xvdb.
part swap --ondisk=xvdb --size=1 --grow

bootloader --location=mbr --driveorder=xvda --append="console=hvc0"
firstboot --disabled
timezone --utc Etc/UTC --ntpservers="0.pool.ntp.org,1.pool.ntp.org,2.pool.ntp.org,3.pool.ntp.org"
keyboard --vckeymap=gb --xlayouts='gb'
lang en_GB.UTF-8
skipx
firewall --enabled --ssh
halt

%packages
@^Minimal install
%end

%post --interpreter=/usr/bin/bash --log=/root/ks-post.log --erroronfail

# Switch to kernel-ml from EPEL. Necessary for Xen PV/PVH boot support.
rpm --import https://www.elrepo.org/RPM-GPG-KEY-elrepo.org
yum -y install https://www.elrepo.org/elrepo-release-8.el8.elrepo.noarch.rpm
yum --enablerepo=elrepo-kernel -y install kernel-ml
yum -y remove kernel-tools kernel-core kernel-modules

sed -i -e 's/DEFAULTKERNEL=.*/DEFAULTKERNEL=kernel-ml/' /etc/sysconfig/kernel
grub2-mkconfig -o /boot/grub2/grub.cfg

# Force SELinux autorelabel on first boot.
touch /.autorelabel
%end
url --url="http://www.mirrorservice.org/sites/mirror.centos.org/8/BaseOS/x86_64/os"
text
# Clear all the disks.
clearpart --all --initlabel
zerombr
# A root filesystem that takes up all of xvda.
part / --ondisk=xvda --fstype=xfs --size=1 --grow
# A swap partition that takes up all of xvdb.
part swap --ondisk=xvdb --size=1 --grow
bootloader --location=mbr --driveorder=xvda --append="console=hvc0"
firstboot --disabled
timezone --utc Etc/UTC --ntpservers="0.pool.ntp.org,1.pool.ntp.org,2.pool.ntp.org,3.pool.ntp.org"
keyboard --vckeymap=gb --xlayouts='gb'
lang en_GB.UTF-8
skipx
firewall --enabled --ssh
halt
%packages
@^Minimal install
%end
%post --interpreter=/usr/bin/bash --log=/root/ks-post.log --erroronfail
# Switch to kernel-ml from EPEL. Necessary for Xen PV/PVH boot support.
rpm --import https://www.elrepo.org/RPM-GPG-KEY-elrepo.org
yum -y install https://www.elrepo.org/elrepo-release-8.el8.elrepo.noarch.rpm
yum --enablerepo=elrepo-kernel -y install kernel-ml
yum -y remove kernel-tools kernel-core kernel-modules
sed -i -e 's/DEFAULTKERNEL=.*/DEFAULTKERNEL=kernel-ml/' /etc/sysconfig/kernel
grub2-mkconfig -o /boot/grub2/grub.cfg
# Force SELinux autorelabel on first boot.
touch /.autorelabel
%end
Obviously this guest config can only boot the installer. Once it’s actually installed and halts you’ll want to make a guest config suitable for normal booting. The kernel-ml does work in PVH mode so at BitFolk we use pvhgrub to boot these.
The actual modifications needed to the stock installer kernel are quite small: just enable CONFIG_XEN_PVH kernel option and build. I don’t know the process to build a CentOS or RHEL installer kernel though, so that wasn’t an option for me.
If you do know how to do it please do send me any information you have.
Sometime in late December (2019) I noticed that when I clicked on a tag in Shotwell, the photo management software that I use, it was showing either zero or hardly any matching photos when I knew for sure that there should be many more.
(When I say “tag” in this article it’s mostly going to refer to the type of tags you generally put on an image, i.e. the tags that identify who or what is in the image, what event it is associated with, the place it was taken etc. Images can have many different kinds of tags containing all manner of metadata, but for avoidance of doubt please assume that I don’t mean any of those.)
I have Shotwell set to store the tags in the image files themselves, in the metadata. There is a standard for this called Exif. What seems to have happened is that Shotwell had removed a huge number of tags from the files themselves. At the time of discovery I had around 15,500 photos in my collection and it looked like the only way to tell what was in them would be by looking at them. Disaster.
Here follows some notes about what I found out when trying to recover from this situation, in case it si ever useful for anyone.
Shotwell still had a visible tag hierarchy, so I could for example click on the “Pets/Remy” tag, but this brought up only one photo that I took on 14 December 2019. I’ve been taking photos of Remy for years so I knew there should be many more. Here’s Remy.
I knew this must have happened fairly recently because I’d have noticed quite quickly that photos were “missing”. I had a look for a recent photo that I knew I’d tagged with a particular thing, and then looked in the backups to see when it was last modified.
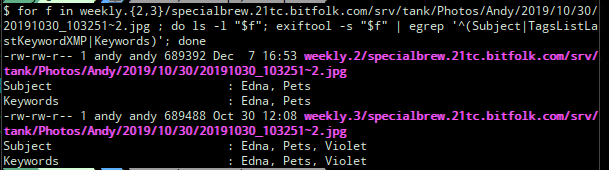
As an example I found a photo that was taken on 30 October 2019 that should have been tagged “Pets/Violet” but no longer was. It had been modified (but not by me) on 7 December 2019.
(Sorry about the text-as-images; I’m reconstructing this series of events from a Twitter thread, where things necessarily had to be posted as screenshots.)
What the above shows is that the version of the photo that existed on 30 October 2019 had the tags “Pets“, “Edna“, and “Violet” but then the version that was written on 7 December 2019 lost the “Violet” tag.
Here I used the exiftool utility to display EXIF tags from the photo files. You can do that like this:
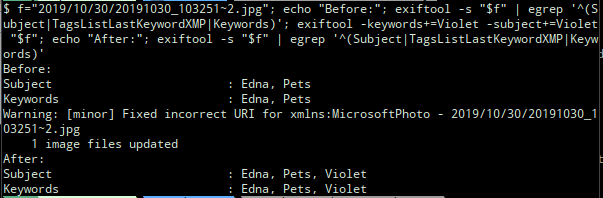
$ exiftool -s $filename
$ exiftool -s $filename
Using egrep I limited this to the tag keys “Subject“, “Keywords“, and “TagsListLastKeywordXMP” but this was a slight mistake: “TagsListLastKeywordXMP” was actually a typo, is totally irrelevant and should be ignored.
“Subject” and “Keywords” were always identical for any photo I examined and contained the flattened list of tags. For example, in Shotwell that photo originally had the tags:
Pets/Edna
Pets/Violet
It seems that Shotwell flattens that to:
Pets
Edna
Violet
and then stores it in “Subject” and “Keywords“.
The tags with hierarchy are actually in the key “TagsList” like:
This shows that the “Violet” tag is now back in the current version of the file. After restarting Shotwell and doing a free text search for “Violet”, this photo now shows up whereas before it did not. It still did not show up when I clicked on “Pets/Violet” in the tag hierarchy however. It was then that I realised I also needed to put “Pets/Violet” into the “TagsList” key.
I ended up using a script to do this in bulk fashion, but individually I think you should be able to do this like:
It was relatively easy to work out which files had been screwed with, because thankfully I didn’t make any other photo modifications on 7 December 2019. So any photo that got modified that day was probably a candidate.
I haven’t mentioned what actually caused this problem yet. I don’t know exactly. At 16:53 on 7 December 2019 I was importing some photos into Shotwell, and I do seem to recall it crashed at some point, either while I was doing that or shortly after.
The photos from that import and all others afterwards had retained their tags correctly, but many that existed prior to that time seemed to be missing some or all tags. I have no idea why such a crash would cause Shotwell to do that but that must have been what did it.
Running this against my backups identified 3,721 files that had been modified on 7 December 2019:
$ cd weekly.2/specialbrew.21tc.bitfolk.com/srv/tank/Photos/Andy
$ find . -type f \
  -newermt "2019-12-07 00:00:00" \! \
  -newermt "2019-12-07 23:59:59" > ~/busted.txt
$ cd weekly.2/specialbrew.21tc.bitfolk.com/srv/tank/Photos/Andy
$ find . -type f \
-newermt "2019-12-07 00:00:00" \! \
-newermt "2019-12-07 23:59:59" > ~/busted.txt
The next thing I did was to check that each of these file paths still exist in the current photo store and in the known-good backups (weekly.3).
After transferring tags.yaml back to my home fileserver it was time to use it to stuff the tags back into the files that had lost them.
One thing to note while doing this is that if you just add a tag, it adds it even if the same tag already exists, leading to duplicates. I thought it best to first delete the tag and then add it again so that there would only be one instance of each one.
16m53s of runtime later, it had completed its work… 🙌 2020 will definitely be the year of Linux on the desktop¹.
¹ As long as you know how to manipulate EXIF tags from a programming language and have a functioning backup system and even then don’t mind losing some stuff
Unfortunately there were some things I couldn’t restore. It was at this point that I discovered that Shotwell does not ever put tags into video files (even though they do support EXIF tags…)
That means that the only record of the tags on a video file is in Shotwell’s own database, which I did not back up as I didn’t think I needed to.
I am now backing that up, but should this sort of thing happen in the future I’d need to know how to manipulate the tags for videos in Shotwell’s database.
Shotwell’s database is an SQLite file that’s normally at $HOME/.local/share/shotwell/data/photo.db. I’m fairly familiar with SQLite so I had a poke around, but couldn’t immediately see how these tags were stored. I had to ask on the Shotwell mailing list.
Here’s how Shotwell does it. There’s a table called TagTable which stores the name of each tag and a comma-separated list of every photo/video which matches it:
sqlite>.schema TagTable
CREATETABLE TagTable (id INTEGERPRIMARYKEY, name TEXT UNIQUENOTNULL, photo_id_list TEXT, time_created INTEGER);
sqlite> .schema TagTable
CREATE TABLE TagTable (id INTEGER PRIMARY KEY, name TEXT UNIQUE NOT NULL, photo_id_list TEXT, time_created INTEGER);
The photo_id_list column holds the comma-separated list. Each item in the list is of the form:
“thumb” or “video-” depending on whether the item is a photo or a video
16 hex digits, zero padded, which is the ID value from the PhotosTable or VideosTable for that item
a comma
Full example of extracting tags for the video file 2019/12/31/20191231_121604.mp4:
$ sqlite3 /home/andy/.local/share/shotwell/DATA/photo.db
SQLite version 3.22.0 2018-01-2218:45:57
Enter ".help"FOR usage hints.
sqlite>SELECT id
FROM VideoTable
WHERE filename LIKE'%20191231%';
553
sqlite>SELECT printf("%016x",553);
0000000000000229
sqlite>SELECT name
FROM TagTable
WHERE photo_id_list LIKE'%video-0000000000000229,%';
/Places
/Places/London
/Places/London/Feltham
/Pets
/Places/London/Feltham/Bedfont Lakes
/Pets/Marge
/Pets/Mandy
$ sqlite3 /home/andy/.local/share/shotwell/data/photo.db
SQLite version 3.22.0 2018-01-22 18:45:57
Enter ".help" for usage hints.
sqlite> select id
from VideoTable
where filename like '%20191231%';
553
sqlite> select printf("%016x", 553);
0000000000000229
sqlite> select name
from TagTable
where photo_id_list like '%video-0000000000000229,%';
/Places
/Places/London
/Places/London/Feltham
/Pets
/Places/London/Feltham/Bedfont Lakes
/Pets/Marge
/Pets/Mandy
If that is not completely clear:
The ID for that video file is 553
553 in hexadecial is 229
Pad that to 16 digits, add “video-” at the front and “.” at the end (even the last item in the list has a comma at the end)
Search for that string in photo_id_list
If a row matches then the name column is a tag that is attached to that file
I don’t exactly know how I would have identified which videos got messed with, but at least I would have had both versions of the database to compare, and I now know how I would do the comparison.
Exif exists for the purpose of storing tags like this.
When I move my photos from one piece of software to another I want it to be able to read the tags. I don’t want to have to input them all over again. That would be unimaginably tedious.
When I moved from F-Spot to Shotwell the fact that the tags were in the files saved me countless hours of work. It just worked on import.
If there wasn’t a dedicated importer feature then it would be so much work that really the only way to do it would be to extract the tags from the database and insert them again programmatically, which is basically admitting that to change software you need to be an expert. That really isn’t how this should work.
If the only copy of my tags is in the internal database of a unique piece of cataloging software, then I have to become an expert on the internal data store of that piece of software. I don’t want to have to do that.
I’ve been forced to do that here for Shotwell because of a deficiency of Shotwell in not storing video tags in the files. But if we’re only talking about photos then I could have avoided it, and could also avoid having to be an expert on every future piece of cataloging software.
Even if I’m not moving to a different cataloging solution, lots of software understands Exif and it’s useful to be able to query those things from other software.
I regard it very much like artist, album, author, genre etc tags in the metadata of digital music and ebooks, all of which are in the files; you would not expect to have to reconstruct these out of the database of some other bit of software every time you wanted to use them elsewhere.
It was a mistake not to backup the Shotwell database though; I thought I did not need it as I thought all tags were being stored in files, and tags were the only things I cared about. As it happened, tags were not being stored in video files and tags for video files only exist in Shotwell’s database.
Having backups was obviously a lifesaver here. It took me ~3 weeks to notice.
Being able to manipulate them like a regular filesystem made things a lot more convenient, so that’s a property I will want to keep in whatever future backup arrangements I have.
I might very well switch to different photo management software now, assuming I could find any that I prefer, but all software has bugs. Whatever I switch to I would have to ensure that I knew how to extract the tags from that as well, if it doesn’t store them in the files.
I don’t want to store my photos and videos “in the cloud” but it is a shortcoming of Shotwell that I can basically only use it from my desktop at home. Its database does not support multiple or remote access. I wonder if there is some web-based thing that can just read (and cache) the tags out of the files, build dynamic galleries and allow arbitrary searches on them…
Shotwell’s database schema and its use of 16 hexadecimal digits (nibbles?) means I can only store a maximum of 18,446,744,073,709,551,615 (1.844674407×10¹⁹ -1) photos or videos of dogs. Arbitrary limits suck so much.
Today I had a look at a customer’s problem. They had a Perl application that connects to a third party API, and as of sometime today it had started failing to connect, although the remote site API still seemed to be responding in general.
The particular Perl module for this service (doesn’t really matter what it was) wasn’t being very verbose about what was going on. It simply said:
Failed to POST to https://api.example.com/api/v1/message.json
I started by writing a small test program using LWP::UserAgent to do a POST to the same URI, and this time I saw:
500 Can’t connect to api.example.com:443 (SSL connect attempt failed with unknown errorerror:14094410:SSL routines:ssl3_read_bytes:sslv3 alert handshake failure)
So, it’s failing to do a TLS handshake. But this was working yesterday. Has anything changed? Yes, the remote service was under a denial of service attack today and they’ve just moved it behind a CDN. TLS connections are now being terminated by the CDN, not the service’s own backend.
And oh dear, the customer’s host is Debian squeeze (!) which comes with OpenSSL 0.9.8. This is badly out of date. Neither the OS nor the OpenSSL version is supported for security any more. It needs to be upgraded.
Unfortunately I am told that upgrading the OS is not an option at this time. So can we update Perl?
Well yes, we could build our own Perl reasonably easily. The underlying issue is OpenSSL, though. So it would be an upgrade of:
OpenSSL
Perl
Net::SSLeay
IO::Socket::SSL
LWP, as the app’s HTTP client is using that
It’s not actually that bad though. In fact you do not need to build a whole new Perl, you only need to build OpenSSL, Net::SSLeay and IO::Socket::SSL and then tell Perl (and the system’s LWP) to use the new versions of those.
Of course, everything else on the system still uses a dangerously old OpenSSL, so this is not really a long term way to avoid upgrading the operating system.
After downloading and unpacking the latest stable release of OpenSSL, the sequence of commands for building, testing and installing it look like this:
$ ./config --prefix=/opt/openssl \
           --openssldir=/opt/openssl \
           -Wl,-rpath,'$(LIBRPATH)'
$ make
$ make test
$ sudo make install
$ ./config --prefix=/opt/openssl \
--openssldir=/opt/openssl \
-Wl,-rpath,'$(LIBRPATH)'
$ make
$ make test
$ sudo make install
The rpath thing is so that the binaries will find the libraries in the alternate path. If you were instead going to add the library path to the system’s ld.so.conf then you wouldn’t have to have that bit, but I wanted this to be self-contained.
When I did this the first time, all the tests failed and at the install step it said:
ar: /opt/openssl/lib/libcrypto.so: File format not recognized
Ultimately the customer’s Perl application needed to be told to use these new modules. This could be done with either the PERL5LIB environment variable or else by putting:
use lib '/opt/perl/cpanm/lib/perl5';
use lib '/opt/perl/cpanm/lib/perl5';
At the top of the main script.
The application was then once more able to talk TLS to the CDN and it all worked again.
The customer could maybe consider putting the application into a container on a new install of the operating system.
That way, the kernel and whole of the OS would be modern and supported, but just this application would be running with a terribly outdated userland. Over time, more of the bits inside the container could be moved out to the modern host (or another container), avoiding having to do everything at once.
but that fails because ssh needs a pseudo-terminal to ask you for your sudo password on hostB:
sudo: no tty present and no askpass program specified
rsync: connection unexpectedly closed (0 bytes received so far) [Receiver]
rsync error: error in rsync protocol data stream (code 12) at io.c(226) [Receiver=3.1.1]
sudo: no tty present and no askpass program specified
rsync: connection unexpectedly closed (0 bytes received so far) [Receiver]
rsync error: error in rsync protocol data stream (code 12) at io.c(226) [Receiver=3.1.1]
and that nearly works! It pops up an askpass dialog (so you need X11 forwarding) which takes your password and does stuff as root on hostB. But ultimately fails because it’s running as your unprivileged user locally (hostA) and can’t write the files. So then you try running the lot under sudo:
Having a bunch of Linux servers that run Linux virtual machines I often find myself having to move a virtual machine from one server to another. The tricky thing is that I’m not in a position to be using shared storage, i.e., the virtual machines’ storage is local to the machine they are running on. So, the data has to be moved first.
The above transfers data between hosts via ssh, which will introduce some overhead since it will be encrypting everything. You may or may not wish to force it to do compression, or pipe it through a compressor (like gzip) first, or even avoid ssh entirely and just use nc.
Personally I don’t care about the ssh overhead; this is on the whole customer data and I’m happier if it’s encrypted. I also don’t bother compressing it unless it’s going over the Internet. Over a gigabit LAN I’ve found it fastest to use ssh with the -c arcfour option.
The above process works, but it has some fairly major limitations:
The virtual machine needs to be shut down for the whole time it takes to transfer data from one host to another. For 10GiB of data that’s not too bad. For 100GiB of data it’s rather painful.
It transfers the whole block device, even the empty bits. For example, if it’s a 10GiB block device with 2GiB of data on it, 10GiB still gets transferred.
Limitation #2 can be mitigated somewhat by compressing the data. But we can do better.
One of the great things about LVM is snapshots. You can do a snapshot of a virtual machine’s logical volume while it is still running, and transfer that using the above method.
But what do you end up with? A destination host with an out of date copy of the data on it, and a source host that is still running a virtual machine that’s still updating its data. How to get just the differences from the source host to the destination?
Again there is a naive approach, which is to shut down the virtual machine and mount the logical volume on the host itself, do the same on the destination host, and use rsync to transfer the differences.
This will work, but again has major issues such as:
It’s technically possible for a virtual machine admin to maliciously construct a filesystem that interferes with the host that mounts it. Mounting random filesystems is risky.
Even if you’re willing to risk the above, you have to guess what the filesystem is going to be. Is it ext3? Will it have the same options that your host supports? Will your host even support whatever filesystem is on there?
What if it isn’t a filesystem at all? It could well be a partitioned disk device, which you can still work with using kpartx, but it’s a major pain. Or it could even be a raw block device used by some tool you have no clue about.
The bottom line is, it’s a world of risk and hassle interfering with the data of virtual machines that you don’t admin.
Sadly rsync doesn’t support syncing a block device. There’s a --copy-devices patch that allows it to do so, but after applying it I found that while it can now read from a block device, it would still only write to a file.
Next I found a --write-devices patch by Darryl Dixon, which provides the other end of the functionality – it allows rsync to write to a block device instead of files in a filesystem. Unfortunately no matter what I tried, this would just send all the data every time, i.e., it was no more efficient than just using dd.
Are you OK? Do you need to have a nice cup of tea and a sit down for a bit? Yeah. I did too.
I’ve rewritten this thing into a single Perl script so it’s a little bit more readable, but I’ll attempt to explain what the above abomination does.
Even though I do refer to this script in unkind terms like “abomination”, I will be the first to admit that I couldn’t have come up with it myself, and that I’m not going to show you my single Perl script version because it’s still nearly as bad. Sorry!
It connects to the destination host and starts a Perl script which begins reading the block device over there, 1024 bytes at a time, running that through md5 and piping the output to a Perl script running locally (on the source host).
The local Perl script is reading the source block device 1024 bytes at a time, doing md5 on that and comparing it to the md5 hashes it is reading from the destination side. If they’re the same then it prints “s” otherwise it prints “c” followed by the actual data from the source block device.
The output of the local Perl script is fed to a third Perl script running on the destination. It takes the sequence of “s” or “c” as instructions on whether to skip 1024 bytes (“s”) of the destination block device or whether to take 1024 bytes of data and write it to the destination block device (“c<1024 bytes of data>“).
The lzop bits are just doing compression and can be changed for gzip or omitted entirely.
Hopefully you can see that this is behaving like a very very dumb version of rsync.
The thing is, it works really well. If you’re not convinced, run md5sum (or sha1sum or whatever you like) on both the source and destination block devices to verify that they’re identical.
The process now becomes something like:
Take an LVM snapshot of virtual machine block device while the virtual machine is still running.
Create suitable logical volume on destination host.
Use dd to copy the snapshot volume to the destination volume.
Move over any other configuration while that’s taking place.
When the initial copy is complete, shut down the virtual machine.
Run the script of doom to sync over the differences from the real device to the destination.
When that’s finished, start up the virtual machine on the destination host.
Delete snapshot on source host.
1024 bytes seemed like rather a small buffer to be working with so I upped it to 1MiB.
I find that on a typical 10GiB block device there might only be a few hundred MiB of changes between snapshot and virtual machine shut down. The entire device does have to be read through of course, but the down time and data transferred is dramatically reduced.
Is there a better way to do this, still without shared storage?
It’s getting difficult to sell the disk capacity that comes with the number of spindles I need for performance, so maybe I could do something with DRBD so that there’s always another server with a copy of the data?
This seems like it should work, but I’ve no experience of DRBD. Presumably the active node would have to be using the /dev/drbdX devices as disks. Does DRBD scale to having say 100 of those on one host? It seems like a lot of added complexity.
I’ve been a member of Hackspace for quite some time, though I have very little hands on experience with electronics or making things or anything like that, and have up until now tended to only use the Hackspace occasionally for somewhere to work from. When the Arduino workshop was announced I thought it sounded not only very good value for money at £80 for a two day instructor-led course, but also would be a great way to broaden my skills.
In the interest of full disclosure, as a minor fanboy of the Hackspace I am prone to want to portray it and all its endeavours in a good light. However I am trying to write this from the point of view of a paying customer of the workshop (which I was), and will try to be fair and objective.
I arrived early on the first day expecting to touch in with my Oyster card (Hackspace’s members can access the space 24/7 using any compatible RFID card), but the door was already open and the place was a hive of activity. Inside I found Andy “Bob” Brockhurst, Charles, Neil, Mike from Earthshine, Adrian and several others busy tidying the place up making it usable for a workshop. This included attaching a shelf to one wall for the projector to sit on!
Eventually the projector was sorted out, a rather makeshift but legible screen put up for it and things began with a presentation from Bob. Bob’s presentation explained what an Arduino is, the sorts of things they might be used for, the concepts behind “open source hardware”, the available software and some resources for getting more information and hardware. Bob’s presentation is available on his github.
Once the presentation was concluded, Bob, Mike, Adrian et al went around ensuring we all had the Arduino IDE installed. This is a piece of Java software comprising a basic editor for the C-like language Arduino is programmed with, together with facilities to compile and upload the code to the board, and a few other features.
There was also a brief diversion into Fritzing, which is another piece of open source software used for producing layouts and prototypes of circuits for sharing with others, ease of manufacturing, etc. Fritzing is not necessary to use the Arduino, but was used to display the board layouts for the examples.
Amongst the delegates there was a mix of Windows, Mac and Linux laptops but we were all eventually able to download and install the IDE. The supplied USB cable once connected to an Arduino board appears as a serial port on the computer, and the IDE just has to be told which board model you have and which serial port to use.
I had a bit of a false start with installing the IDE on Linux, owing to me not reading the documentation. It is necessary on Ubuntu to already have installed gcc-avr and avr-libc otherwise the IDE will be unable to compile your sketch to object code. I think I was in the minority using Linux; it seems Windows is preferred amongst AVR coders. The usual Java blah is needed to run the IDE, but I already had that.
I’m not sure who prepared the refreshments; I know that Clare, Charles’s other half had some hand in it but I don’t know if she was solely responsible. In any case, tea, coffee, cordial, biscuits and flapjacks were provided throughout both days, with sandwiches (two different cheeses, tuna, egg, bacon), crisps and fruit for lunch.
Once everyone had their IDE up and running and had confirmed that the IDE could talk to their Arduino, Bob went through some simple example circuits. While Bob put the circuits up on the projector and explained how they worked, both electronically and software-wise, Mike, Neil and other knowledgeable Arduino hackers moved around the room helping people out where necessary.
Bob’s examples built on each other progressively, and included:
Making an LED blink
Simulating a traffic light sequence with 3 LEDs
Adding a button to simulate a pedestrian crossing feature
Adding a buzzer which sounds when safe to cross
There was also a final example which used a motor as a spinner to simulate an accessible pedestrian crossing, but most people did not attempt this due to the risks of damaging the Arduino board.
The last few hours of the day were taken at our own individual speeds, practising with the examples and seeing what we could get working. Some people surged ahead, completing all examples and then moving on to their own ideas, whereas others took longer or needed some assistance. As far as I could see everyone made their way through the first four examples.
One person’s Arduino was damaged towards the end of day one and was replaced by Mike.
Some time between 4 and 5pm most people started to pack up and we were reminded to try to think of a personal project to work on the next day if we had not done so already.
I arrived just before 10am the next day owing to general Sunday public transport fail, Jubilee line closure etc., again expecting to swipe my Oyster and again being confounded. This time however it was by a group of people standing outside the Hackspace.
It transpired that we had perhaps tried to be too clever for our own good and the door computer had crashed some time in the night, preventing all of us from getting in. After about 30 minutes, some IRCing, unsuccessful nmapping and leaving of voicemails, Mark popped up on IRC and kindly rushed over to let us in with a real metal key.
For the rest of this day we all worked on our own individual ideas, with Bob, Neil, Adrian and others milling around dispensing masses of assistance.
I couldn’t really think of anything practically useful to work on so decided I just wanted to push the limits of what I’d already learned. I’d spied the 8×8 matrix display in the kit box and wanted to play with that, but this first would involve learning how to drive a shift register.
The 8×8 matrix has 64 LEDs (actually 128 since each one is either red or green), and connecting up 64 outputs would not only be extremely tedious, the Arduino doesn’t have that many outputs anyway. The component actually has only 16 pins but even so, 16 outputs is too many. A shift register helps solve this by allowing the control of 8 outputs using only 3 pins.
The basic idea is that you use one pin to tell the shift register when you’re ready to start or finish feeding it data, one pin to tell it there is a new piece of data to read, and a third pin for the data itself. After you’ve indicated that you’re finished, all the data you’ve fed in will be output. The 74HC595 shift registers in the kit box have 8 outputs each.
In order to get a working knowledge of the shift register I decided to first try using one to drive 8 LEDs, first to make them count in binary and then to display various patterns. After that I would go on to try the shift registers with the matrix display.
I put a circuit together by following the commentary in one of the examples in Earthshine’s Complete Beginners Guide to the Arduino. Unfortunately I couldn’t get it to produce sensible results. At times it seemed like I almost had it, with it counting up in binary correctly except for a couple of values. Other times it was just completely messed up with the LEDs cycling through all kinds of patterns.
I found debugging this to be very difficult. Dammit Jim, I’m a sysadmin, not a hardware hacker; when I write awful sysadmin Perl I at least have some idea how to debug it! After a couple of hours of frustration I had to ask Bob for help, and after a good while of him checking everything I’d done several times, he was stumped too.
Neil then wandered over and measured the frequencies the Arduino was producing, confirming that my code and the Arduino were working correctly, narrowing the breakage down to my circuit. He got his magnifying glass out, we got the datasheet for the shift register, and after a short while he noticed that I was trying to use the shift register’s latch pin as a clock and vice versa.
It turned out that while the pinout of the shift register was correct in the Earthshine guide, the commentary in the guide had switched around the purpose of the shift register clock input pin and the storage register clock input pin, which accounted for the bizarre behaviour I was seeing. It worked! A similar example on the Arduino site has things the correct way around.
I went ahead and wrote the code to do binary counting and then to put some simple patterns on the LEDs, but after all that I felt a bit too burnt out to go on to the matrix display and decided to quit while I was ahead. I definitely feel confident enough to tackle this on my own now though.
This workshop was indeed incredible value for money. I think the components, presentation and walk through of examples alone were easily worth £80 and could have been done in one day. What was worth so much more was having knowledgeable people in the same room as you for two days, personally guiding you through the examples and discussing your own ideas. I’ve paid 5 times as much for one day courses that were nowhere near as good.
This could and probably should have justified a doubling or more of price, but I can understand that this was the first workshop put on in the Hackspace and there was a desire to sell it out and gain some experience from the host side.
I hope the workshop is repeated. If it is, and you’re interested in this sort of thing, you should book it quickly.
Many Bothans diedTwo or three Arduinos died during the course of the workshop. As far as I could tell through overhearing conversation, every case was related to running them from the power supply instead of the USB power. I think someone put a multimeter on one and found it was supplying over voltage. I understand better PSUs will be sought in future.
We struggled to fit everyone in. The last two late-comers had less than ideal seating during the presentation because Bob needed to stand in one of the seating places in order to do the presentation. This could probably be easily remedied by tidying up the Hackspace a bit before the day of the workshop. I don’t think there’s any need to reduce the number of participants.
The screen for the projector was rather tatty and ramshackle. It didn’t matter much for Bob’s presentation because his slides were very simple and just about fitted on the screen, but anything more demanding than that would have real problems.
The door episode was extremely unfortunate timing. A suggestion was made that at least two of the people running any workshop should have keys in case of similar emergencies. Sounds reasonable.