Another disappointing btrfs experience

I’ve been using btrfs on my home fileserver for about 4½ years. I am not entirely happy with it and kind of wish I never did it; I will certainly not be introducing it anywhere else. I’m also pretty lazy though, which probably explains why I haven’t ripped it out and replaced it with something else yet.

I’ve had a few problems with it over the years. To be fair I’ve never lost any data; it’s really the availability aspects of it which I feel just aren’t ready yet. When I use multiple storage devices it’s generally to increase availability. I don’t expect device failure to stop me doing what I need to do, at least for small amounts of device failure.

Unfortunately btrfs has consistently not lived up to these expectations. Almost every single-disk failure I’ve had in the past has resulted in an “outage” of some sort. As this is just our data, at home, it may be strange to think of it as an outage, but that’s what it is. Our data became unavailable in some way for some period of time.

This time around, one of the drives started throwing up “Currently unreadable (pending)” and “Offline uncorrectable” sectors a few days ago. That means that there’s areas of the drive that it cannot read. Initially there were just a small number, and a scrub came back clean so that suggested the problem sectors were at that time outside of any filesystem.

In a more critical setting I’d have spare drives available and would just swap them, but for home use I’m usually comfortable with forcing the drive to reallocate these by forcing a write, before ordering a replacement if the problem doesn’t go away. Worst case, I have backups.

After a day or so though, the number of problem sectors was increasing and it was obvious the drive was going to die fairly soon. I ordered a replacement. About 6 hours before the replacement arrived the drive completely stopped responding.

Now, this drive was at the time one of five in the btrfs filesystem, and the filesystem has a raid1 storage policy so there should have been no issue with one device going missing. But apparently there was a problem. btrfs sits spewing the kernel log with errors about lost writes to a device that’s no longer there; the filesystem goes read-only.

The replacement drive arrives, but with the filesystem read-only I can’t add it. I can’t even unmount the filesystem (says it is busy but lsof doesn’t see any users). Nope, I had to reboot the fileserver, at which point the filesystem wouldn’t mount at all because you have to give it the degraded mount option if you want it to mount with any devices missing.

Add the replacement drive, btrfs device remove missing /path/to/fs to kick off a remove of the dead device. Things are at least up and running read-write while this is going on. In fact it’s still going on, because there was 1.2TiB of data on the dead device and reconstructing it is painfully slow. As I write this we’re now about 9 hours in and there’s still about 421GiB to go.

So, it’s not terrible. No data was lost (probably). A short outage due to a required reboot. But it is kind of disappointing and not really how I want to be spending my time just because a single HDD slipped its mortal coil. I am massively thankful that the operating system of that fileserver is still on four other HDDs on ext4+lvm+md and never give me any trouble. Otherwise I’d have to be booting into a rescue OS to fix this sort of thing. When the thing you’re glad of is that you didn’t use a filesystem, that isn’t a great advert for that filesystem.

I should probably try to find some time to play (again) with ZFS-on-Linux. I did actually give it a go last year but got bogged down trying to compare its performance against btrfs and ext4+lvm+md using fio, which proved quite difficult to do, and I moved on to other things.

One of the things that initially attracted me to btrfs is the possibility of using a mish-mash of differently-sized drives. Due to BitFolk constantly replacing hardware I have in my possession plenty of HDDs of differing sizes that are individually perfectly serviceable, but would be awkward to try to match up into identical sizes for conventional RAID arrays. Over the years of this btrfs filesystem it had started out with mostly 250G drives and just before this failure it was 1x 1TB, 3x 2TB and 1x 3TB.

I had thought that ZFS requires every device to be the same capacity (i.e. it would only use the smallest capacity) but I’ve since been informed that ZFS will just use the capacity of the smallest device in the vdev. So assuming mirror vdevs, I’d just need to pair the drives up (or accept that the capacity will be that of the smaller of the two).

That doesn’t seem too onerous at all, when considering the advantages that ZFS would bring. I’m most interested in the self-healing (checksums) and the storage tiering (through using faster devices like SSDs for L2ARC and ZIL). btrfs doesn’t have a good solution for tiering yet, unless you are insane and want to play with bcache(fs).

So, yeah, should stop being lazy and crack on with ZFS again. In my copious free time.
Disabling edge tiling on GNOME 3.28 / Debian testing (buster)

We’ve been here before

In an earlier post I mentioned how to disable edge tiling. That was for my desktop machine which at the time was running Ubuntu 17.10 and GNOME 3.26.

My laptop, however, currently runs Debian testing (buster) with GNOME 3.28, and this method does not work.

Things that work

In fact, one of the ways the Internet suggested that didn’t work for Ubuntu, does work on my Debian laptop. That is:

$ gsettings set org.gnome.shell.overrides edge-tiling false

I have no idea why, sorry.

Things that don’t work

So, for my Debian buster laptop running GNOME 3.28 under Xorg, the things that don’t work are:

$ dconf write /org/gnome/shell/extensions/classic-overrides/edge-tiling false
$ dconf write /org/gnome/mutter/edge-tiling false
$ dconf write /org/gnome/shell/overrides/edge-tiling false

Stewart Lee interviewed on The Comedian’s Comedian Podcast

Really good interview with Stewart Lee on The Comedian’s Comedian Podcast with Stuart Goldsmith. It’s lengthy—over 2 hours when Goldsmith’s extras are tacked on—and not a work of comedy in itself, so don’t listen if you’re expecting a laugh-fest. It is an actual interview with the person, not the character, inasmuch as they can ever be fully separated.

Also don’t read the description and be put off by how much Goldsmith talks him up in it; it’s a good humble interview that goes into the craft of it.

Some of the incidents he mentions in the interview were either filmed professionally or caught on camera phone and if you are a Stewart Lee fangirl like me then they’re interesting to watch in light of his comments about them.

1. Glaswegian audience member gets hung up on Lee’s Caffe Nero card during DVD recording.

2. “Stewart Lee destroys a heckler” which Lee complains is misnamed because he doesn’t set out to destroy hecklers, but rather to simply address their concerns, in character.

3. “I think he’d feel flattered to be misquoted by me“. Out of context on YouTube it would be easy to mistake this for a genuine (but very silly) debate, but it was entirely written by Lee and is presented in-character as part of a show, as a justification by the character of Stewart Lee as to why he can mock and misquote Russell Brand.

4. “There’s just so much now it’s unmanageable … it had a positive effect on the act in that I just decided to become more like the thing they hate.” Lee’s now-frozen file of abusive online critiques is also worth linking to.

Using a different theme for Mediawiki’s SyntaxHighlight extension

Probably the best syntax highlighting plugin for Mediawiki at the moment is the one simply called SyntaxHighlight. It uses Pygments to do the heavy lifting. What sets it apart from the other extensions is that it supports line numbers and picking out highlighted lines.

Unfortunately the default style (theme) is dark-on-light whereas for most of my syntax highlighting I am giving examples of either shell sessions or code. All my shell sessions and code are viewed as light-on-dark, so I would prefer that the wiki’s syntax highlighting followed suit.

I spent quite a while messing about with editing the extension itself but to little effect, until Robert pointed out that I just needed to edit the Common.css file inside the wiki itself. Then you get some decent results.

I used something like this to generate the correct CSS for the “native” style:

$ ./extensions/SyntaxHighlight_GeSHi/pygments/pygmentize -S native -f html|sed -e 's/^/.mw-highlight > pre /'
.mw-highlight > pre .hll { background-color: #404040 }
.mw-highlight > pre .c { color: #999999; font-style: italic } /* Comment */
.mw-highlight > pre .err { color: #a61717; background-color: #e3d2d2 } /* Error */
.mw-highlight > pre .esc { color: #d0d0d0 } /* Escape */
.mw-highlight > pre .g { color: #d0d0d0 } /* Generic */
.mw-highlight > pre .k { color: #6ab825; font-weight: bold } /* Keyword */
.mw-highlight > pre .l { color: #d0d0d0 } /* Literal */
.mw-highlight > pre .n { color: #d0d0d0 } /* Name */
.mw-highlight > pre .o { color: #d0d0d0 } /* Operator */
.mw-highlight > pre .x { color: #d0d0d0 } /* Other */
.mw-highlight > pre .p { color: #d0d0d0 } /* Punctuation */
.mw-highlight > pre .ch { color: #999999; font-style: italic } /* Comment.Hashbang */
.mw-highlight > pre .cm { color: #999999; font-style: italic } /* Comment.Multiline */
.mw-highlight > pre .cp { color: #cd2828; font-weight: bold } /* Comment.Preproc */
.mw-highlight > pre .cpf { color: #999999; font-style: italic } /* Comment.PreprocFile */
.mw-highlight > pre .c1 { color: #999999; font-style: italic } /* Comment.Single */
.mw-highlight > pre .cs { color: #e50808; font-weight: bold; background-color: #520000 } /* Comment.Special */
.mw-highlight > pre .gd { color: #d22323 } /* Generic.Deleted */
.mw-highlight > pre .ge { color: #d0d0d0; font-style: italic } /* Generic.Emph */
.mw-highlight > pre .gr { color: #d22323 } /* Generic.Error */
.mw-highlight > pre .gh { color: #ffffff; font-weight: bold } /* Generic.Heading */
.mw-highlight > pre .gi { color: #589819 } /* Generic.Inserted */
.mw-highlight > pre .go { color: #cccccc } /* Generic.Output */
.mw-highlight > pre .gp { color: #aaaaaa } /* Generic.Prompt */
.mw-highlight > pre .gs { color: #d0d0d0; font-weight: bold } /* Generic.Strong */
.mw-highlight > pre .gu { color: #ffffff; text-decoration: underline } /* Generic.Subheading */
.mw-highlight > pre .gt { color: #d22323 } /* Generic.Traceback */
.mw-highlight > pre .kc { color: #6ab825; font-weight: bold } /* Keyword.Constant */
.mw-highlight > pre .kd { color: #6ab825; font-weight: bold } /* Keyword.Declaration */
.mw-highlight > pre .kn { color: #6ab825; font-weight: bold } /* Keyword.Namespace */
.mw-highlight > pre .kp { color: #6ab825 } /* Keyword.Pseudo */
.mw-highlight > pre .kr { color: #6ab825; font-weight: bold } /* Keyword.Reserved */
.mw-highlight > pre .kt { color: #6ab825; font-weight: bold } /* Keyword.Type */
.mw-highlight > pre .ld { color: #d0d0d0 } /* Literal.Date */
.mw-highlight > pre .m { color: #3677a9 } /* Literal.Number */
.mw-highlight > pre .s { color: #ed9d13 } /* Literal.String */
.mw-highlight > pre .na { color: #bbbbbb } /* Name.Attribute */
.mw-highlight > pre .nb { color: #24909d } /* Name.Builtin */
.mw-highlight > pre .nc { color: #447fcf; text-decoration: underline } /* Name.Class */
.mw-highlight > pre .no { color: #40ffff } /* Name.Constant */
.mw-highlight > pre .nd { color: #ffa500 } /* Name.Decorator */
.mw-highlight > pre .ni { color: #d0d0d0 } /* Name.Entity */
.mw-highlight > pre .ne { color: #bbbbbb } /* Name.Exception */
.mw-highlight > pre .nf { color: #447fcf } /* Name.Function */
.mw-highlight > pre .nl { color: #d0d0d0 } /* Name.Label */
.mw-highlight > pre .nn { color: #447fcf; text-decoration: underline } /* Name.Namespace */
.mw-highlight > pre .nx { color: #d0d0d0 } /* Name.Other */
.mw-highlight > pre .py { color: #d0d0d0 } /* Name.Property */
.mw-highlight > pre .nt { color: #6ab825; font-weight: bold } /* Name.Tag */
.mw-highlight > pre .nv { color: #40ffff } /* Name.Variable */
.mw-highlight > pre .ow { color: #6ab825; font-weight: bold } /* Operator.Word */
.mw-highlight > pre .w { color: #666666 } /* Text.Whitespace */
.mw-highlight > pre .mb { color: #3677a9 } /* Literal.Number.Bin */
.mw-highlight > pre .mf { color: #3677a9 } /* Literal.Number.Float */
.mw-highlight > pre .mh { color: #3677a9 } /* Literal.Number.Hex */
.mw-highlight > pre .mi { color: #3677a9 } /* Literal.Number.Integer */
.mw-highlight > pre .mo { color: #3677a9 } /* Literal.Number.Oct */
.mw-highlight > pre .sa { color: #ed9d13 } /* Literal.String.Affix */
.mw-highlight > pre .sb { color: #ed9d13 } /* Literal.String.Backtick */
.mw-highlight > pre .sc { color: #ed9d13 } /* Literal.String.Char */
.mw-highlight > pre .dl { color: #ed9d13 } /* Literal.String.Delimiter */
.mw-highlight > pre .sd { color: #ed9d13 } /* Literal.String.Doc */
.mw-highlight > pre .s2 { color: #ed9d13 } /* Literal.String.Double */
.mw-highlight > pre .se { color: #ed9d13 } /* Literal.String.Escape */
.mw-highlight > pre .sh { color: #ed9d13 } /* Literal.String.Heredoc */
.mw-highlight > pre .si { color: #ed9d13 } /* Literal.String.Interpol */
.mw-highlight > pre .sx { color: #ffa500 } /* Literal.String.Other */
.mw-highlight > pre .sr { color: #ed9d13 } /* Literal.String.Regex */
.mw-highlight > pre .s1 { color: #ed9d13 } /* Literal.String.Single */
.mw-highlight > pre .ss { color: #ed9d13 } /* Literal.String.Symbol */
.mw-highlight > pre .bp { color: #24909d } /* Name.Builtin.Pseudo */
.mw-highlight > pre .fm { color: #447fcf } /* Name.Function.Magic */
.mw-highlight > pre .vc { color: #40ffff } /* Name.Variable.Class */
.mw-highlight > pre .vg { color: #40ffff } /* Name.Variable.Global */
.mw-highlight > pre .vi { color: #40ffff } /* Name.Variable.Instance */
.mw-highlight > pre .vm { color: #40ffff } /* Name.Variable.Magic */
.mw-highlight > pre .il { color: #3677a9 } /* Literal.Number.Integer.Long */

(Yes, I also need to do the light-on-dark thing here in this blog)

To get a list of available styles:

$ ./extensions/SyntaxHighlight_GeSHi/pygments/pygmentize -L styles
Pygments version 2.2.0, (c) 2006-2017 by Georg Brandl.
 
Styles:
~~~~~~~
* manni:
    A colorful style, inspired by the terminal highlighting style.
* igor:
    Pygments version of the official colors for Igor Pro procedures.
* lovelace:
    The style used in Lovelace interactive learning environment. Tries to avoid the "angry fruit salad" effect with desaturated and dim colours.
* xcode:
    Style similar to the Xcode default colouring theme.
* vim:
    Styles somewhat like vim 7.0
* autumn:
    A colorful style, inspired by the terminal highlighting style.
* abap:
 
* vs:
 
* rrt:
    Minimalistic "rrt" theme, based on Zap and Emacs defaults.
* native:
    Pygments version of the "native" vim theme.
* perldoc:
    Style similar to the style used in the perldoc code blocks.
* borland:
    Style similar to the style used in the borland IDEs.
* arduino:
    The Arduino® language style. This style is designed to highlight the Arduino source code, so exepect the best results with it.
* tango:
    The Crunchy default Style inspired from the color palette from the Tango Icon Theme Guidelines.
* emacs:
    The default style (inspired by Emacs 22).
* friendly:
    A modern style based on the VIM pyte theme.
* monokai:
    This style mimics the Monokai color scheme.
* paraiso-dark:
 
* colorful:
    A colorful style, inspired by CodeRay.
* murphy:
    Murphy's style from CodeRay.
* bw:
 
* pastie:
    Style similar to the pastie default style.
* rainbow_dash:
    A bright and colorful syntax highlighting theme.
* algol_nu:
 
* paraiso-light:
 
* trac:
    Port of the default trac highlighter design.
* default:
    The default style (inspired by Emacs 22).
* algol:
 
* fruity:
    Pygments version of the "native" vim theme.

Although you may find it easier looking at the Pygments style gallery.

Let’s Encrypt wildcard certificates, acme.sh and automated DNS verification

Let’s Encrypt’s wildcard certificates

Now that Let’s Encrypt can issue wildcard TLS certificates I found some time to look into that.

I already use a Lua script with haproxy which takes care of automatically answering http-01 ACME challenges, but to issue/renew a wildcard certificate you need to answer a dns-01 challenge. A different client/setup would be needed.

dns-01 ACME challenges

Most of the clients that support ACME v2 offer a range of integrations for DNS providers, plus a manual mode that prints out the DNS record that you need to add and then waits for you to indicate that you’ve done it. I run my own DNS infrastructure so the thing to do would be RFC2136 dynamic DNS updates.

One wrinkle here is that currently none of my DNS zones have dynamic updates enabled. At the moment I manage them as zone files (some are automatically generated by scripts though). After looking at a few of the client options I found that acme.sh supports an “alias zone”.

Basically, in your main zone you create a CNAME for the challenge record that points at another zone, and then enable dynamic updates in that other zone. The other zone is dedicated for this purpose, so the only updates which will be happening will be for the purpose of answering dns-01 ACME challenges. I made my dynamic zone a sub-zone of my main one:

strugglers.net zone file content

These records need to be added to the main zone for this to work.

.
.
.
; sub-zone purely used for dns-01 ACME challenges.
acmesh          NS a.authns.bitfolk.co.uk.
                NS b.authns.bitfolk.com.
                NS c.authns.bitfolk.com.
 
; Alias the dns-01 challenge record into the dedicated zone.
_acme-challenge CNAME _acme-challenge.acmesh.strugglers.net.
.
.
.

acmesh.strugglers.net zone file content

Initially this just needs to be an empty zone with only SOA and NS records, so this is the entire content of the file.

$ORIGIN .
$TTL 86400      ; 1 day
acmesh.strugglers.net   IN SOA  a.authns.bitfolk.co.uk. hostmaster.bitfolk.com. (
                                2018031905 ; serial
                                14400      ; refresh (4 hours)
                                7200       ; retry (2 hours)
                                1209600    ; expire (2 weeks)
                                43200      ; minimum (12 hours)
                                )
                        NS      a.authns.bitfolk.co.uk.
                        NS      b.authns.bitfolk.com.
                        NS      c.authns.bitfolk.com.

DNS server configuration

The DNS server needs to know a key by which it will authenticate acme.sh‘s updates, and also needs to be told that the new zone is a dynamic zone. I use BIND, so it goes as follows.

Generate a key for dynamic DNS updates

Use the dnssec-keygen command to generate a key suitable for authenticating DNS updates.

$ dnssec-keygen -r /dev/urandom -a HMAC-SHA512 -b 512 -n HOST DDNS_UPDATE

This creates two files named like Kddns_update.+165+14059.key and Kddns_update.+165+14059.private.

Put the key in the BIND config

Look in the private file and take the key from the line that starts “Key:”. Put that in some config file that you will load into your BIND like this:

key "strugglers" {
    algorithm hmac-sha512;
    secret "Sb8nvwpO8bhiU4haPB+NiJKoMO6vVJumrr29Bj3daSuB8hBoTKoqPKMBKTYLRUv12pbKPwJATgdsU6BtL4Hmcw==";
};

The thing in quotes after “key” is a symbolic name for this key and can be anything that makes sense to you. The “secret” is the key from the private file. You can delete the two Kddns_update.+165+14059.* files now.

Put the new zone into the BIND config

The config for the zone itself looks something like this:

zone "acmesh.strugglers.net" {
    type master;
    file "/path/to/acmesh.strugglers.net";
    allow-update {
        key "strugglers";
    };
};

Reload the DNS server

Once BIND has been reloaded the log file should indicate that the acemsh.strugglers.net zone was loaded correctly, and in my case that triggers DNS NOTIFY to my secondary servers which automatically begin zone transfers.

Check things out with nsupdate

At this point it might be worth using the nsupdate command to check that you can do dynamic DNS updates.

Just type the nsupdate line in the shell, the > is a prompt at which you will type the updates you wish to send. We’ll add a trivial TXT record. The -k argument is the path to the file containing the key.

$ nsupdate -k /path/to/strugglers.key -v
> server a.authns.bitfolk.co.uk
> debug yes
> zone acmesh.strugglers.net.
> update add foo.acmesh.strugglers.net. 86400 TXT "bar"
> show
Outgoing update query:
;; ->>HEADER<<- opcode: UPDATE, status: NOERROR, id:      0
;; flags:; ZONE: 0, PREREQ: 0, UPDATE: 0, ADDITIONAL: 0
;; ZONE SECTION:
;acmesh.strugglers.net.         IN      SOA
 
;; UPDATE SECTION:
foo.acmesh.strugglers.net. 86400 IN     TXT     "bar"
 
> send
Sending update to 85.119.80.222#53
Outgoing update query:
;; ->>HEADER<<- opcode: UPDATE, status: NOERROR, id:  19987
;; flags:; ZONE: 1, PREREQ: 0, UPDATE: 1, ADDITIONAL: 1
;; ZONE SECTION:
;acmesh.strugglers.net.         IN      SOA
 
;; UPDATE SECTION:
foo.acmesh.strugglers.net. 86400 IN     TXT     "bar"
 
;; TSIG PSEUDOSECTION:
strugglers.             0       ANY     TSIG    hmac-sha512. 1521454639 300 64 dPndp1/ZyqzmSEn0AKIsGR62HrsplJBhntWioM4oBdPlNXUIAwg7Jwpg DGSM2S3kY+5hfGTleNqwXZrMvnBhUQ== 19987 NOERROR 0 
 
 
Reply from update query:
;; ->>HEADER<<- opcode: UPDATE, status: NOERROR, id:  19987
;; flags: qr; ZONE: 1, PREREQ: 0, UPDATE: 0, ADDITIONAL: 1
;; ZONE SECTION:
;acmesh.strugglers.net.         IN      SOA
 
;; TSIG PSEUDOSECTION:
strugglers.             0       ANY     TSIG    hmac-sha512. 1521454639 300 64 NfH/78kvq6f+59RXnyJwC6kfFRLGjG6Rh9jdYRId7UjH0jwIbtRVpqCu xx4HToGmlJrDTUqpgbYZq2orUOZlkQ== 19987 NOERROR 0
 
> [Ctrl-D]

And to verify it really got added (though the status of NOERROR should be confirmation enough):

$ dig +short -t txt foo.acmesh.strugglers.net
"bar"

That it; you can do dynamic DNS updates.

acme.sh

I’m going to assume you’ve installed acme.sh according to one of its supported installation methods. Personally I am not into curl | sh so I:

  • Create a system user that can’t log in.
  • git clone the source.
  • acme.sh --install it as that user.

acme.sh doesn’t have to be run on the primary DNS server, because it’s going to use a dynamic DNS update to do all the DNS things. It just needs access to the dynamic DNS update key file. Either you can install acme.sh on each host that will need to generate/renew certificates and copy the DNS key there, or else do all the certificate generation/renewal in one place and copy the certificate files around.

However you manage it, make sure that the user you’re going to run acme.sh as can read the dynamic DNS update key file.

Issuing the first wildcard certificate

The first time you issue the certificate you need to set NSUPDATE_KEY and NSUPDATE_SERVER in your environment. After the first successful issuance acme.sh will store these variables in its configuration for use in the automated renewals.

$ NSUPDATE_SERVER=a.authns.bitfolk.co.uk NSUPDATE_KEY=/path/to/strugglers.key ./acme.sh --issue -d strugglers.net -d '*.strugglers.net' --challenge-alias acmesh.strugglers.net --dns dns_nsupdate
[Mon 19 Mar 09:19:00 UTC 2018] Multi domain='DNS:strugglers.net,DNS:*.strugglers.net'
[Mon 19 Mar 09:19:00 UTC 2018] Getting domain auth token for each domain
[Mon 19 Mar 09:19:03 UTC 2018] Getting webroot for domain='strugglers.net'
[Mon 19 Mar 09:19:03 UTC 2018] Getting webroot for domain='*.strugglers.net'
[Mon 19 Mar 09:19:04 UTC 2018] Found domain api file: /path/to/acmesh/dnsapi/dns_nsupdate.sh
[Mon 19 Mar 09:19:04 UTC 2018] adding _acme-challenge.acmesh.strugglers.net. 60 in txt "WmenhbXRtenhpNLYLOBjznyHcVvFk-jjxurCVTrhWc8"
[Mon 19 Mar 09:19:04 UTC 2018] Found domain api file: /path/to/acmesh/dnsapi/dns_nsupdate.sh
[Mon 19 Mar 09:19:04 UTC 2018] adding _acme-challenge.acmesh.strugglers.net. 60 in txt "fwZPUBHijOQkJJaoOF_nIn3Z_FtuVU9R635NDVz_hPA"
[Mon 19 Mar 09:19:04 UTC 2018] Sleep 120 seconds for the txt records to take effect

At this point a DNS update has been crafted and sent so you should see your zone update and zone transfer happen to any secondary servers. If that doesn’t happen within 120 seconds then when Let’s Encrypt tries to verify the challenge it might query a DNS server that doesn’t yet have the record. Your zone transfers need to be reliable.

[Mon 19 Mar 09:21:08 UTC 2018] Verifying:strugglers.net
[Mon 19 Mar 09:21:12 UTC 2018] Success
[Mon 19 Mar 09:21:12 UTC 2018] Verifying:*.strugglers.net
[Mon 19 Mar 09:21:15 UTC 2018] Success
[Mon 19 Mar 09:21:15 UTC 2018] Removing DNS records.
[Mon 19 Mar 09:21:15 UTC 2018] removing _acme-challenge.acmesh.strugglers.net. txt
[Mon 19 Mar 09:21:16 UTC 2018] removing _acme-challenge.acmesh.strugglers.net. txt
[Mon 19 Mar 09:21:16 UTC 2018] Verify finished, start to sign.
[Mon 19 Mar 09:21:18 UTC 2018] Cert success.
-----BEGIN CERTIFICATE-----
MIIFETCCA/mgAwIBAgISAz4ZQV27n1FgemVAEhIqiUZnMA0GCSqGSIb3DQEBCwUA
MEoxCzAJBgNVBAYTAlVTMRYwFAYDVQQKEw1MZXQncyBFbmNyeXB0MSMwIQYDVQQD
.
.
.
NeAmr5I=
-----END CERTIFICATE-----
[Mon 19 Mar 09:21:18 UTC 2018] Your cert is in  /path/to/acmesh/.acme.sh/strugglers.net/strugglers.net.cer 
[Mon 19 Mar 09:21:18 UTC 2018] Your cert key is in  /path/to/acmesh/.acme.sh/strugglers.net/strugglers.net.key 
[Mon 19 Mar 09:21:18 UTC 2018] The intermediate CA cert is in  /path/to/acmesh/.acme.sh/strugglers.net/ca.cer 
[Mon 19 Mar 09:21:18 UTC 2018] And the full chain certs is there:  /path/to/acmesh/.acme.sh/strugglers.net/fullchain.cer

Examining a certificate

Just for peace of mind…

$ openssl x509 -text -noout -certopt no_subject,no_header,no_version,no_serial,no_signame,no_subject,no_issuer,no_pubkey,no_sigdump,no_aux -in /path/to/acmesh/.acme.sh/strugglers.net/strugglers.net.cer
        Validity
            Not Before: Mar 19 08:21:17 2018 GMT
            Not After : Jun 17 08:21:17 2018 GMT
        X509v3 extensions:
            X509v3 Key Usage: critical
                Digital Signature, Key Encipherment
            X509v3 Extended Key Usage: 
                TLS Web Server Authentication, TLS Web Client Authentication
            X509v3 Basic Constraints: critical
                CA:FALSE
            X509v3 Subject Key Identifier: 
                BF:C7:8E:F5:87:05:D0:6E:15:AC:7B:37:9F:82:05:C3:E3:11:B7:32
            X509v3 Authority Key Identifier: 
                keyid:A8:4A:6A:63:04:7D:DD:BA:E6:D1:39:B7:A6:45:65:EF:F3:A8:EC:A1
 
            Authority Information Access: 
                OCSP - URI:http://ocsp.int-x3.letsencrypt.org
                CA Issuers - URI:http://cert.int-x3.letsencrypt.org/
 
            X509v3 Subject Alternative Name: 
                DNS:*.strugglers.net, DNS:strugglers.net
            X509v3 Certificate Policies: 
                Policy: 2.23.140.1.2.1
                Policy: 1.3.6.1.4.1.44947.1.1.1
                  CPS: http://cps.letsencrypt.org
                  User Notice:
                    Explicit Text: This Certificate may only be relied upon by Relying Parties and only in accordance with the Certificate Policy found at https://letsencrypt.org/repository/

From the Subject Alternative Name we can see it is a wildcard certificate.

Disabling edge tiling on GNOME 3.26 / Ubuntu 17.10

Edge tiling?

It’s that thing where when you drag a window so it hits the edge of the screen, GNOME offers to maximise the window. Generally the number of times I will knowingly want to maximise a window by dragging it to the top of the screen is 0, while the number of times it happens accidentally is over 9,000 by lunch time.

Things that work

$ dconf write /org/gnome/mutter/edge-tiling false

It should take effect immediately.

If you like a pointy clicky way to do it then install dconf-editor package and run dconf-editor, but really all you will do is click down the tree orggnomemutter and then toggle edge-tiling so I don’t really see the point.

Things that people on the Internet say work, but don’t – a non-exhaustive list

These suggestions silently fail to do anything, as far as I can see. They may have been correct for earlier versions of GNOME, but I am using GNOME on Ubuntu 17.10 and they didn’t work for me.

dconf write /org/gnome/shell/extensions/classic-overrides/edge-tiling false
gsettings set org.gnome.shell.overrides edge-tiling false
dconf write /org/gnome/shell/overrides/edge-tiling false

Giving Cinema Paradiso a try

Farewell, LoveFiLM

I’ve been a customer of LoveFiLM for something like 12 years—since before they were owned by Amazon. In their original incarnation they were great: very cheap, and titles very often arrived in exactly the order you specified, i.e. they often managed to send the thing from the very top of the list.

In 2011 they got bought by Amazon and I was initially a bit concerned, but to be honest Amazon have run it well. The single list disappeared and was replaced by three priority lists; high, normal and low, and then a list of things that haven’t yet been released. New rentals were supposed to almost always come from the high priority list (as long as you had enough titles on there) but in a completely unpredictable order. Though of course they would keep multi-disc box sets together, and send lower-numbered seasons before later seasons.

Amazon have now announced that they’re shutting LoveFiLM by Post down at the end of October which I think is a shame, as it was a service I still enjoy.

It was inevitable I suppose due to the increasing popularity of streaming and downloads, and although I’m perfectly able to do the streaming and download thing, receiving discs by post still works for me.

I am used to receiving mockery for consuming some of my entertainment on little plastic discs that a human being has to physically transport to my residence, but LoveFiLM’s service was still cheap, the selection was very good, things could be rented as soon as they were available on disc, and the passive nature of just making a list and having the things sent to me worked well for me.

Cinema Paradiso

My first thought was that that was it for the disc-by-post rental model in the UK. That progress had left it behind. But very quickly people pointed me to Cinema Paradiso. After a quick look around I’ve decided to give it a try and so here are my initial thoughts.

Pricing

At a casual glance the pricing is slightly worse than LoveFiLM’s. I was paying £6.99 a month for 2 discs at home, unlimited rental per month. £6.98 at Cinema Paradiso gets you 2 discs at home but only 4 rentals per month.

I went back through my LoveFiLM rental history for the last year and found there were only 2 months where I managed to rent more than 4 discs, and those times I rented 5 and 6 discs respectively. Realistically it doesn’t seem like 4 discs per month will be much of a restriction to me.

Annoyingly, Cinema Paradiso have a 2 week trial period but only if you sign up to the £9.98 subscription (6 discs a month). You’d have to remember to downgrade to the cheaper subscriptions after 2 weeks, if that’s all you wanted.

Selection

I was pleasantly surprised at how good the selection is at Cinema Paradiso. Not only did they have every title that is currently on my LoveFiLM rental list (96 titles), but they also had a few things that LoveFiLM thinks haven’t been released yet.

I’m not going to claim that my tastes are particularly niche, but there are a few foreign language films and some anime in there, and release dates range from the 70s to 2017.

Manual approval

It seems that new Cinema Paradiso signups need to be manually approved, and this happens only on week days between 8am and mid day. I’ve signed up on a Saturday evening so nothing will get sent out until Monday I suppose.

It’s probably not a big deal as we’re talking about the postal service here so even with LoveFiLM nothing would get posted out until Monday anyway. It is a little jarring after moving away from the behemoth that is Amazon though, and serves as a reminder that Cinema Paradiso is a much smaller company.

Searching for titles

The search feature is okay. It provides suggestions as you type but if your title is obscure then it may not appear in the list of suggestions at all you and need to submit the search box and look through the longer list that appears.

A slight niggle is that if you have moused over any of the initial suggestions it replaces your text with that, so if your title isn’t amongst the suggestions you now have to re-type it.

I like that it shows a rating from Rotten Tomatoes as well as from their own site’s users. LoveFiLM shows IMDB ratings which I don’t trust very much, and also Amazon ratings, which I don’t trust at all for movies or TV. Seeing some of the shockingly-low Rotten Tomatoes scores for some of my LoveFiLM titles resulted in my Cinema Paradiso list shrinking to 83 titles!

Rental list mechanics

It’s hard to tell for sure at this stage because I haven’t yet got my account approved and had any rentals, but it looks to me like the rental list mechanics are a bit clunky compared to LoveFiLM’s.

At LoveFiLM at the point of adding a new title you would choose which of the three “buckets” to put a rental in; high priority, normal priority, or low priority. Every title in those buckets were of equal priority to every other item in the same bucket. So, when adding a new title all you had to consider was whether it was high, medium or low.

Cinema Paradiso has a single big list of rentals. In some ways this might appeal because you can fine-tune what order you would like things in. But I would suggest that very few people want to put that much effort into ordering their list. Personally, when I add a new title I can cope with:

  • “I want to see this soon”
  • “I want to see this some time”
  • “I want to see this, but I’m not bothered when”

Cinema Paradiso appears to want me to say:

  • “Put this at the top, I want it immediately!”
  • “This belongs at #11, just after the 6th season of American Horror Story, but before Capitalism: A love Story
  • “Just stick it at the end”

I can’t find any explanation anywhere on their site as to how the selection actually works, so the logical assumption is that they go down your list from top to bottom until they find a title that you want that they have available right now. Without the three buckets to put titles in, it seems to me then that every addition will have to involve some list management unless I either want to see that title really soon, or probably never.

I’ll have to give it a go but this mechanism seems a bit more awkward than LoveFiLM’s approach and needlessly so, because LoveFiLM’s way doesn’t make any promises about which of the titles in each bucket will come next either, nor even that it will be anything from the high priority bucket at all. Although I cannot remember a time when something has come that wasn’t from the high priority bucket.

Cinema Paradiso does let you have more than one list, and you can divide your disc allocation between lists, but I don’t think I could emulate the high/normal/low with that. Having a 2 disc allocation I’d always be getting one disc from the “high” list and one disc from the “normal” priority, which isn’t how I’d want that to work.

Let’s see how it goes.

Referral

I did not know when I signed up that there was a referral scheme which is a shame because I do know some people already using Cinema Paradiso. If you’re going to sign up then please use my referral link. I will get a ⅙ reduction in rental fees for each person that does.

Tricky issues when upgrading to the GoCardless “Pro” API

Background

Since 2012 BitFolk has been using GoCardless as a Direct Debit payment provider. On the whole it has been a pleasant experience:

  • Their API is a pleasure to integrate against, having excellent documentation
  • Their support is responsive and knowledgeable
  • Really good sandbox environment with plenty of testing tools
  • The fees, being 1% capped at £2.00, are pretty good for any kind of payment provider (much less than PayPal, Stripe, etc.)

Of course, if I was submitting Direct Debits myself there would be no charge at all, but BitFolk is too small and my bank (Barclays) are not interested in talking to me about that.

The “Pro” API

In September 2014 GoCardless came out with a new version of their API called the “Pro API”. It made a few things nicer but didn’t come with any real new features applicable to BitFolk, and also added a minimum fee of £0.20.

The original API I’d integrated against has a 1% fee capped at £2.00, and as BitFolk’s smallest plan is £10.79 including VAT the fee would generally be £0.11. Having a £0.20 fee on these payments would represent nearly a doubling of fees for many of my payments.

So, no compelling reason to use the Pro API.

Over the years, GoCardless made more noise about their Pro API and started calling their original API the “legacy API”. I could see the way things were going. Sure enough, eventually they announced that the legacy API would be disabled on 31 October 2017. No choice but to move to the Pro API now.

Payment caps

There aren’t normally any limits on Direct Debit payments. When you let your energy supplier or council or whatever do a Direct Debit, they can empty your bank account if they like.

The Direct Debit Guarantee has very strong provisions in it for protecting the payee and essentially if you dispute anything, any time, you get your money back without question and the supplier has to pursue you for the money by other means if they still think the charge was correct. A company that repeatedly gets Direct Debit chargebacks is going to be kicked off the service by their bank or payment provider.

The original GoCardless API had the ability to set caps on the mandate which would be enforced their side. A simple “X amount per Y time period”. I thought that this would provide some comfort to customers who may not be otherwise familiar with authorising Direct Debits from small companies like BitFolk, so I made use of that feature by default.

This turned out to be a bad decision.

The main problem with this was that there was no way to change the cap. If a customer upgraded their service then I’d have to cancel their Direct Debit mandate and ask them to authorise a new one because it would cease being possible to charge them the correct amount. Authorising a new mandate was not difficult—about the same amount of work as making any sort of online payment—but asking people to do things is always a pain point.

There was a long-standing feature request with GoCardless to implement some sort of “follow this link to authorise the change” feature, but it never happened.

Payment caps and the new API

The Pro API does not support mandates with a capped amount per interval. Given that I’d already established that it was a mistake to do that, I wasn’t too bothered about that.

I’ve since discovered however that the Pro API not only does not support setting the caps, it does not have any way to query them either. This is bad because I need to use the Pro API with mandates that were created in the legacy API. And all of those have caps.

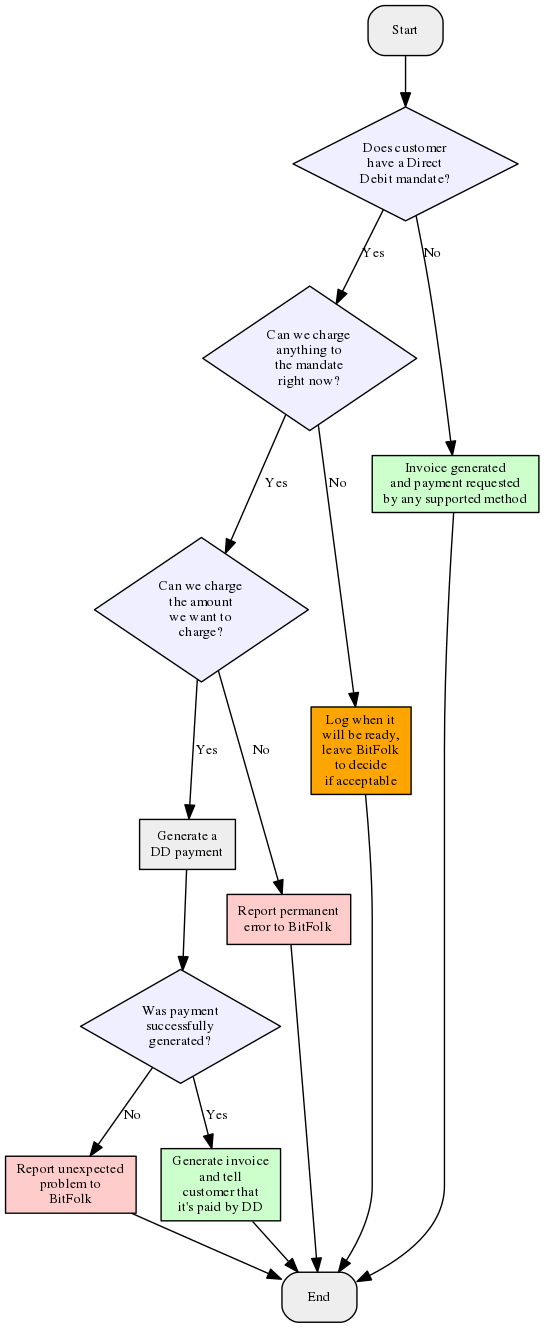
Here’s the flow I had using the legacy API.

Legacy payment process

This way if the charge was coming a little too early, I could give some latitude and let it wait a couple of days until it could be charged. I’d also know if the problem was that the cap was too low. In that case there would be no choice but to cancel the customer’s mandate and ask them to authorise another one, but at least I would know exactly what the problem was.

With the Pro API, there is no way to check timings and charge caps. All I can do is make the charge, and then if it’s too soon or too much I get the same error message:

“Validation failed / exceeds mandate cap”

That’s it. It doesn’t tell me what the cap is, it doesn’t tell me if it’s because I’m charging too soon, nor if I’m charging too much. There is no way to distinguish between those situations.

Backwards compatible – sort of

GoCardless talk about the Pro API being backwards compatible to the legacy API, so that once switched I would still be able to create payments against mandates that were created using the legacy API. I would not need to get customers to re-authorise.

This is true to a point, but my use of caps per interval in the legacy API has severely restricted how compatible things are, and that’s something I wasn’t aware of. Sure, their “Guide to upgrading” does briefly mention that caps would continue to be enforced:

“Pre-authorisation mandates are not restricted, but the maximum amount and interval that you originally specified will still apply.”

That is the only mention of this issue in that entire document, and that statement would be fine by me, if there would have continued to be a way to tell which failure mode would be encountered.

Thinking that I was just misunderstanding, I asked GoCardless support about this. Their reply:

Thanks for emailing.

I’m afraid the limits aren’t exposed within the new API. The only solution as you suggest, is to try a payment and check for failure.

Apologies for the inconvenience caused here and if you have any further queries please don’t hesitate to let us know.

What now?

I am not yet sure of the best way to handle this.

The nuclear option would be to cancel all mandates and ask customers to authorise them again. I would like to avoid this if possible.

I am thinking that most customers continue to be fine on the “amount per interval” legacy mandates as long as they don’t upgrade, so I can leave them as they are until that happens. If they upgrade, or if a DD payment ever fails with “exceeds mandate cap” then I will have to cancel their mandate and ask them to authorise again. I can see if their mandate was created before ~today and advise them on the web site to cancel it and authorise it again.

Conclusion

I’m a little disappointed that GoCardless didn’t think that there would need to be a way to query mandate caps even though creating new mandates with those limits is no longer possible.

I can’t really accept that there is a good level of backwards compatibility here if there is a feature that you can’t even tell is in use until it causes a payment to fail, and even then you can’t tell which details of that feature cause the failure.

I understand why they haven’t just stopped honouring the caps: it wouldn’t be in line with the consumer-focused spirit of the Direct Debit Guarantee to alter things against customer expectations, and even sending out a notification to the customer might not be enough. I think they should have gone the other way and allowed querying of things that they are going to continue to enforce, though.

Could I have tested for this? Well, the difficulty there is that the GoCardless sandbox environment for the Pro API starts off clean with no access to any of your legacy activity neither from live nor from legacy sandbox. So I couldn’t do something like the following:

  1. Create legacy mandate in legacy sandbox, with amount per interval caps
  2. Try to charge against the legacy mandate from the Pro API sandbox, exceeding the cap
  3. Observe that it fails but with no way to tell why

I did note that there didn’t seem to be attributes of the mandate endpoint that would let me know when it could be charged and what the amount left to charge was, but it didn’t set off any alarm bells. Perhaps it should have.

Also I will admit I’ve had years to switch to Pro API and am only doing it now when forced. Perhaps if I had made a start on this years ago, I’d have noted what I consider to be a deficiency, asked them to remedy it and they might have had time to do so. I don’t actually think it’s likely they would bump the API version for that though. In my defence, as I mentioned, there is nothing attractive about the Pro API for my use, and it does cost more, so no surprise I’ve been reluctant to explore it.

So, if you are scrambling to update your GoCardless integration before 31 October, do check that you are prepared for payments against capped mandates to fail.

When is a 64-bit counter not a 64-bit counter?

…when you run a Xen device backend (commonly dom0) on a kernel version earlier than 4.10, e.g. Debian stable.

TL;DR

Xen netback devices used 32-bit counters until that bug was fixed and released in kernel version 4.10.

On a kernel with that bug you will see counter wraps much sooner than you would expect, and if the interface is doing enough traffic for there to be multiple wraps in 5 minutes, your monitoring will no longer be accurate.

The problem

A high-bandwidth VPS customer reported that the bandwidth figures presented by BitFolk’s monitoring bore no resemblance to their own statistics gathered from inside their VPS. Their figures were a lot higher.

About octet counters

The Linux kernel maintains byte/octet counters for its network interfaces. You can view them in /sys/class/net/<interface>/statistics/*_bytes.

They’re a simple count of bytes transferred, and so the count always goes up. Typically these are 64-bit unsigned integers so their maximum value would be 18,446,744,073,709,551,615 (264-1).

When you’re monitoring bandwidth use the monitoring system records the value and the timestamp. The difference in value over a known period allows the monitoring system to work out the rate.

Wrapping

Monitoring of network devices is often done using SNMP. SNMP has 32-bit and 64-bit counters.

The maximum value that can be held in a 32-bit counter is 4,294,967,295. As that is a byte count, that represents 34,359,738,368 bits or 34,359.74 megabits. Divide that by 300 (seconds in 5 minutes) and you get 114.5. Therefore if the average bandwidth is above 114.5Mbit/s for 5 minutes, you will overflow a 32-bit counter. When the counter overflows it wraps back through zero.

Wrapping a counter once is fine. We have to expect that a counter will wrap eventually, and as counters never decrease, if a new value is smaller than the previous one then we know it has wrapped and can still work out what the rate should be.

The problem comes when the counter wraps more than once. There is no way to tell how many times it has wrapped so the monitoring system will have to assume the answer is once. Once traffic reaches ~229Mbit/s the counters will be wrapping at least twice in 5 minutes and the statistics become meaningless.

64-bit counters to the rescue

For that reason, network traffic is normally monitored using 64-bit counters. You would have to have a traffic rate of almost 492 Petabit/s to wrap a 64-bit byte counter in 5 minutes.

The thing is, I was already using 64-bit SNMP counters.

Examining the sysfs files

I decided to remove SNMP from the equation by going to the source of the data that SNMP uses: the kernel on the device being monitored.

As mentioned, the kernel’s interface byte counters are exposed in sysfs at /sys/class/net/<interface>/statistics/*_bytes. I dumped out those values every 10 seconds and watched them scroll in a terminal session.

What I observed was that these counters, for that particular customer, were wrapping every couple of minutes. I never observed a value greater than 8,469,862,875. That’s larger than a 32-bit counter would hold, but very close to what a 33 bit counter would hold (8,589,934,591).

64-bit counters not to the rescue

Once I realised that the kernel’s own counters were wrapping every couple of minutes inside the kernel it became clear that using 64-bit counters in SNMP was not going to help at all, and multiple wraps would be seen in 5 minutes.

What a difference a minute makes

To test the hypothesis I switched to 1-minute polling. Here’s what 12 hours of real data looks like under both 5- and 1-minute polling.

As you can see that is a pretty dramatic difference.

The bug

By this point, I’d realised that there must be a bug in Xen’s netback driver (the thing that makes virtual network interfaces in dom0).

I went searching through the source of the kernel and found that the counters had changed from an unsigned long in kernel version 4.9 to a u64 in kernel version 4.10.

Of course, once I knew what to search for it was easy to unearth a previous bug report. If I’d found that at the time of the initial report that would have saved 2 days of investigation!

Even so, the fix for this was only committed in February of this year so, unfortunately, is not present in the kernel in use by the current Debian stable. Nor in many other current distributions.

For Xen set-ups on Debian the bug could be avoided by using a backports kernel or packaging an upstream kernel.

Or you could do 1-minute polling as that would only wrap one time at an average bandwidth of ~572Mbit/s and should be safe from multiple wraps up to ~1.1Gbit/s.

Inside the VPS the counters are 64-bit so it isn’t an issue for guest administrators.

A slightly more realistic look at lvmcache

Recap

And then…

I decided to perform some slightly more realistic benchmarks against lvmcache.

The problem with the initial benchmark was that it only covered 4GiB of data with a 4GiB cache device. Naturally once lvmcache was working correctly its performance was awesome – the entire dataset was in the cache. But clearly if you have enough fast block device available to fit all your data then you don’t need to cache it at all and may as well just use the fast device directly.

I decided to perform some fio tests with varying data sizes, some of which were larger than the cache device.

Test methodology

Once again I used a Zipf distribution with a factor of 1.2, which should have caused about 90% of the hits to come from just 10% of the data. I kept the cache device at 4GiB but varied the data size. The following data sizes were tested:

  • 1GiB
  • 2GiB
  • 4GiB
  • 8GiB
  • 16GiB
  • 32GiB
  • 48GiB

With the 48GiB test I expected to see lvmcache struggling, as the hot 10% (~4.8GiB) would no longer fit within the 4GiB cache device.

A similar fio job spec to those from the earlier articles was used:

[cachesize-1g]
size=512m
ioengine=libaio
direct=1
iodepth=8
numjobs=2
readwrite=randread
random_distribution=zipf:1.2
bs=4k
unlink=1
runtime=30m
time_based=1
per_job_logs=1
log_avg_msec=500
write_iops_log=/var/tmp/fio-${FIOTEST}

…the only difference being that several different job files were used each with a different size= directive. Note that as there are two jobs, the size= is half the desired total data size: each job lays out a data file of the specified size.

For each data size I took care to fill the cache with data first before doing a test run, as unreproducible performance is still seen against a completely empty cache device. This produced IOPS logs and a completion latency histogram. Test were also run against SSD and HDD to provide baseline figures.

Results

IOPS graphs

All-in-one

Immediately we can see that for data sizes 4GiB and below performance converges quite quickly to near-SSD levels. That is very much what we would expect when the cache device is 4GiB, so big enough to completely cache everything.

Let’s just have a look at the lower-performing configurations.

Low-end performers

For 8, 16 and 32GiB data sizes performance clearly gets progressively worse, but it is still much better than baseline HDD. The 10% of hot data still fits within the cache device, so plenty of acceleration is still happening.

For the 48GiB data size it is a little bit of a different story. Performance is still better (on average) than baseline HDD, but there are periodic dips back down to roughly HDD figures. This is because not all of the 10% hot data fits into the cache device any more. Cache misses cause reads from HDD and consequently end up with HDD levels of performance for those reads.

The results no longer look quite so impressive, with even the 8GiB data set achieving only a few thousand IOPS on average. Are things as bad as they seem? Well no, I don’t think they are, and to see why we will have to look at the completion latency histograms.

Completion latency histograms

The above graphs are generated by fitting a Bezier curve to a scatter of data points each of which represents a 500ms average of IOPS achieved. The problem there is the word average.

It’s important to understand what effect averaging the figures gives. We’ve already seen that HDDs are really slow. Even if only a few percent of IOs end up missing cache and going to HDD, the massive latency of those requests will pull the average for the whole 500ms window way down.

Presumably we have a cache because we suspect we have hot spots of data, and we’ve been trying to evaluate that by doing most of the reads from only 10% of the data. Do we care what the average performance is then? Well it’s a useful metric but it’s not going to say much about the performance of reads from the hot data.

The histogram of completion latencies can be more useful. This shows how long it took between issuing the IO and completing the read for a certain percentage of issued IOs. Below I have focused on the 50% to 99% latency buckets, with the times for each bucket averaged between the two jobs. In the interests of being able to see anything at all I’ve had to double the height of the graph and still cut off the y axis for the three worst performers.

A couple of observations:

  • Somewhere between 70% and 80% of IOs complete with a latency that’s so close to SSD performance as to be near-indistinguishable, no matter what the data size. So what I think I am proving is that:

    you can cache a 48GiB slow backing device with 4GiB of fast SSD and if you have 10% hot data then you can expect it to be served up at near-SSD latencies 70%–80% of the time. If your hot spots are larger (not so hot) then you won’t achieve that. If your fast device is larger than 1/12th the backing device then you should do better than 70%–80%.

  • If the cache were perfect then we should expect the 90th percentile to be near SSD performance even for the 32GiB data set, as the 10% hot spot of ~3.2GiB fits inside the 4GiB cache. For whatever reason this is not achieved, but for that data size the 90th percentile latency is still about half that of HDD.
  • When the backing device is many times larger (32GiB+) than the cache device, the 99th percentile latencies can be slightly worse than for baseline HDD.

    I hesitate to suggest there is a problem here as there are going to be very few samples in the top 1%, so it could just be showing close to HDD performance.

Conclusion

Assuming you are okay with using a 4.12..x kernel, and assuming you are already comfortable using LVM, then at the moment it looks fairly harmless to deploy lvmcache.

Getting a decent performance boost out of it though will require you to check that your data really does have hot spots and size your cache appropriately.

Measuring your existing workload with something like blktrace is probably advisable, and these days you can feed the output of blktrace back into fio to see what performance might be like in a difference configuration.

Full test output

You probably want to stop reading here unless the complete output of all the fio runs is of interest to you.
Continue reading “A slightly more realistic look at lvmcache”