Every time I go to test file integrity — e.g. are these two files the same? Is this file the same as a backup copy of this file? — muscle memory makes me type md5sum. Then my brain reprimands me:
Wait! md5 is insecure! It’s broken! Use SHA256!
Hands are wrong and brain is wrong. Just another day in the computer mines.
Well, if it was a secure hash function you were looking for, where someone might tamper with these files, then brain is not so wrong: MD5 has long been known to be too weak and is trivially subject to collision attacks.
But for file integrity on trusted data, like where you are checking for bitrot, cosmic rays or just everyday changes, you don’t need a cryptographically secure hash function. md5sum is safe enough for this, but in terms of performance it sucks. There’s been better hash functions around and packaged in major operating systems for years. Such as xxHash!
Maybe like me you reach for md5sum because…
You always have!
It’s right there!
It’s pretty fast though right?
On Debian, xxhash is right there after you have typed:
$ sudo apt install xxhash
$ sudo apt install xxhash
Here’s me hashing the first 1GiB of one of my desktop machine’s NVMe drives.
Hash Function
CPU seconds (user+kernel)
%CPU
XXH128
0.21
10
xXH64
0.21
11
MD5
1.38
56
SHA1
1.72
62
SHA512
2.36
70
SHA256
3.76
80
I think this scenario was a good test as NVMe are really fast, so this focuses on the cost of algorithm rather than the IO. But if you want to see similar for slow storage, here is me doing same by reading 10GiB off a pair of 7,200RPM SATA drives:
Hash Function
CPU seconds (user+kernel)
%CPU
XXH128
2.44
5
xXH64
4.76
10
MD5
16.62
35
SHA1
18.00
38
SHA512
23.74
51
SHA256
35.99
69
$ for sum in md5 sha1 sha256 sha512 xxh64 xxh128; do \
sudo sh -c 'echo 3 > /proc/sys/vm/drop_caches'; \
printf "# %ssum\n" "$sum"; \
sudo dd if=/dev/sda bs=1M count=1024 status=none \
| /usr/bin/time -f 'CPU time %Us (user), %Ss (kernel); %P total CPU' "${sum}sum"; \
done
# md5sum
c5515c49de5116184a980a51c7783d9f  -
CPU time 1.28s (user), 0.10s (kernel); 56% total CPU
# sha1sum
60ecdfefb6d95338067b52118d2c7144b9dc2d63  -
CPU time 1.62s (user), 0.10s (kernel); 62% total CPU
# sha256sum
7fbffa1d96ae2232aa754111597634e37e5fd9b28ec692fb6deff2d020cb5bce  -
CPU time 3.68s (user), 0.08s (kernel); 80% total CPU
# sha512sum
eb4bffafc0dbdf523cc5229ba379c08916f0d25e762b60b2f52597acb040057a4b6795aa10dd098929bde61cffc7a7de1ed38fc53d5bd9e194e3a84b90fd9a21  -
CPU time 2.29s (user), 0.07s (kernel); 70% total CPU
# xxh64sum
d43417824bd6ef3a  stdin
CPU time 0.06s (user), 0.15s (kernel); 11% total CPU
# xxh128sum
e339b1c3c5c1e44db741a2e08e76fe66  stdin
CPU time 0.02s (user), 0.19s (kernel); 10% total CPU
$ for sum in md5 sha1 sha256 sha512 xxh64 xxh128; do \
sudo sh -c 'echo 3 > /proc/sys/vm/drop_caches'; \
printf "# %ssum\n" "$sum"; \
sudo dd if=/dev/sda bs=1M count=1024 status=none \
| /usr/bin/time -f 'CPU time %Us (user), %Ss (kernel); %P total CPU' "${sum}sum"; \
done
# md5sum
c5515c49de5116184a980a51c7783d9f -
CPU time 1.28s (user), 0.10s (kernel); 56% total CPU
# sha1sum
60ecdfefb6d95338067b52118d2c7144b9dc2d63 -
CPU time 1.62s (user), 0.10s (kernel); 62% total CPU
# sha256sum
7fbffa1d96ae2232aa754111597634e37e5fd9b28ec692fb6deff2d020cb5bce -
CPU time 3.68s (user), 0.08s (kernel); 80% total CPU
# sha512sum
eb4bffafc0dbdf523cc5229ba379c08916f0d25e762b60b2f52597acb040057a4b6795aa10dd098929bde61cffc7a7de1ed38fc53d5bd9e194e3a84b90fd9a21 -
CPU time 2.29s (user), 0.07s (kernel); 70% total CPU
# xxh64sum
d43417824bd6ef3a stdin
CPU time 0.06s (user), 0.15s (kernel); 11% total CPU
# xxh128sum
e339b1c3c5c1e44db741a2e08e76fe66 stdin
CPU time 0.02s (user), 0.19s (kernel); 10% total CPU
TL;DR: Despite otherwise seeming to work correctly, I can’t monitor a Back-UPS BX1600MI in Linux without seeing a constant stream of spurious battery detach/reattach and power fail/restore events that last less than 2 seconds each. I’ve tried multiple computers and multiple UPSes of that model. It doesn’t happen in their own proprietary Windows software, so I think they’ve changed the protocol.
Apart from nearly two decades ago when I was given one for free, I’ve never bothered with a UPS at home. Our power grid is very reliable. Looking at availability information from “uptimed“, my home file server has been powered on for 99.97% of the time in the last 14 years. That includes time spent moving house and a day when the house power was off for several hours while the kitchen was refitted!
However, in December 2023 a fault with our electric oven popped the breaker for the sockets causing everything to be harshly powered off. My fileserver took it badly and one drive died. That wasn’t a huge issue as it has a redundant filesystem, but I didn’t like it.
I decided I could afford to treat myself to a relatively cheap UPS.
I did some research and read some reviews of the APC Back-UPS range, their cheapest offering. Many people were dismissive calling them cheap pieces of crap with flimsy plastic construction and batteries that are not regarded as user-replaceable. But there was no indication that such a model would not work, and I felt it hard to justify paying a lot here.
I found YouTube videos of the procedure that a technician would go through to replace the battery in 3 to 5 years. To do it yourself voids your warranty, but your warranty is done after 3 years anyway. It looked pretty doable even for a hardware-avoidant person like myself.
It’s important to me that the UPS can be monitored by a Linux computer. The entire point here is that the computer detects when the battery is near to exhausted and gracefully powers itself down. There are two main options on Linux for this: apcupsd and Network UPS Tools (“nut“).
Looking at the Back-UPS BX1600MI model, it has a USB port for monitoring and says it can be monitored with APC’s own Powerchute Serial Shutdown Windows software. There’s an entry in nut‘s hardware compatibility list for “Back-UPS (USB)” of “supported, based on publicly available protocol”. I made the order.
The UPS worked as expected in terms of being an uninterruptible power supply. It was hopeless trying to talk to it with nut though. nut just kept saying it was losing communications.
I tried apcupsd instead. This stayed connected, but it showed a continuous stream of battery detach/reattach and power fail/restore events each lasting less than 2 seconds. Normally on a power fail you’d expect a visual and audible alert on the UPS itself and I wasn’t getting any of that, but I don’t know if that’s because they were real events that were just too brief.
I contacted APC support but they were very quick to tell me that they did not support any other software but their own Windows-only Powerchute Serial Shutdown (PCSS).
I then asked about this on the apcupsd mailing list. The first response:
“Something’s wrong with your UPS, most likely the battery is bad, but since you say the UPS is brand new, just get it replaced.”
As this thing was brand new I wasn’t going to go through a warranty claim with APC. I just contacted the vendor and told them I thought it was faulty and I wanted to return it. They actually offered to send me another one in advance and me send back the one I had, so I went for that.
In the mean time I found time to install Windows 10 in a virtual machine and pass through USB to it. Guess what? No spurious events in PCSS on Windows. It detected expected events when I yanked the power etc. I had no evidence that the UPS was in any way faulty. You can probably see what is coming.
The replacement UPS (of the same model) behaved exactly the same: spurious events. This just seems to be what the APC Back-UPS does on non-Windows.
Returning to my thread on the apcupsd mailing list, I asked again if there was actually anyone out there who had one of these working with non-Windows. The only substantive response I’ve got so far is:
“BX are the El Cheapo plastic craps, worst of all, not even the BExx0 family is such a crap – Schneider’s direct response to all the chinese craps flooding the markets […] no sane person would buy these things, but, well, here we are.”
So as far as I am aware, the Back-UPS models cannot currently be monitored from non-Windows. That will have to be my working theory unless someone who has it working with non-Windows contacts me to let me know I am wrong, which I would be interested to know about. I feel like I’ve done all that I can to find such people, by asking on the mailing list for the software that is meant for monitoring APC UPSes on Unix.
After talking all this over with the vendor they’ve recommended a Riello NPW 1.5kVA which is listed as fully supported by nut. They are taking the APC units back for a full refund; the Riello is about £30 more expensive.
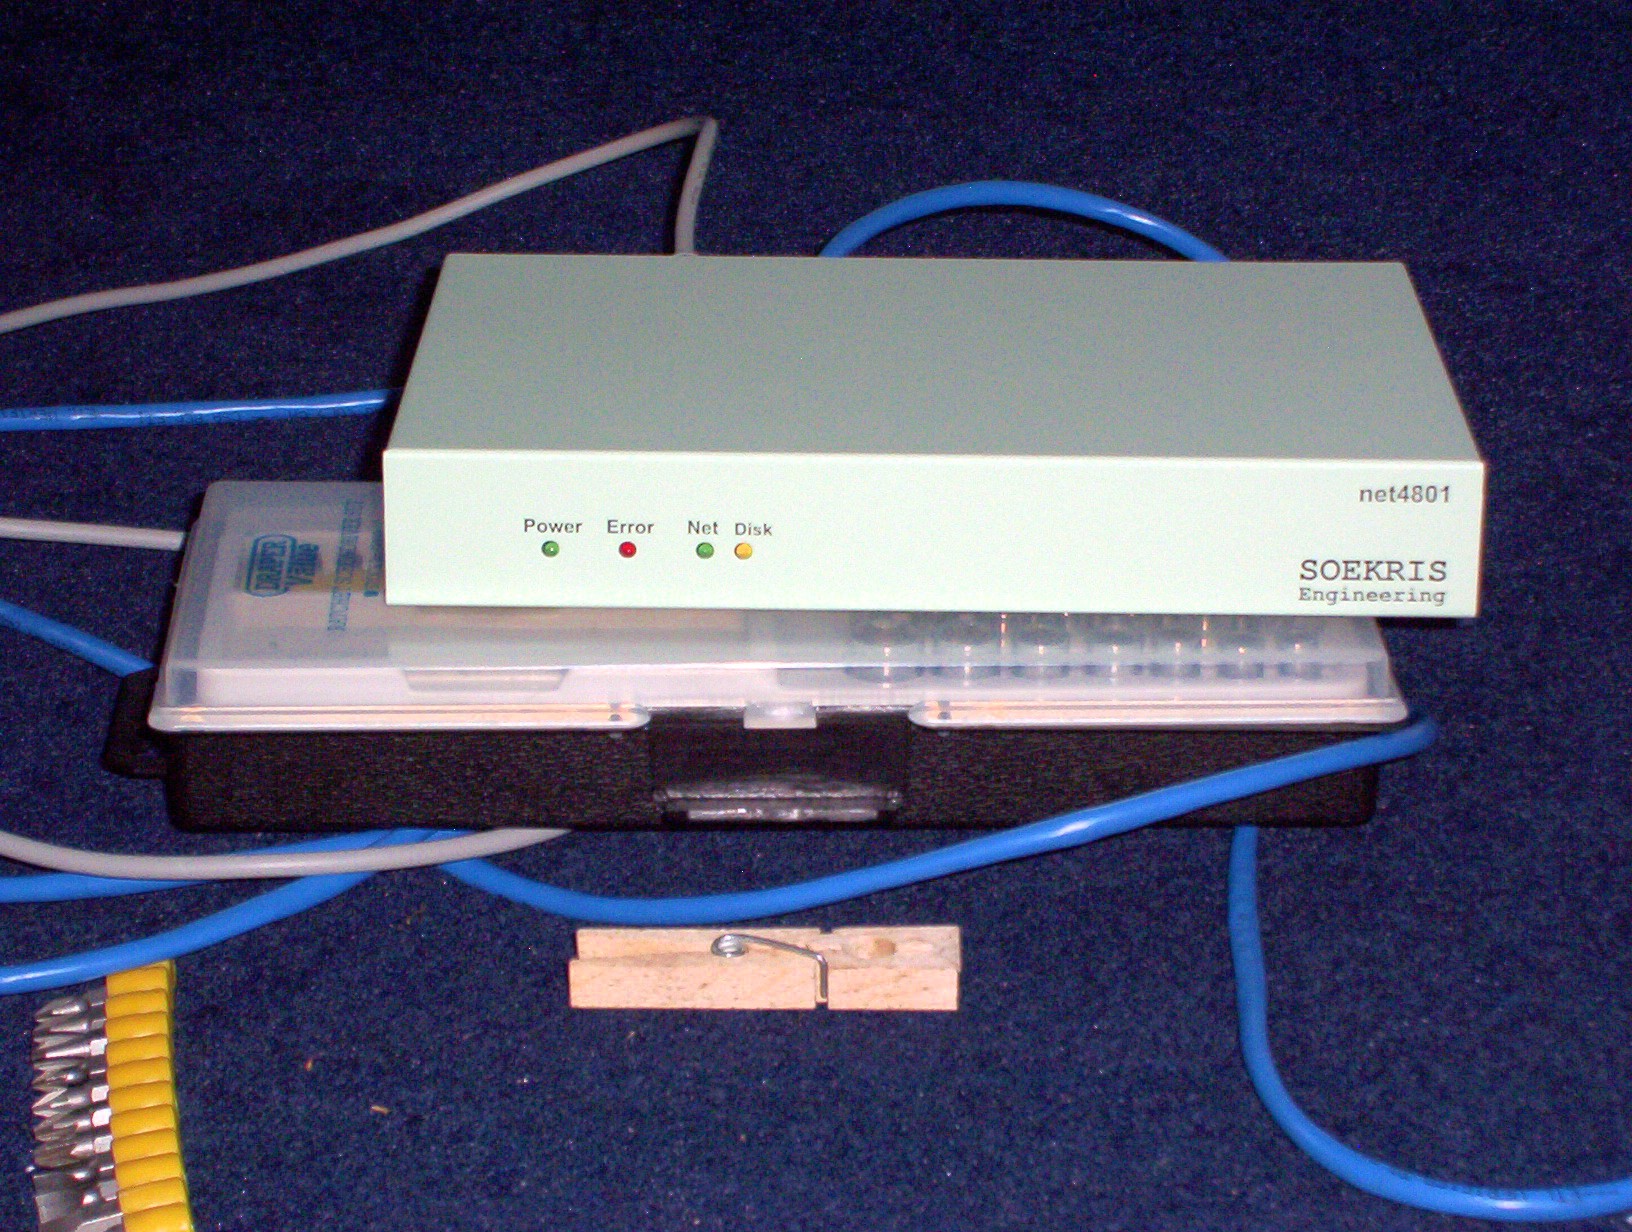
This morning I shut off the Soekris Engineering net4801 that has served as our home firewall / PPP termination box for just over 18½ years.
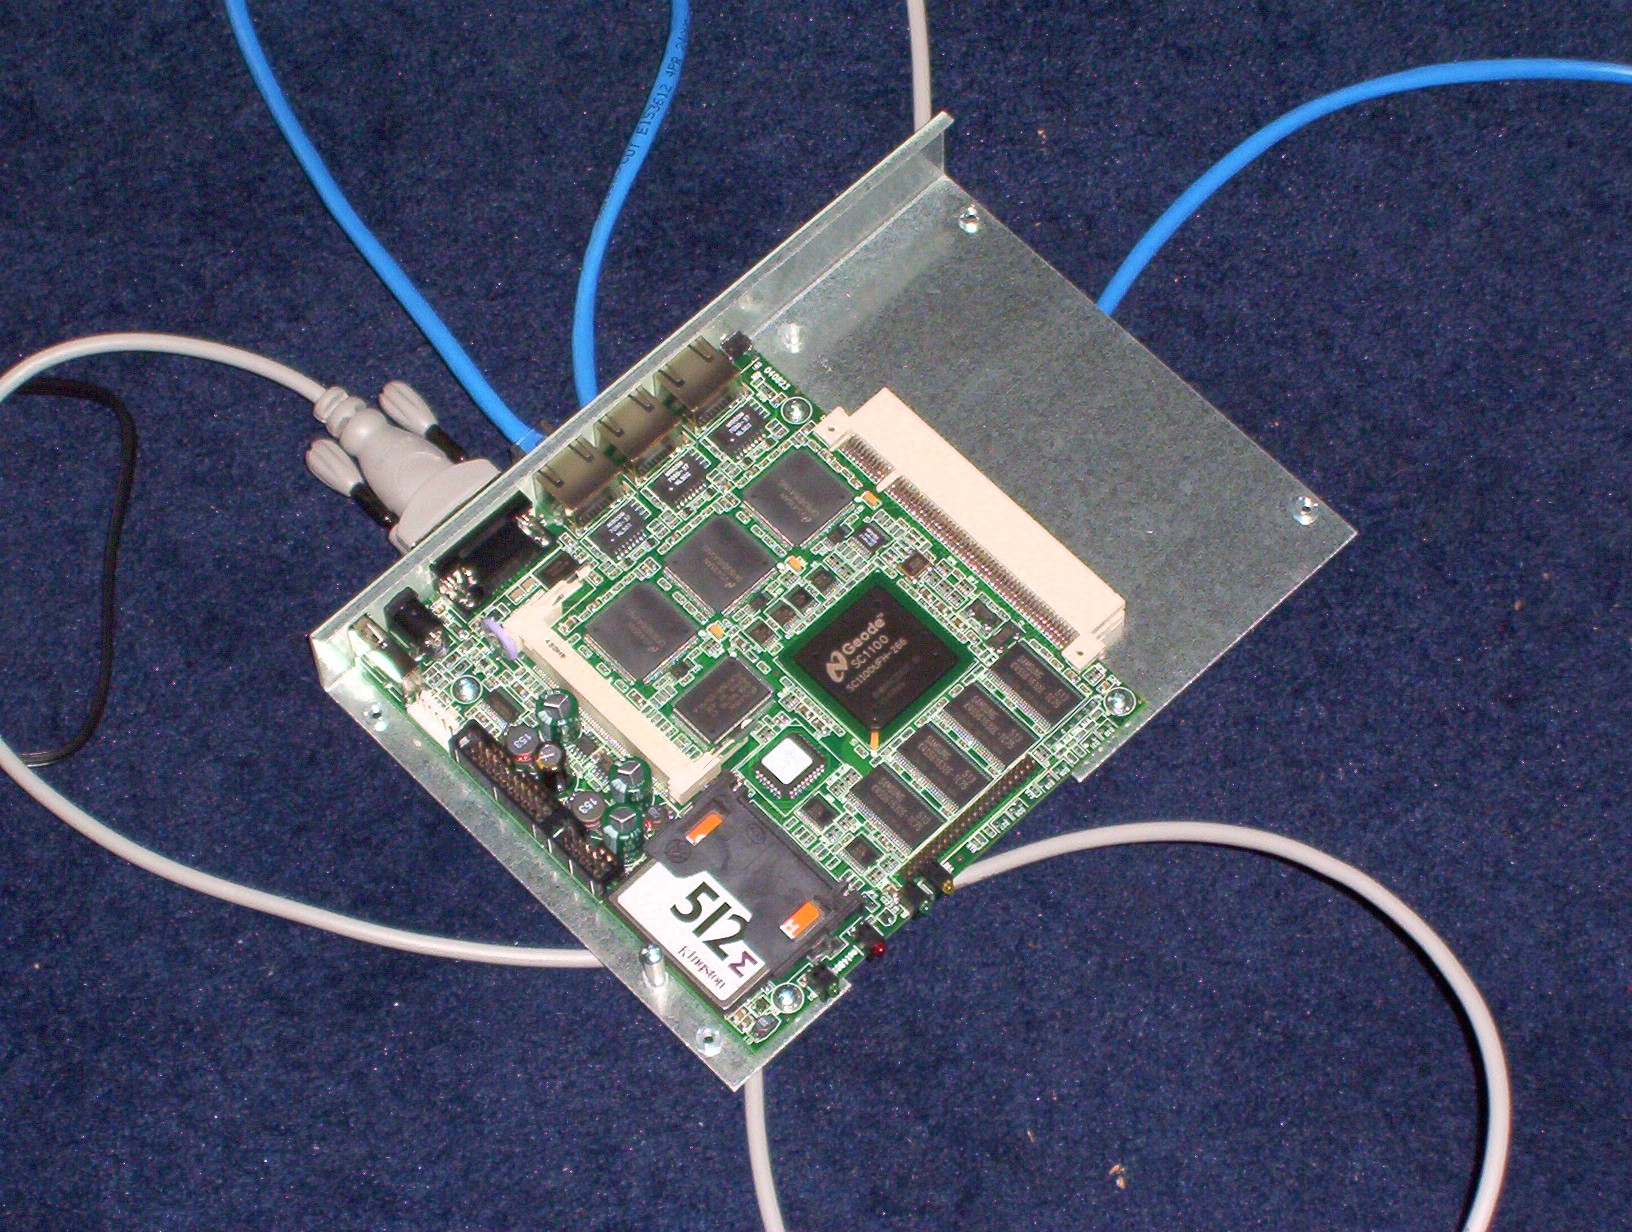
Front view of a Soekris net4801. Clothes peg for scale.Inside of a Soekris net4801.
In truth this has been long overdue. Like, at least 10 years overdue. It has been struggling to cope with even our paltry ~60Mbps VDSL (what UK calls Fibre to the Cabinet). But I am very lazy, and change is work.
In theory we can get fibre from Openreach to approach 1Gbit/s down, and I should sort that out, but see above about me being really very lazy. The poor old Soekris would certainly not be viable then.
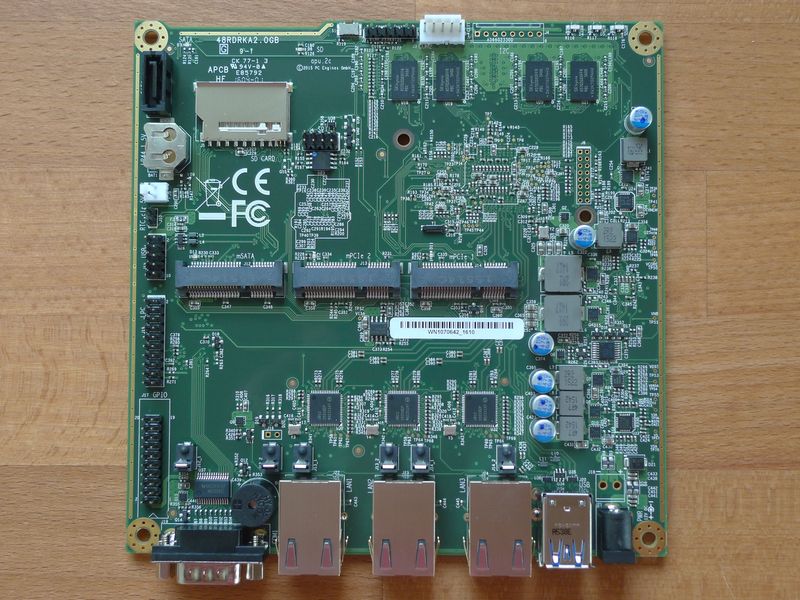
I’ve replaced it with a PC Engines APU2 (the apu2e2 model). Much like the Soekris it’s a fanless single board x86 computer with coreboot firmware so it’s manageable from the BIOS over serial.
An apu2e2 single board computer, image copyright PC Engines GmbH
Rear view of an APU2 case1d2redu, image copyright PC Engines GmbH
Front view of an APU2 case1d2redu, image copyright PC Engines GmbH
An APU2 case1d2redu, top and bottom halves separated, image copyright PC Engines GmbH
The Soekris ran Debian and so does the APU2. Installing it over PXE was completely straightforward on the APU2; a bit simpler than it was with the net4801 back in 2005! If you have just one and it’s right there in the same building then it’s probably quicker to just boot the Debian installer off of USB though. I may be lazy but once I do get going I’m also pointlessly bloody-minded.
Anyway, completely stock Debian works fine, though obviously it has no display whatsoever — all non-Ethernet-based interaction would have to be done over serial. By default that runs at 115200 baud (8n1).
This is not “home server” material. Like the Soekris even in 2005 it’s weak and it’s expensive for what it is. It’s meant to be an appliance. I think I was right with the Soekris’s endurance, beyond even sensible limits, and I hope I will be right about the APU2.
The Soekris is still using its original 512M CompactFlash card from 2005 by the way. Although admittedly I did go to some effort to make it run on a read-only filesystem, only flipped to read-write for upgrades.
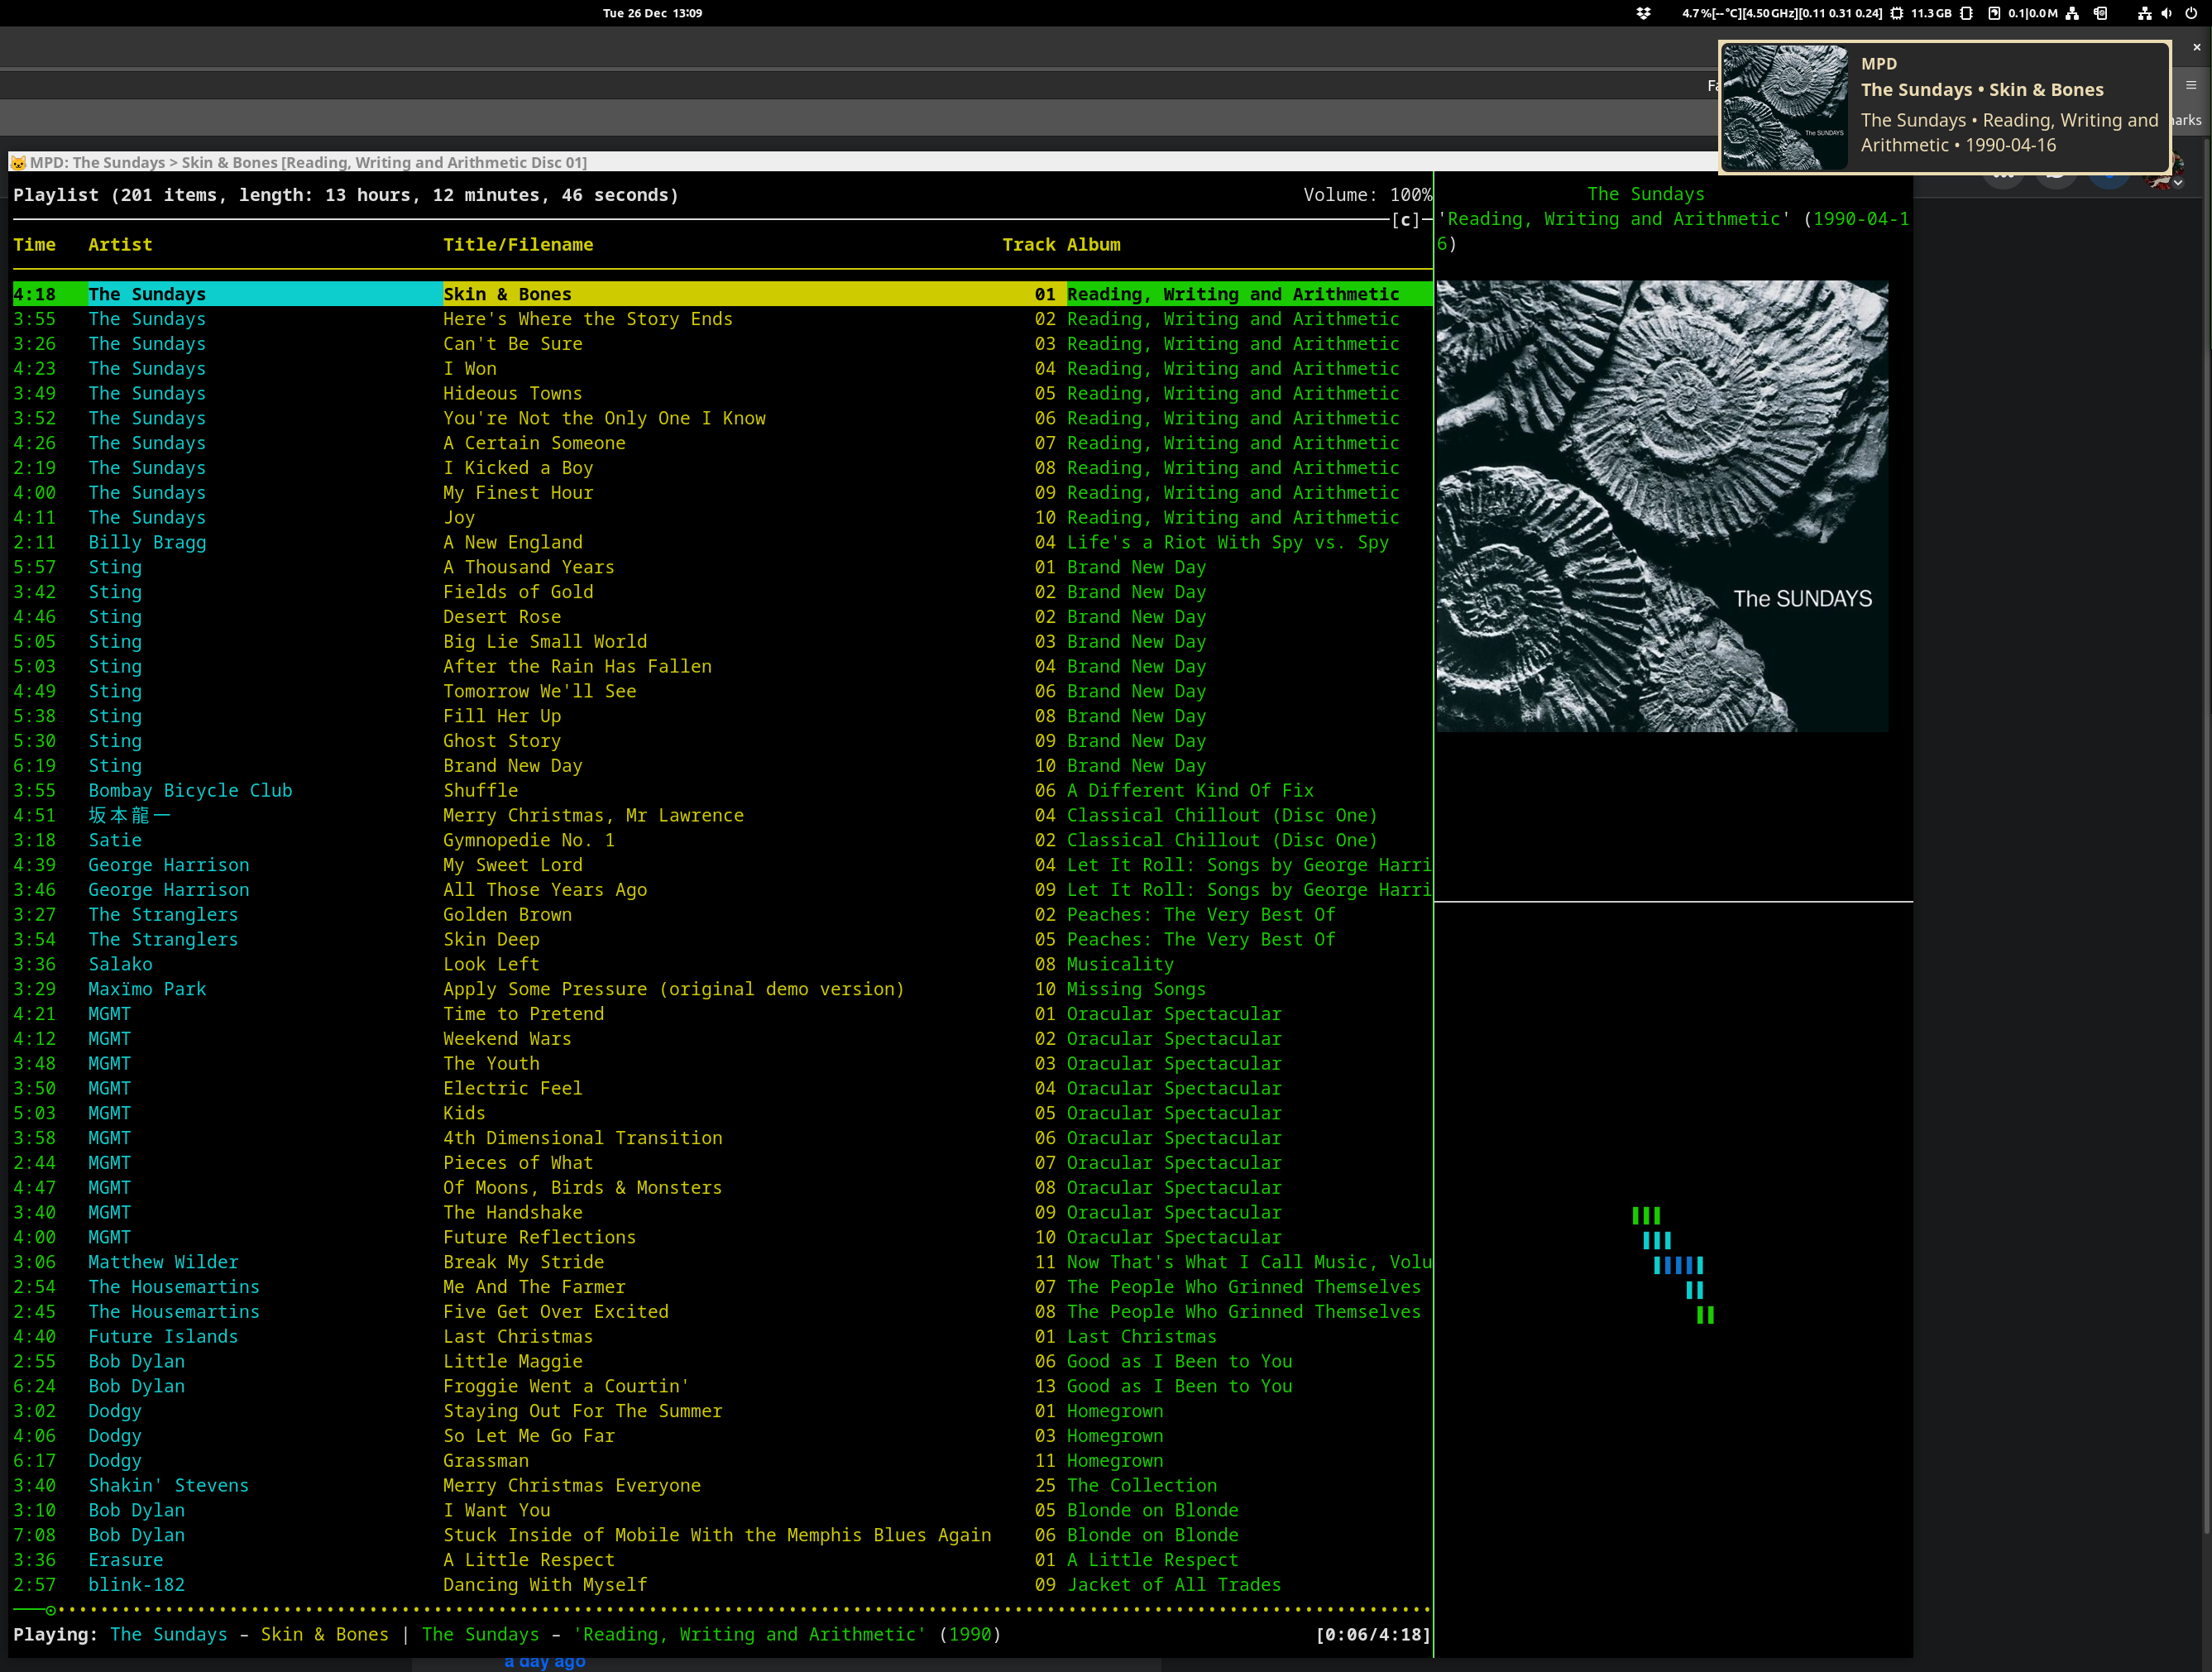
This article is about how I’ve ended up (back) on the terminal-based music player ncmpcpp on my GNOME Linux desktop and laptop. I’ll cover why it is that this has happened, and some of the finer points of the configuration. The various scripts are available at GitHub. My thing now looks like this:
A screenshot of my ncmpcpp setup running in a kitty terminal, with a track change notification visible in the top right corner
These sorts of things are inherently personal. I don’t expect that most people would have my requirements — the lack of functioning software that caters for them must indicate that — but if you do, or if you’re just interested in seeing what a modern text interface player can do on Linux, maybe you will be interested in what I came up with.
My Requirements
I’m one of those strange old-fashioned people who likes owning the music I regularly play, instead of just streaming everything, always. I don’t mind doing a stream search to play something on a whim or to check out new music, but if I think I’ll want to listen to it again then I want to own a copy of it. So I also need something to play music with.
I thought I had simple requirements.
Essential
Fill a play queue randomly by album, i.e. queue entire albums at once until some target number of tracks are in the queue. The sort of thing that’s often called a “dynamic playlist” or a “smart playlist” these days.
Have working media keys, i.e. when I press the Play/Pause button or the Next button on my keyboard, that actually happens.
That’s it. Those are my essential requirements.
Nice to have
Have album cover art displayed.
Have desktop notifications show up announcing a new track being played.
Ancient history
Literally decades ago these needs were met by the likes of Winamp and Amarok; software that’s now consigned to history. Still more than a decade ago on desktop Linux I looked around and couldn’t easily find what I wanted from any of the music apps. I settled on putting my music in mpd and using an mpd client to play it, because that way it was fairly easy to write a script for a dynamic play queue that worked exactly how I wanted it to — the most important requirement.
For a while I used a terminal-based mpd client called ncmpcpp. I’m very comfortable in a Linux terminal so this wasn’t alien to me. It’s very pleasant to use, but being text-based it doesn’t come with the niceties of media key support, album cover art or desktop notifications. The mpd client that I settled upon was GNOME’s built-in gmpc. It’s a very basic player but all it had to do was show the play queue that mpd had provided, and do the media keys, album art and notifications.
Change Is Forced Upon Me
Fast forward to December 2023 and I found myself desperately needing to upgrade my Ubuntu 18.04 desktop machine. I switched to Debian 12, which brought with it a new major version of GNOME as well as using Wayland instead of Xorg. And I found that gmpc didn’t work correctly any more! The media keys weren’t doing anything (they work fine in everything else), and I didn’t like the notifications.
I checked out a wide range of media players again. I’m talking Rhythmbox, Clementine, Raspberry, Quod Libet and more. Some of them clearly didn’t do the play queue thing. Others might do, but were incomprehensible to me and lacking in documentation. I think the nearest might have been Rhythmbox which has a plugin that can queue a specified number of random albums. There is an 11 year old GitHub issue asking for it to just continually queue such albums. A bit clunky without that.
I expect some reading this are now shouting at their screens about how their favourite player does actually do what I want. It’s quite possible I was too ignorant to notice it or work out how. Did I mention that quite a lot of this software is not documented at all? Seriously, major pieces of software that just have a web site that is a set of screenshots and a bulleted feature list and …that’s it. I had complained about this on Fedi and got some suggestions for things to try, which I will (and I’ll check out any that are suggested here), but the thing is… I know how shell scripts work now. 😀
This Is The Way
I had a look at ncmpcpp again. I still enjoyed using it. I was able to see how I could get the niceties after all. This is how.
Required Software
Here’s the software I needed to install to make this work on Debian 12. I’m not going to particularly go into the configuration of Debian, GNOME, mpd or ncmpcpp because it doesn’t really matter how you set those up. Just first get to the point where your music is in mpd and you can start ncmpcpp to play it.
In case you weren’t aware, you can arrange for your personal mpd to be started every time you start your desktop environment like this:
$ systemctl --user enable --now mpd
$ systemctl --user enable --now mpd
The --now flag both enables the service and starts it right away.
At this point you should have mpd running and serving your music collection to any mpd client that connects. You can verify this with gmpc which is a very simple graphical mpd client.
This small Go binary listens on the user DBUS for the media keys and issues mpd commands appropriately. If you didn’t want to use this then you could lash up something very simple that executes e.g. “mpc next” or “mpc toggle” when the relevant key is pressed, but this does it all for you. Once you’ve got it from GitHub place the binary in $HOME/bin/, the mpd-mpris.service file from my GitHub at $HOME/.config/systemd/user/mpd-mpris.service and issue:
$ systemctl --user enable --now mpd-mpris
$ systemctl --user enable --now mpd-mpris
Assuming you have a running mpd and mpd client your media keys should now control it. Test that with gmpc or whatever.
My scripts and supporting files
Just four files, and they are all in GitHub. Here’s what to do with them.
Put it in $HOME/.ncmpcpp/. If you don’t like it, just substitute it with any other you like. When it comes time for timg to display it, it will scale it to fit inside the window whatever size it is on your desktop.
Put it in $HOME/.ncmpcpp/. This is a cut-down example ncmpcpp config for the visualizer pane that removes a number of UI elements. It’s just for an ncmpcpp that starts on a visualizer view so feel free to customise it however you like your visualizer to be. You will need to change mpd_music_dir to match where your music is, like in your main ncmpcpp config.
The Main App
The main app displayed in the screenshot above is a kitty terminal with three windows. The leftmost 75% of the kitty terminal runs ncmpcpp defaulting to the playlist view. In the bottom right corner is a copy of ncmpcpp defaulting to the visualizer view and using the viz.conf. The top right corner is running a shell script that polls for album covert art and displays it in the terminal.
kitty is one of the newer crop of terminals that can display graphics. The timg program will detect kitty‘s graphics support and display a proper graphical image. In the absence of kitty‘s graphical protocol timg will fall back to sixel mode, which may be discernible but I wouldn’t personally want to use it.
I don’t actually use kitty as my day-to-day terminal. I use gnome-terminal and tmux. You can make a layout like this with gnome-terminal and tmux, or even kitty and tmux, but tmux doesn’t support kitty‘s graphical protocol so it would cause a fall back to sixel mode. So for this use and this use alone I use kitty and its built-in windowing support.
Album cover art for Good Vibrations: Thirty Years of The Beach Boys displayed in a kitty terminal using timg
The same cover art file displayed as sixels through tmux
If you don’t want to use kitty then pick whatever terminal you like and figure out how to put some different windows in it (tmux panes work fine, layout-wise). timg will probably fall back to sixels as even the venerable xterm supports that. But assuming you are willing to use kitty, you can start it like this:
That kitty session file is in GitHub with everything else, and it’s what lays things out in the main terminal window. You should now be able to start playing music in ncmpcpp and have everything work.
How Stuff Works
You don’t need to know how it works, but in case you care I will explain a bit.
There are two bash shell scripts; album_cover_poller.sh and track_change.sh.
Album cover art
album_cover_poller.sh uses inotifywait from the inotify-tools package to watch a file in a cache directory. Any time that file changes, it uses timg to display it in the upper right window and queries mpd for the meta data of the currently-playing track.
Track change tasks
track_change.sh is a bit more involved.
ncmpcpp is made to execute it when it changes track by adding this to your ncmpcpp configuration:
The /path/to/your/music/dir should be the same as what you have set your music library to in your MPD config. It defaults to $HOME/Music/ if not set.
First it asks mpd for a bunch of metadata about the currently-playing track. Using that it’s able to find the directory in the filesystem where the track file lives. It assumes that if album cover art is available then it will be in this directory and named cover.jpg. If it finds such a file then it copies it to the place where album_cover_poller.sh is expecting to find it. That will trigger that script’s inotifywait to display the new image. If it doesn’t find such a file then a default generic cover art image is used.
(A consequence of this is that it expects each directory in your music library to be for an album, with the cover.jpg being the album covert art. It intentionally doesn’t try to handle layouts like Artist/Track.ogg because it hasn’t got a way to know which file would be for that album. If you use some other layout I’d be interested in hearing about it. An obvious improvement would be to have it look inside each file’s metadata for art in the absence of a cover.jpg in the directory. That would be pretty easy, but it’s not relevant for my use at the moment.)
Secondly, a desktop notification is sent using notify-send. Most modern desktops including GNOME come with support for showing such notifications. Exactly how they look and the degree to which you can configure that depends upon your desktop environment. For GNOME, the answer is “like ass“, and “not at all without changing notification daemon,” but that’s the case for every notification on the system so is a bit out of scope for this article.
Other Useful Tools
I use a few other bits of software to help manage my music collection and play things nicely, that aren’t directly relevant to this.
Library maintenance
A good experience relies on there being correct metadata and files in the expected directory structure. It’s pretty common for music I buy to have junk metadata, and moving things into place would be tedious even when the metadata is correct. MusicBrainz Picard to the rescue!
It’s great at fixing metadata and then moving files en masse to my chosen directory structure. It can even be told for example that if the current track artist differs from the album artist then it should save the file out to “${album_artist}/${track_number}-${track_artist}-${track title}.mp3” so that a directory listing of a large “Various Artists” compilation album looks nice.
It also finds and saves album cover art for me.
It’s packaged in Debian.
I hear good things about beets, too, but have never tried it.
Album cover art
Picard is pretty good at finding album cover art but sometimes it can’t manage it, or it chooses sub-par images. I like the Python app sacad which tries really hard to find good quality album art and works on masses of directories at once.
Nicer desktop notifications
I really don’t like the default GNOME desktop notifications. On a 4K display they are tiny unless you crank up the general font size, in which case your entire desktop then looks like a toddler’s toy. Not only is their text tiny but they don’t hold much content either. When most track title notifications are ellipsized I start to wonder what the point is.
I replaced GNOME’s notification daemon with wired-notify, which is extremely configurable. I did have to clone it out of GitHub, install the rust toolchain and cargo build it, however.
My track change script that I talk about above will issue notifications that work on stock GNOME just as well as any other app’s notifications, but I prefer the wired-notify ones. Here’s an unscaled example.
If there’s any music files with tabs or newlines in any of their metadata, the scripts are going to blow up. I’m not sure of the best way to handle that one. mpc can’t format output NULL-separated like you’d do with GNU find. I’m not sure there is any character you can make it use in a format that is banned in metadata. I think worst case is simply messed up display and/or no cover art displayed, and I’d regard tabs and newlines in track metadata as a data error that I’d want to fix, so maybe I don’t care too much.
timg is supposed to scale and centre the image in the terminal, and the kitty window does resize to keep it at 25% width, 50% height, but timg is sometimes visibly a little off-centre. No ideas at the moment how to improve that.
mpd is a networked application — while by default it listens only on localhost, you can configure it to listen on any or all interfaces and be available over your local network or even the Internet. All of these scripts rely on your mpd client, in this case ncmpcpp, having direct access to the music library and its files, which is probably not going to be the case for a non-localhost mpd server. I can think of various tricky ways to handle this, but again it’s not relevant to my situation at present.
Many projects that I follow are switching away from email discussion lists in favour of web-first interfaces (“forums”, I think the youngsters are calling them now) like Discourse. That is fine—there’s lots of problems with trying to run a busy community over email—but Discourse offers a “mailing list mode” and I still find my Mutt email client to be a comfortable way to follow discussions. So all my accounts on the various Discourse instances are set to mailing list mode.
The Problem
One of the slight issues I have with this is the subject lines that Discourse uses. On an instance with a lot of categories and sub-categories, these will all be prepended to the subject line of each email using up quite a lot of screen space.
The same is true for legacy mailing list subject tags, but in that environment the admins were generally conscious that whatever text they chose would be prepended to every subject, so they tend to choose terse tags like “[users]” for example.
There was a time when subject line tags were controversial amongst experienced email users, because experienced email users know how to sort and filter their mails based on headers and don’t need a tag in the subject line to let them know what an email is. It doesn’t seem to be very controversial any more; I hypothesise that’s because new Internet users don’t use email as much and so don’t value spending much time working out how to get their filtering just right, and so on. So, most legacy mailing lists that I’m part of now do use terse subject tags and not many people complain about that.
Since the posts on Discourse are primarily intended for a web browser, the verbosity of the categories is not an issue. It’s not uncommon to see a category called, say, “Help & Support” and then within that a sub-category for a particular project, e.g. “Footronic 5.x”. When Discourse sends out an email for a post to such a category, it’ll look like this:
Subject: [Help & Support] [Footronic 5.x] Need some help getting my Foo into alignment after passing through a bar-quux transform
Subject: [Help & Support] [Footronic 5.x] Need some help getting my Foo into alignment after passing through a bar-quux transform
Lots of space used by that prefix, on every message, and pointlessly so for me since these mails will have been filtered into a folder so I always know which folder I’m looking at anyway: all of the messages in that folder would be for help and support on Footronic 5.x. Like most email clients, Mutt has an index view that shows an overview of all the emails with a single line for each. Long subjects are truncated at the edge of my terminal.
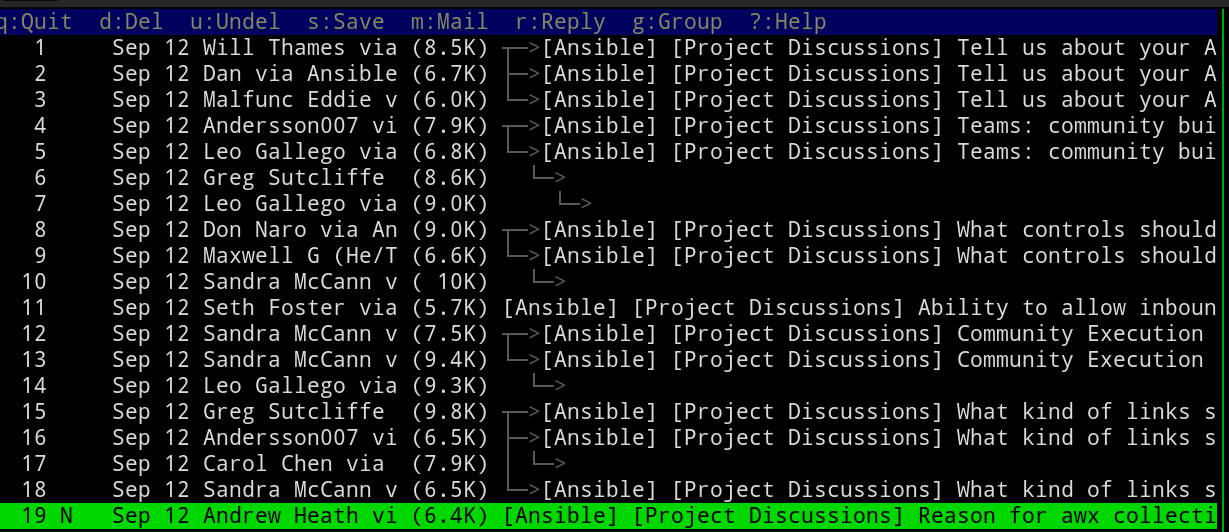
I’ve put up with this for years now but the last straw was the newly-launched Ansible forum. Their category names are large and there’s lots of sub-categories. Here’s an example of what that looks like in my 95 character wide terminal.
The index view of a Mutt email client
This is quite irritating! I wondered if it could be fixed.
The Fix
Of course the Mutt community thought of this, and years ago. subjectrx! You put it in your config, specifying a regular expression to match and what it should be replaced with. For example:
subjectrx '\[Ansible\] \[[^]]*\] *' '%L%R'
subjectrx '\[Ansible\] \[[^]]*\] *' '%L%R'
That matches any sequence of “[Ansible] ” followed by another set of “[]” that have anything inside them, and replaces all of that with the left side of the match (%L) and the right side of the match (%R). So that effectively discards the tags.
This happens only on display; it doesn’t modify the actual emails on storage.
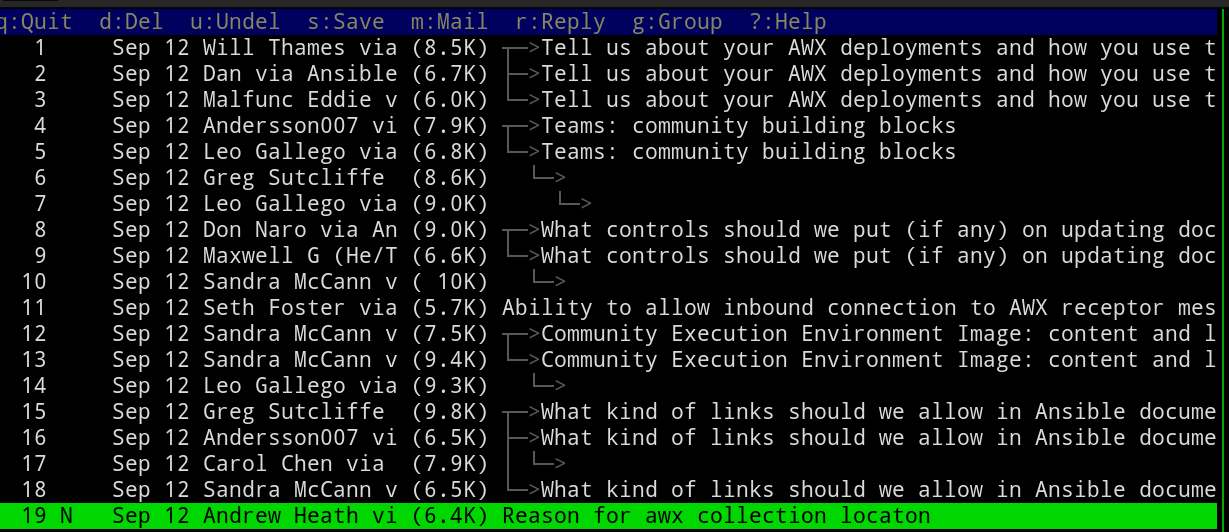
Here’s what that looks like afterwards:
The index view of a Mutt email client, with tags removed from subject lines
Much better, right?
And that’s one of the reasons why I continue to use Mutt.
Other Solutions
Off the top of my head, there are some other ways this could have been done.
Alter emails upon delivery
It would have been pretty simple to strip these tags out of emails as they were being delivered, but I really like to keep emails on storage the same as they were when they arrived. At the very least doing this will cause a DKIM failure as I would have modified the message after it was signed. That wouldn’t be an issue for my delivery since my DKIM check would happen before any such editing, but I’d still rather not.
Run the subject lines through an external filter program
The format of many things in Mutt is highly configurable and one such format is index_format, which controls how the lines on the index view are displayed.
Sadly there is not a builtin format specifier to search and replace in the subject tag (or any other tag), but you can run the whole thing through an external program, which could do anything you liked to it. That would involve fork()ing and exec()ing a process for every single mail in a mailbox though. Yuck.
On Discourse
This is not a gripe about Discourse. I think Discourse is a better way to run a busy community than email lists. At this point I’d be happy for most mailing lists I’m part of to switch to Discourse instances, especially the very busy ones. I’m impressed with the amount of work and features that Discourse now has.
The only exception to that I think is that purely question-answer support mailing lists might be better off with a StackOverflow-style approach like AskUbuntu. But failing that, I think Discourse is still many times better than a mailing list for that use case.
Not that you asked, but I think the primary problem with email as a community platform is that only old people use email. In the 21st century it’s an unacceptable barrier to entry.
The next most serious problem with email for running a community is that any decently-sized community will have a certain percentage of utter numpties; these utter numpties won’t be self-aware enough to know they are utter numpties, and they will post a lot of nonsense. The only way to counter a numpty posting nonsense is to reply to it and call them out. That is exhausting, unrewarding work, which frequently goes wrong, adding to the noise and ill-feeling. Problem posters do not get dealt with until they reach a level bad enough to warrant their posting rights being removed. Forums like Discourse scale their moderation tasks much better, with a lot of it being amenable to wide community input.
I could go on to list a lot more serious problems but those two are the worst in my opinion.
The machine these are in is a fileserver at my home. The four 320GB HDDs are what the operating system is installed on, whereas the hodge podge assortment of differently-sized HDDs and SSDs are the main storage for files.
That is not the most performant way to do things, but it’s only at home and doesn’t need best performance. It mostly just uses up discarded storage from other machines as they get replaced.
sdd has seen every release of Debian since 4.0 (etch) and several iterations of hardware, but this can’t go on much longer. The machine that the four 320GB HDDs are in now is very underpowered but any replacement I can think of won’t be needing four 3.5″ SATA devices inside it. More like 2x 2.5″ NVMe or M.2.
Then again, I’ve been saying that it must be replaced for about 5 years now, so who knows how long it will take me. sdd will definitely reach 120,000 hours barring hardware failure in the next month.
I recently upgraded bind9 on my primary nameserver and soon after I noticed that one particular zone would no longer transfer to my secondary nameservers, which run PowerDNS. All the PowerDNS servers were saying:
Nov 18 00:25:26 daiquiri pdns_server[32452]: While checking domain freshness: Query to '2001:ba8:1f1:f085::53' for SOA of 'example.com' did not return a SOA
Nov 18 00:25:26 daiquiri pdns_server[32452]: While checking domain freshness: Query to '2001:ba8:1f1:f085::53' for SOA of 'example.com' did not return a SOA
The confusing thing was that manually using dig to query for this did work fine:
After scratching my head for several hours over this yesterday, I eventually broke out tcpdump and was surprised to see that the response to PowerDNS’s SOA query was indeed empty. And it was also truncated!
Back to dig, I could see that this zone was DNSSEC-signed and the SOA query with DNSSEC info was 2293 bytes in size:
That’s bigger than a DNS response can be in UDP, so it truncates and the client is supposed to retry over TCP. dig has no problem doing that, but PowerDNS can’t (yet).
I can stop PowerDNS from doing the SOA check at all by upgrading all PowerDNS servers to v4.7.x and using the secondary-check-signature-freshness=no option.
I could put bind9’s EDNS buffer size back up to 4096, but it doesn’t seem advisable to go over about 1400 bytes and so that won’t help.
For now I have enabled the minimal-responses option in bind9, which drops extra records from the Authority and Additional sections of responses unless they are absolutely required. This reduces the response size of that SOA query to 685 bytes, so it no longer truncates and PowerDNS is happy.
I’m not sure if an SOA response can ever go above 1232 bytes now. Maybe as DNSSEC signatures get bigger. So this might not be a permanenet solution and hopefully PowerDNS will gain the ability to retry those SOA queries over TCP.
I haven’t really been taking good care of myself which is highly inadvisable as someone with diabetes, but last week I had an extremely high blood pressure reading and so this cannot go on. At the same time I had a very high blood glucose reading although that wasn’t a surprise to me as I’ve long found it difficult to control this.
I have actually been taking my diet and level of activity half seriously and as a result I am currently at my lowest weight in over 25 years, though still at the lower end of “obese” by BMI standards. To put that into some context, in 2006 when first diagnosed with diabetes I was almost 140kg.
Anyway since my weight while not ideal is better than it’s ever been, the high blood pressure was even more of a worry. I was concerned that my kidneys might have packed up or something. Happily the result of yesterday’s bloods had my GP saying that my kidney and liver function were “perfect” (his words), which is very relieving but does leave me wondering what else I can do.
For now the GP has prescribed me some pills for blood pressure and told me to come back in a month for another blood test and blood pressure check, so it seems like he isn’t overly concerned. With the blood pressure as high as it is I was seriously wondering if he was going to call me with the results and say “go to hospital now”.
Clearly even though I thought I was doing okay with the weight loss I am going to have to step things up a bit.
Also I am hopelessly addicted to (sugar free) fizzy drinks but I’m going to have to do something about this. Although there’s no proven link to high blood pressure, it is a bit more likely that the artificial sweeteners are going to be playing havoc with my blood sugar levels and appetite.
My habit was at the ridiculous level of over 2 litres per day but since last week’s shock I’ve started by instituting a policy of one full pint of water between any fizzy drink. Small steps but I don’t feel like I can do cold turkey.
What I have found after sticking to this policy for the last 9 days is that I often can’t physically ingest any more liquid so I don’t reach for the fizzy drink, and that it really does seem to have reduced my appetite as well. Today I had my first fizzy drink of the day with dinner, whereas before I might have had 2 litres already by that time. At the moment I’m at around 500ml a day. I hope I can keep to something like that.
The caffeine withdrawal is not pleasant. I don’t think it is a good idea to try to find another caffeine source until my blood pressure is under control. By then I might not feel the need.
If I don’t get the blood pressure under control then my near future will feature a stroke or heart attack. If I don’t get the blood sugar under control then my near future will include insulin injections.
Added a bit about timeouts, as concern was expressed that I am “bonkers”.
The Problem
For statistical purposes I wanted to add the Autonomous System Number (ASN) for the IP address of the connecting host as a header in the received email, like this:
X-ASN: AS63949 2a01:7e01::/32
X-ASN: AS63949 2a01:7e01::/32
The Answer
You can obtain this information through a DNS query to Team Cymru:
Expand the address out fully (2a01:7e01::f03c:92ff:fe32:a408 → 2a01:7e01:0000:0000:f03c:92ff:fe32:a408)
Remove the colons (2a01:7e01:0000:0000:f03c:92ff:fe32:a408 → 2a017e0100000000f03c92fffe32a408)
Reverse it (2a017e0100000000f03c92fffe32a408 → 804a23efff29c30f0000000010e710a2)
Add a dot after every hexadecimal number (804a23efff29c30f0000000010e710a2 → 8.0.4.a.2.3.e.f.f.f.2.9.c.3.0.f.0.0.0.0.0.0.0.0.1.0.e.7.1.0.a.2.)
Add origin6.asn.cymru.com on the end (8.0.4.a.2.3.e.f.f.f.2.9.c.3.0.f.0.0.0.0.0.0.0.0.1.0.e.7.1.0.a.2.origin6.asn.cymru.com)
Query that TXT record and parse out the first two values separated by ‘|’ in the response.
For legacy IP addresses the process is much simpler; reverse the octets, add origin.asn.cymru.com on the end and query that.
An Exim Answer
In Exim configuration you can do it like this:
(This is meant to go inside an ACL like your check_rcpt or check_data. Maybe near the end of check_data at the point where you’ve already decided to accept the email. No point in doing this for an email you will reject.)
# Add X-ASN: header for IPv6 senders.
  warn message = X-ASN: AS${sg{${extract{1}{|}{$acl_m9}}}{\N\s+\N}{}} ${sg{${extract{2}{{|}{$acl_m9}}}{\N\s+\N}{}}
     condition = ${if isip6{$sender_host_address}}
    set acl_m9 = ${lookup dnsdb{txt=${reverse_ip:$sender_host_address}.origin6.asn.cymru.com}}

# Add X-ASN: header for legacy IP senders.
  warn message = X-ASN: AS${sg{${extract{1}{|}{$acl_m9}}}{\N\s+\N}{}} ${sg{${extract{2}{{|}{$acl_m9}}}{\N\s+\N}{}}
     condition = ${if isip4{$sender_host_address}}
    set acl_m9 = ${lookup dnsdb{txt=${reverse_ip:$sender_host_address}.origin.asn.cymru.com}}
# Add X-ASN: header for IPv6 senders.
warn message = X-ASN: AS${sg{${extract{1}{|}{$acl_m9}}}{\N\s+\N}{}} ${sg{${extract{2}{{|}{$acl_m9}}}{\N\s+\N}{}}
condition = ${if isip6{$sender_host_address}}
set acl_m9 = ${lookup dnsdb{txt=${reverse_ip:$sender_host_address}.origin6.asn.cymru.com}}
# Add X-ASN: header for legacy IP senders.
warn message = X-ASN: AS${sg{${extract{1}{|}{$acl_m9}}}{\N\s+\N}{}} ${sg{${extract{2}{{|}{$acl_m9}}}{\N\s+\N}{}}
condition = ${if isip4{$sender_host_address}}
set acl_m9 = ${lookup dnsdb{txt=${reverse_ip:$sender_host_address}.origin.asn.cymru.com}}
I dislike that I’ve had to use two tests that are almost exactly the same except they query slightly different DNS names (origin6.asn.cymru.com vs origin.asn.cymru.com). I’m sure it could be done in one, but I’m not good enough with the Exim string evaluations. They send me cross-eyed. I couldn’t find a better way so I decided to use the time-honoured tactic of posting what I have in order to provoke people into correcting me. Please let me know if you can improve it!
The amount of nested {} will probably drive you mad, but basically:
${reverse_ip:$sender_host_address} handles expanding and reversing an IP address into the form you would use for a reverse DNS query.
That gets queried in DNS with the correct suffix and the full response stored in $acl_m9.
warn message = X-ASN: adds a header to the email, the content of which is built from two fields extracted out of $acl_m9 with all whitespace removed (${sg{source}{regex}{replacement}}).
What about timeouts?
One piece of feedback I got was that I am “bonkers” to make my email delivery rely on a real time network lookup. I can kind of see the argument, but also not: this is a DNS query exactly the same as a typical DNSBL query (Team Cymru IP-to-ASN service is used exactly like a typical DNSBL).
Most people’s mail servers do multiple DNSBL queries already and nobody really is up in arms saying it’s bonkers to do so. My Exim already does a couple of DNSBL queries and then if it is going to deliver the email it will call out to SpamAssassin which does many DNSBL queries itself. If these hit a timeout then it would slow down my mail delivery.
In the past where a DNSBL has unceremoniously shut down and made its nameservers unresponsive I have seen problems, as it caused the delivery processes to pile up while they waited on their timeouts and then Exim would complain that there’s too many processes. That would be resolved by removing the errant DNSBL(s) from the configuration.
Query load is not a concern as DNS is highly scalable and my system is not going to add noticeable load to Team Cymru’s already public service. The SpamAssassin ASN plugin is already out there, hard coded to use this same service and must have many many users already.
As far as I can tell, in Exim dnsdb queries use the same timeouts and retries as dnslist queries do, that being controlled by the dns_retrans and dns_rety settings. These settings both default to 0, which means “operating system / resolver library default”. If you were worried you could explicitly set these to their minimum value:
If still worried then you would first have to either turn off all DNSBLs or make sure you had local copies of them (e.g. by arranging AXFR to your own local servers). Then to do the IP-to-ASN locally you’d arrange to have a local BGP feed that you could query. I think you’d need to have an absolutely huge mail server before these issues became real concerns.
…
set acl_m9 = ${lookup dnsdb{retrans_1s,retry_1,txt=${reverse_ip:$sender_host_address}.origin6.asn.cymru.com}}
…
…
set acl_m9 = ${lookup dnsdb{retrans_1s,retry_1,txt=${reverse_ip:$sender_host_address}.origin6.asn.cymru.com}}
…
As for dnslist, the consequence of a time out is that you get no data, so it would just result in an empty header.
But Why?
I’ve actually been doing this for a while with SpamAssassin’s ASN plugin but I’ve changed the way in which I query SpamAssassin and now I don’t directly get the rewritten email that SpamAssassin makes (with its X-Spam-ASN: header in).
I use it for feeding into Bayes to see if there’s a particular prevalence of ASN amongst the email that is classified as spam, and I sometimes add a few points on manually for ASNs that are particularly bad. That is a lot less work than trying to track down all their IP addresses and keep that up to date.
I have a server that I use for making backups. I also send backups from that server into Amazon S3 at the “Infrequent Access” storage class. That class is cheaper to store but expensive to access. It’s intended for backups of last resort that you only access in an emergency. I use Duplicity to handle the S3 part.
(I could save a bit more by using one of the “Glacier” classes but at the moment the cost is minimal and I’m not that brave.)
I recently decided to change which server I use for the backups. I noticed that renting a server with only IPv6 connectivity was cheaper, and as all the hosts I back up have IPv6 connectivity I decided to give that a go.
This mostly worked fine. The only thing I really noticed was when I tried to install some software from GitHub. GitHub doesn’t support IPv6, so I had to piggy back that download through another host.
Then I came to set up Duplicity again and found that I needed to make some non-obvious changes to make it work with S3 over IPv6-only.
S3 endpoint
The main issue is that the default S3 endpoint URL is https://s3.<region>.amazonaws.com, and this host only has an A (IPv4) record! For example:
$ host s3.us-east-1.amazonaws.com
s3.us-east-1.amazonaws.com has address 52.216.89.254
$ host s3.us-east-1.amazonaws.com
s3.us-east-1.amazonaws.com has address 52.216.89.254
If you run Duplicity with a target like s3://yourbucketname/path/to/backup then it will try that endpoint, get only an IPv4 address, and return Network unreachable.
S3 does actually support IPv6, but for that to work you need to use a dual stack endpoint! They look like this:
$ host s3.dualstack.us-east-1.amazonaws.com
s3.dualstack.us-east-1.amazonaws.com has address 54.231.129.0
s3.dualstack.us-east-1.amazonaws.com has IPv6 address 2600:1fa0:80dc:5101:34d9:451e::
$ host s3.dualstack.us-east-1.amazonaws.com
s3.dualstack.us-east-1.amazonaws.com has address 54.231.129.0
s3.dualstack.us-east-1.amazonaws.com has IPv6 address 2600:1fa0:80dc:5101:34d9:451e::
So we need to specify the S3 endpoint to use.
Specifying the S3 endpoint
In order to do this you need to switch Duplicity to the “boto3” backend. Assuming you’ve installed the correct package (python3-boto3 on Debian), this is as simple as changing the target from s3://… to boto3+s3://….
That then allows you to use the command line arguments --s3-region-name and --s3-endpoint-url so you can tell it which host to talk to. That ends up giving you both an IPv4 and an IPv6 address and your system correctly chooses the IPv6 one.
The full script
The new, working script now looks something like this:


