nftables is the new thing and iptables is deprecated, but I haven’t found time to convert everything to nft rules syntax yet.
I’m still using iptables rules but it’s the iptables frontend to nftables. All of this works both with legacy iptables and with nft but with different syntax.
If you have logging rules in your firewall then they’ll log to your kernel log, which is available at /dev/kmsg. The dmesg command displays the contents of /dev/kmsg but /dev/kmsg is a fixed size circular buffer, so after a while your firewall logs will crowd out every other thing.
On a modern systemd system this stuff does get copied to the journal, so if you set that to be persistent then you can keep the kernel logs forever. Or you can additionally run a syslog daemon like rsyslogd, and have that keep things forever.
Either way though your dmesg or journalctl -k commands are only going to display the contents of the kernel’s ring buffer which will be a limited amount.
I’m not that interested in firewall logs. They’re nice to have and very occasionally valuable when debugging something, but most of the time I’d rather they weren’t in my kernel log.
One answer to this problem is ulogd2. ulogd2 is a userspace logging daemon into which you can feed netfilter data and have it log it in a flexible way, to multiple different formats and destinations.
I actually already use it to log certain firewall things to a MariaDB database for monitoring purposes, but you can also emit plain text, JSON, netflow and all manner of things. Since I’m already running it I decided to switch my general firewall logging to it.
# This one for logging to local file in emulated syslog format.
stack=log2:NFLOG,base1:BASE,ifi1:IFINDEX,ip2str1:IP2STR,print1:PRINTPKT,emu1:LOGEMU

[log2]
group=2

[emu1]
file="/var/log/iptables_ulogd2.log"
sync=1
# This one for logging to local file in emulated syslog format.
stack=log2:NFLOG,base1:BASE,ifi1:IFINDEX,ip2str1:IP2STR,print1:PRINTPKT,emu1:LOGEMU
[log2]
group=2
[emu1]
file="/var/log/iptables_ulogd2.log"
sync=1
I already had a stack called log1 for logging to MariaDB, so I called the new one log2 with its output being emu1.
The log2 section can then be told to expect messages from netfilter group 2. Don’t worry about this, just know that this is what you refer to in your firewall rules, and you can’t use group 0 because that’s used for something else.
The emu1 section then says which file to write this stuff to.
The --nflog-group 2 needs to match what you put in /etc/ulogd.conf.
You’re now logging with ulogd2 and none of this will be going to the kernel log buffer. Don’t forget to rotate the new log file! Or maybe you’d like to play with logging this as JSON or into a SQLite DB?
The main complication here is that sudo on the remote side is going to ask for a password, which either requires an interactive terminal or a forwarded X session.
I thought I would mention that if you’ve disabled tty_tickets in the sudo configuration then you can “prime” the sudo authentication with some harmless command and then do the real rsync without it asking for a sudo password:
I suggest this is only for ad hoc commands and not for automation. For automation you need to find a way to make sudo not ever ask for a password, and some would say to add configuration to sudo with a NOPASSWD directive to accomplish that.
I would instead suggest allowing a root login by ssh using a public key that is only for the specific purpose, as you can lock it down to only ever be able to execute that one script/program.
Also bear in mind that if you permanently allow “host A” to run rsync as root with unrestricted parameters on “host B” then a compromise of “host A” is also a compromise of “host B”, as full write access to filesystem is granted. Whereas if you only allow “host A” to run a specific script/program on “host B” then you’ve a better chance of things being contained.
The recent security update of the GRUB bootloader did not want to install on my fileserver at home:
$ sudo apt dist-upgrade
Reading package lists... Done
Building dependency tree
Reading state information... Done
Calculating upgrade... Done
The following packages will be upgraded:
  grub-common grub-pc grub-pc-bin grub2-common
4 upgraded, 0 newly installed, 0 to remove and 0 not upgraded.
Need to get 4,067 kB of archives.
After this operation, 72.7 kB of additional disk space will be used.
Do you want to continue? [Y/n]
…
Setting up grub-pc (2.02+dfsg1-20+deb10u4) ...
Installing for i386-pc platform.
grub-install: warning: your core.img is unusually large.  It won't fit in the embedding area.
grub-install: error: embedding is not possible, but this is required for RAID and LVM install.
Installing for i386-pc platform.
grub-install: warning: your core.img is unusually large.  It won't fit in the embedding area.
grub-install: error: embedding is not possible, but this is required for RAID and LVM install.
Installing for i386-pc platform.
grub-install: warning: your core.img is unusually large.  It won't fit in the embedding area.
grub-install: error: embedding is not possible, but this is required for RAID and LVM install.
Installing for i386-pc platform.
grub-install: warning: your core.img is unusually large.  It won't fit in the embedding area.
grub-install: error: embedding is not possible, but this is required for RAID and LVM install.
$ sudo apt dist-upgrade
Reading package lists... Done
Building dependency tree
Reading state information... Done
Calculating upgrade... Done
The following packages will be upgraded:
grub-common grub-pc grub-pc-bin grub2-common
4 upgraded, 0 newly installed, 0 to remove and 0 not upgraded.
Need to get 4,067 kB of archives.
After this operation, 72.7 kB of additional disk space will be used.
Do you want to continue? [Y/n]
…
Setting up grub-pc (2.02+dfsg1-20+deb10u4) ...
Installing for i386-pc platform.
grub-install: warning: your core.img is unusually large. It won't fit in the embedding area.
grub-install: error: embedding is not possible, but this is required for RAID and LVM install.
Installing for i386-pc platform.
grub-install: warning: your core.img is unusually large. It won't fit in the embedding area.
grub-install: error: embedding is not possible, but this is required for RAID and LVM install.
Installing for i386-pc platform.
grub-install: warning: your core.img is unusually large. It won't fit in the embedding area.
grub-install: error: embedding is not possible, but this is required for RAID and LVM install.
Installing for i386-pc platform.
grub-install: warning: your core.img is unusually large. It won't fit in the embedding area.
grub-install: error: embedding is not possible, but this is required for RAID and LVM install.
Four identical error messages, because this server has four drives upon which the operating system is installed, and I’d decided to do a four way RAID-1 of a small first partition to make up /boot. This error is coming from grub-install.
This system came to life in 2006, so it’s 15 years old. It’s always been Debian stable, so right now it runs Debian buster and during those 15 years it’s been transplanted into several different iterations of hardware.
Choices were made in 2006 that were reasonable for 2006, but it’s not 2006 now. Some of these choices are now causing problems.
Aside: four way RAID-1 might seem excessive, but we’re only talking about the small /boot partition. Back in 2006 I chose a ~256M one so if I did the minimal thing of only having a RAID-1 pair I’d have 2x 256M spare on the two other drives, which isn’t very useful. I’d honestly rather have all four system drives with the same partition table and there’s hardly ever writes to /boot anyway.
Here’s what the identical partition tables of the drives /dev/sd[abcd] look like:
$ sudo fdisk -u -l /dev/sda
Disk /dev/sda: 298.1 GiB, 320069031424 bytes, 625134827 sectors
Disk model: ST3320620AS
Units: sectors of 1 * 512 = 512 bytes
Sector size (logical/physical): 512 bytes / 512 bytes
I/O size (minimum/optimal): 512 bytes / 512 bytes
Disklabel type: dos
Disk identifier: 0x00000000

Device     Boot   Start       End   Sectors  Size Id Type
/dev/sda1  *         63    514079    514017  251M fd Linux raid autodetect
/dev/sda2        514080   6393869   5879790  2.8G fd Linux raid autodetect
/dev/sda3       6393870 625121279 618727410  295G fd Linux raid autodetect
$ sudo fdisk -u -l /dev/sda
Disk /dev/sda: 298.1 GiB, 320069031424 bytes, 625134827 sectors
Disk model: ST3320620AS
Units: sectors of 1 * 512 = 512 bytes
Sector size (logical/physical): 512 bytes / 512 bytes
I/O size (minimum/optimal): 512 bytes / 512 bytes
Disklabel type: dos
Disk identifier: 0x00000000
Device Boot Start End Sectors Size Id Type
/dev/sda1 * 63 514079 514017 251M fd Linux raid autodetect
/dev/sda2 514080 6393869 5879790 2.8G fd Linux raid autodetect
/dev/sda3 6393870 625121279 618727410 295G fd Linux raid autodetect
Note that the first partition starts at sector 63, 32,256 bytes into the disk. Modern partition tools tend to start partitions at sector 2,048 (1,024KiB in), but this was acceptable in 2006 for me and worked up until a few days ago.
Those four partitions /dev/sd[abcd]1 make up an mdadm RAID-1 with metadata version 0.90. This was purposefully chosen because at the time of install GRUB did not have RAID support. This metadata version lives at the end of the member device so anything that just reads the device can pretend it’s an ext2 filesystem. That’s what people did many years ago to boot off of software RAID.
The last successful update of grub-pc seems to have been done on 7 February 2021:
$ ls -la /boot/grub/i386-pc/core.img
-rw-r--r-- 1 root root 31082 Feb  7 17:19 /boot/grub/i386-pc/core.img
$ ls -la /boot/grub/i386-pc/core.img
-rw-r--r-- 1 root root 31082 Feb 7 17:19 /boot/grub/i386-pc/core.img
I’ve got 62 sectors available for the core.img so that’s 31,744 bytes – just 662 bytes more than what is required.
The update of grub-pc appears to be detecting that my /boot partition is on a software RAID and is now including MD RAID support even though I don’t strictly require it. This makes the core.img larger than the space I have available for it.
I don’t think it is great that such a major change has been introduced as a security update, and it doesn’t seem like there is any easy way to tell it not to include the MD RAID support, but I’m sure everyone is doing their best here and it’s more important to get the security update out.
Option #1 is okay short term, especially if you don’t use Secure Boot as that’s what the security update was about.
Option #2 doesn’t seem that feasible as I can’t find a way to influence how Debian’s upgrade process calls grub-install. I don’t want that to become a manual process.
Option #3 seems like the easiest thing to do, as shaving ~1MiB off the size of my /boot isn’t going to cause me any issues.
At this point I would also recommend doing a wipefs -a on each of the partitions in order to remove the MD superblocks. I didn’t and it caused me a slight problem later as we shall see.
Delete and recreate first partition on each drive ^
I chose to use parted, but should be doable with fdisk or sfdisk or whatever you prefer.
I know from the fdisk output way above that the new partition needs to start at sector 2048 and end at sector 514,079.
$ sudo parted /dev/sda
GNU Parted 3.2
Using /dev/sda
Welcome to GNU Parted! Type 'help' to view a list of commands.
(parted) unit s
(parted) rm 1
(parted) mkpart primary ext4 2048 514079s
(parted) set 1 raid on
(parted) set 1 boot on
(parted) p
Model: ATA ST3320620AS (scsi)
Disk /dev/sda: 625134827s
Sector size (logical/physical): 512B/512B
Partition Table: msdos
Disk Flags:

Number  Start     End         Size        Type     File system  Flags
 1      2048s     514079s     512032s     primary  ext4         boot, raid, lba
 2      514080s   6393869s    5879790s    primary               raid
 3      6393870s  625121279s  618727410s  primary               raid

(parted) q
Information: You may need to update /etc/fstab.
$ sudo parted /dev/sda
GNU Parted 3.2
Using /dev/sda
Welcome to GNU Parted! Type 'help' to view a list of commands.
(parted) unit s
(parted) rm 1
(parted) mkpart primary ext4 2048 514079s
(parted) set 1 raid on
(parted) set 1 boot on
(parted) p
Model: ATA ST3320620AS (scsi)
Disk /dev/sda: 625134827s
Sector size (logical/physical): 512B/512B
Partition Table: msdos
Disk Flags:
Number Start End Size Type File system Flags
1 2048s 514079s 512032s primary ext4 boot, raid, lba
2 514080s 6393869s 5879790s primary raid
3 6393870s 625121279s 618727410s primary raid
(parted) q
Information: You may need to update /etc/fstab.
Do that for each drive in turn. When I got to /dev/sdd, this happened:
Error: Partition(s) 1 on /dev/sdd have been written, but we have been unable to
inform the kernel of the change, probably because it/they are in use.  As a result,
the old partition(s) will remain in use.  You should reboot now before making further changes.
Ignore/Cancel?
Error: Partition(s) 1 on /dev/sdd have been written, but we have been unable to
inform the kernel of the change, probably because it/they are in use. As a result,
the old partition(s) will remain in use. You should reboot now before making further changes.
Ignore/Cancel?
The reason for this seems to be that something has decided that there is still a RAID signature on /dev/sdd1 and so it will try to incrementally assemble the RAID-1 automatically in the background. This is why I recommend a wipefs of each member device.
To get out of this situation without rebooting I needed to repeat my mdadm --stop /dev/md0 command and then do a wipefs -a /dev/sdd1. I was then able to partition it with parted.
My /etc/fstab didn’t need a change because it mounted by device name, i.e. /dev/md0, but if yours uses UUID or label then you’ll need to update that now, too.
You probably should reboot now to make sure it all works when you have time to fix any problems, as opposed to risking issues when you least expect it.
$ uprecords
     #               Uptime | System                                     Boot up
----------------------------+---------------------------------------------------
     1   392 days, 16:45:55 | Linux 4.7.0               Thu Jun 14 16:13:52 2018
     2   325 days, 03:20:18 | Linux 3.16.0-0.bpo.4-amd  Wed Apr  1 14:43:32 2015
->   3   287 days, 16:03:12 | Linux 4.19.0-9-amd64      Fri May 22 12:33:27 2020     4   257 days, 07:31:42 | Linux 4.19.0-6-amd64      Sun Sep  8 05:00:38 2019
     5   246 days, 14:45:10 | Linux 4.7.0               Sat Aug  6 06:27:52 2016
     6   165 days, 01:24:22 | Linux 4.5.0-rc4-specialb  Sat Feb 20 18:18:47 2016
     7   131 days, 18:27:51 | Linux 3.16.0              Tue Sep 16 08:01:05 2014
     8    89 days, 16:01:40 | Linux 4.7.0               Fri May 26 18:28:40 2017
     9    85 days, 17:33:51 | Linux 4.7.0               Mon Feb 19 17:17:39 2018
    10    63 days, 18:57:12 | Linux 3.16.0-0.bpo.4-amd  Mon Jan 26 02:33:47 2015
----------------------------+---------------------------------------------------
1up in    37 days, 11:17:07 | at                        Mon Apr 12 15:53:46 2021
no1 in   105 days, 00:42:44 | at                        Sat Jun 19 05:19:23 2021
    up  2362 days, 06:33:25 | since                     Tue Sep 16 08:01:05 2014
  down     0 days, 14:02:09 | since                     Tue Sep 16 08:01:05 2014
   %up               99.975 | since                     Tue Sep 16 08:01:05 2014
$ uprecords
# Uptime | System Boot up
----------------------------+---------------------------------------------------
1 392 days, 16:45:55 | Linux 4.7.0 Thu Jun 14 16:13:52 2018
2 325 days, 03:20:18 | Linux 3.16.0-0.bpo.4-amd Wed Apr 1 14:43:32 2015
-> 3 287 days, 16:03:12 | Linux 4.19.0-9-amd64 Fri May 22 12:33:27 2020
4 257 days, 07:31:42 | Linux 4.19.0-6-amd64 Sun Sep 8 05:00:38 2019
5 246 days, 14:45:10 | Linux 4.7.0 Sat Aug 6 06:27:52 2016
6 165 days, 01:24:22 | Linux 4.5.0-rc4-specialb Sat Feb 20 18:18:47 2016
7 131 days, 18:27:51 | Linux 3.16.0 Tue Sep 16 08:01:05 2014
8 89 days, 16:01:40 | Linux 4.7.0 Fri May 26 18:28:40 2017
9 85 days, 17:33:51 | Linux 4.7.0 Mon Feb 19 17:17:39 2018
10 63 days, 18:57:12 | Linux 3.16.0-0.bpo.4-amd Mon Jan 26 02:33:47 2015
----------------------------+---------------------------------------------------
1up in 37 days, 11:17:07 | at Mon Apr 12 15:53:46 2021
no1 in 105 days, 00:42:44 | at Sat Jun 19 05:19:23 2021
up 2362 days, 06:33:25 | since Tue Sep 16 08:01:05 2014
down 0 days, 14:02:09 | since Tue Sep 16 08:01:05 2014
%up 99.975 | since Tue Sep 16 08:01:05 2014
As of the release of CentOS 8 / RHEL8, Red Hat disabled kernel support for running as a Xen PV or PVH guest, even though such support is enabled by default in the upstream Linux kernel.
As a result—unlike with all previous versions of CentOS/RHEL—you cannot boot the installer in Xen PV or PVH mode. You can still boot it in Xen HVM mode, or under KVM, but that is not very helpful if you don’t want to run HVM or KVM.
At BitFolk ever since the release of CentOS 8 we’ve had to tell customers to use the Rescue VM (a kind of live system) to unpack CentOS into a chroot.
This method was worked out by Jon Fautley. Jon emailed me instructions and I was able to replicate them. Several people have since asked me how it was done and Jon was happy for me to write it up, but this was all worked out by Jon, not me.
I’ll go into enough detail that you should be able to exactly replicate what I did to end up with something that works. This is quite a lot but it only needs to be done each time the real installer initrd.img changes, which isn’t that often. The resulting kernel and initrd.img can be used to install many guests.
Throughout the rest of this article I’ll refer to CentOS, but Jon initially made this work for RHEL 8. I’ve replicated it for CentOS 8 and will soon do so for RHEL 8 as well.
You will find this in the install ISO or on mirrors as images/pxeboot/initrd.img.
$ mkdir/var/tmp/frankeninitrd/initrd
$ cd/var/tmp/frankeninitrd/initrd
$ xz -dc/path/to/initrd.img > ../initrd.cpio
$ # root needed because this will do some mknod/mkdev.
$ sudocpio-idv< ../initrd.cpio
$ mkdir /var/tmp/frankeninitrd/initrd
$ cd /var/tmp/frankeninitrd/initrd
$ xz -dc /path/to/initrd.img > ../initrd.cpio
$ # root needed because this will do some mknod/mkdev.
$ sudo cpio -idv < ../initrd.cpio
I’m going to use the Xen guest that I’m doing this on, which at the time of writing is a Debian buster system running kernel 4.19.0-13. Even a system that is not currently running as a Xen guest will probably work, as they usually have modules available for everything.
At the time of writing the kernel version in the installer is 4.18.0-240.
If you’ve got different, adjust filenames accordingly.
$ sudocp-r/lib/modules/4.19.0-13-amd64 lib/modules/
$ # You're not going to use the original modules
$ # so may as well delete them to save space.
$ sudorm-vr lib/modules/4.18*
$ sudo cp -r /lib/modules/4.19.0-13-amd64 lib/modules/
$ # You're not going to use the original modules
$ # so may as well delete them to save space.
$ sudo rm -vr lib/modules/4.18*
$ cp/boot/vmlinuz-4.19.0-13-amd64 ../centos8-vmlinuz
$ ls-lah ../centos*-rw-r--r--1 andy andy 81M Feb 1 04:43 ../centos8-initrd.img
-rw-r--r--1 andy andy 5.1M Feb 1 04:04 ../centos8-vmlinuz
$ cp /boot/vmlinuz-4.19.0-13-amd64 ../centos8-vmlinuz
$ ls -lah ../centos*
-rw-r--r-- 1 andy andy  81M Feb  1 04:43 ../centos8-initrd.img
-rw-r--r-- 1 andy andy 5.1M Feb  1 04:04 ../centos8-vmlinuz
Copy the kernel and initrd to somewhere on your dom0 and create a guest config file that looks a bit like this:
name       = "centostest"
# CentOS 8 installer requires at least 2.5G RAM.
# OS will run with a lot less though.
memory     = 2560
vif        = [ "mac=00:16:5e:00:02:39, ip=192.168.82.225, vifname=v-centostest" ]
type       = "pvh"
kernel     = "/var/tmp/frankeninitrd/centos8-vmlinuz"
ramdisk    = "/var/tmp/frankeninitrd/centos8-initrd.img"
extra      = "console=hvc0 ip=192.168.82.225::192.168.82.1:255.255.255.0:centostest:eth0:none nameserver=8.8.8.8 inst.stage2=http://www.mirrorservice.org/sites/mirror.centos.org/8/BaseOS/x86_64/os/ inst.ks=http://example.com/yourkickstart.ks"
disk       = [ "phy:/dev/vg/centostest_xvda,xvda,w",
               "phy:/dev/vg/centostest_xvdb,xvdb,w" ]
name = "centostest"
# CentOS 8 installer requires at least 2.5G RAM.
# OS will run with a lot less though.
memory = 2560
vif = [ "mac=00:16:5e:00:02:39, ip=192.168.82.225, vifname=v-centostest" ]
type = "pvh"
kernel = "/var/tmp/frankeninitrd/centos8-vmlinuz"
ramdisk = "/var/tmp/frankeninitrd/centos8-initrd.img"
extra = "console=hvc0 ip=192.168.82.225::192.168.82.1:255.255.255.0:centostest:eth0:none nameserver=8.8.8.8 inst.stage2=http://www.mirrorservice.org/sites/mirror.centos.org/8/BaseOS/x86_64/os/ inst.ks=http://example.com/yourkickstart.ks"
disk = [ "phy:/dev/vg/centostest_xvda,xvda,w",
"phy:/dev/vg/centostest_xvdb,xvdb,w" ]
Assumptions in the above:
vif and disk settings will be however you usually do that.
“extra” is for the kernel command line and here gives the installer static networking with the ip=IP address::default gateway:netmask:hostname:interface name:auto configuration type option.
inst.stage2 here goes to a public mirror but could be an unpacked installer iso file instead.
inst.ks points to a minimal kickstart file you’ll have to create (see below).
Automatically wipe disks and partition. I use xvda for the OS and xvdb for swap. Adjust accordingly.
Install only minimal package set.
Switch the installed system over to kernel-ml from EPEL.
Force an SELinux autorelabel at first boot.
The only thing it doesn’t do is create any users. The installer will wait for you to do that. If you want an entirely automated install just add the user creation stuff to your kickstart file.
url --url="http://www.mirrorservice.org/sites/mirror.centos.org/8/BaseOS/x86_64/os"
text

# Clear all the disks.
clearpart --all --initlabel
zerombr

# A root filesystem that takes up all of xvda.
part /    --ondisk=xvda --fstype=xfs --size=1 --grow

# A swap partition that takes up all of xvdb.
part swap --ondisk=xvdb --size=1 --grow

bootloader --location=mbr --driveorder=xvda --append="console=hvc0"
firstboot --disabled
timezone --utc Etc/UTC --ntpservers="0.pool.ntp.org,1.pool.ntp.org,2.pool.ntp.org,3.pool.ntp.org"
keyboard --vckeymap=gb --xlayouts='gb'
lang en_GB.UTF-8
skipx
firewall --enabled --ssh
halt

%packages
@^Minimal install
%end

%post --interpreter=/usr/bin/bash --log=/root/ks-post.log --erroronfail

# Switch to kernel-ml from EPEL. Necessary for Xen PV/PVH boot support.
rpm --import https://www.elrepo.org/RPM-GPG-KEY-elrepo.org
yum -y install https://www.elrepo.org/elrepo-release-8.el8.elrepo.noarch.rpm
yum --enablerepo=elrepo-kernel -y install kernel-ml
yum -y remove kernel-tools kernel-core kernel-modules

sed -i -e 's/DEFAULTKERNEL=.*/DEFAULTKERNEL=kernel-ml/' /etc/sysconfig/kernel
grub2-mkconfig -o /boot/grub2/grub.cfg

# Force SELinux autorelabel on first boot.
touch /.autorelabel
%end
url --url="http://www.mirrorservice.org/sites/mirror.centos.org/8/BaseOS/x86_64/os"
text
# Clear all the disks.
clearpart --all --initlabel
zerombr
# A root filesystem that takes up all of xvda.
part / --ondisk=xvda --fstype=xfs --size=1 --grow
# A swap partition that takes up all of xvdb.
part swap --ondisk=xvdb --size=1 --grow
bootloader --location=mbr --driveorder=xvda --append="console=hvc0"
firstboot --disabled
timezone --utc Etc/UTC --ntpservers="0.pool.ntp.org,1.pool.ntp.org,2.pool.ntp.org,3.pool.ntp.org"
keyboard --vckeymap=gb --xlayouts='gb'
lang en_GB.UTF-8
skipx
firewall --enabled --ssh
halt
%packages
@^Minimal install
%end
%post --interpreter=/usr/bin/bash --log=/root/ks-post.log --erroronfail
# Switch to kernel-ml from EPEL. Necessary for Xen PV/PVH boot support.
rpm --import https://www.elrepo.org/RPM-GPG-KEY-elrepo.org
yum -y install https://www.elrepo.org/elrepo-release-8.el8.elrepo.noarch.rpm
yum --enablerepo=elrepo-kernel -y install kernel-ml
yum -y remove kernel-tools kernel-core kernel-modules
sed -i -e 's/DEFAULTKERNEL=.*/DEFAULTKERNEL=kernel-ml/' /etc/sysconfig/kernel
grub2-mkconfig -o /boot/grub2/grub.cfg
# Force SELinux autorelabel on first boot.
touch /.autorelabel
%end
Obviously this guest config can only boot the installer. Once it’s actually installed and halts you’ll want to make a guest config suitable for normal booting. The kernel-ml does work in PVH mode so at BitFolk we use pvhgrub to boot these.
The actual modifications needed to the stock installer kernel are quite small: just enable CONFIG_XEN_PVH kernel option and build. I don’t know the process to build a CentOS or RHEL installer kernel though, so that wasn’t an option for me.
If you do know how to do it please do send me any information you have.
My desktop runs Ubuntu 18.04 at the moment, and so does my partner’s laptop. I also have a Debian buster laptop but I’ve never installed snapd there. So it’s just my desktop and my partner’s laptop I’m concerned about.
If you run Ubuntu 20.04 or later I think there’s probably more concern, as I understand the software centre offers snap versions of things by default.
Anyway, I couldn’t recall ever installing a snap on purpose on my desktop except for a short while ago when I intentionally installed signal-desktop. But in fact I have quite a few snaps installed.
(The tr is necessary above because the /proc/*/environ file is a NUL-separated string, so that modifies it to be one variable per line, then looks for the LD_LIBRARY_PATH line, and checks if it has an empty entry ::)
So yeah, my gnome-system-monitor is a local code execution vector.
As are my gnome-characters, gnome-logs and that gnome-calculator if I ever uninstall the non-snap version.
That CVE seems to have been published on 3 December 2020. I hope that the affected snaps will be fixed soon.
I don’t like that the CVE says the impact is:
If a user were tricked into installing a malicious snap or downloading a malicious library, under certain circumstances an attacker could exploit this to affect strict mode snaps that have access to the library and were launched from the directory containing the library.
My first thought upon reading is, “I’m safe, I haven’t been tricked into downloading any malicious snaps!” But I do have snaps that aren’t malicious, they are just insecure. The hardest part of the exploit is indeed getting a malicious file (a library) into my filesystem in a directory where I will run a snap from.
Sometimes you only want services to start up once there is a network configured. Most network services can handle the situation where there is initially no network, waiting until the network appears, because this is a very common situation.
Other services though may not in themselves be expecting to use the network, and so have never thought about it. Also a great thing about open source software is that it tends to be very composable, so it’s not possible to predict the ways that people will use combinations of software.
systemd will tend to start things as soon as it can. If your service is not configured to wait for the network that means it will most likely be started up before the network exists. If your service then tries to do something that requires a network it will receive an error, which it may not be prepared to handle.
As you can see there’s nothing in there that says to wait for a network.
I use a database plugin for ulogd2 that makes it log to a (remote) database. As a consequence as soon as it starts up it tries to establish a database connection, immediately fails as there is no route to any remote host, retries a few times and then bails out.
Most of the time it exhausts its retries before the network is up, so the result is that the service is in a failed state. Simply manually starting the service (or having config management do it) resolves that, but that’s a mess.
Ideally I don’t want systemd to start ulogd2 until there is a network.
If like me you know just enough about systemd to be dangerous, you figure that what you want to do is add something like this to the [Unit] section of the service unit file:
The thing about the network-online target is that it doesn’t exist unless you’re using a “modern” method of bringing up your networking, like NetworkManager or systemd-networkd.
If you’re not doing that then systemd works out that the network-online target can never be reached and ignores it as a Want.
I’m using ifupdown on servers as it still does everything I need it to. To make ifupdown support the network-online target on Debian, you should enable the ifupdown-wait-online service:
The temptation now may be to edit the ulogd2 service file that’s under /lib/systemd/system/ to contain the Want/After bits.
That will work but it isn’t the correct way because if there is a package update then your changes will be overwritten.
A better way is to place a new service file into /etc/systemd/system/. That will entirely override the distributed copy. The obvious downside there is that if there’s an improvement to the packaged service file then you’ll never use it, as you’ve entirely overridden it with your own file.
Since this was posted on 2020-09-13 there was some interest in the comments and on Hacker News and I learned some things which required updates. I’ve tried to indicate them with struck out text.
Of particular note is the re-add method of removing BBLs.
MD is the Linux kernel driver that is used for running software RAID arrays. mdadm is the software that you run to manage MD devices. They are both part of the same project.
Since about 2010, MD has had a bad blocks log (BBL) feature. When it fails to read from an underlying device it will (sometimes?) mark that block as bad and read the correct data from a different device, and then forever more redirect reads away from those bad blocks. This feature defaults to being on.
One problem with this feature is that read errors can occur for many reasons besides permanent failure of part of a storage device. For example, it could be a failure of the backplane or controller that causes many read errors on multiple devices, or the devices could be reached over a network of some sort and temporary network problems could propagate errors.
Even if the particular part of the device is unreadable, the operating system is supposed to try to write the correct data over the top. This write will either clear the problem or else be redirected to a spare sector on the drive by the drive’s firmware. The operating system is not supposed to be taking on this role, the drives are, and when the drives fail to do so then the redundancy of the array is supposed to save the day.
Even worse, there are apparently bugs somewhere in the BBL code that cause a device’s BBL to be copied onto a new device when the array is rebuilt or a device replaced. Clearly it does not make sense for a new device to get a copy of another device’s BBL because they are inherently a per-device thing. So far there has been no successful intentional reproduction of this, only people unwittingly hitting it at the worst possible moments.It has been reproduced that adding or replacing a device results in a BBL being copied. I am not aware of a formal bug report for this yet.
mdadm doesn’t even try particularly hard to warn you if a new bad block is found. Unlike when a device fails, it doesn’t send you an email. The MD driver writes in the syslog about the bad block(s). There’s also no change to /proc/mdstat. You have to examine some files in sysfs.
I’ll say right now that this story doesn’t (yet?) have a satisfying ending.
I’ve been aware of the “Bad Blocks Controversy” for about 5 years but I haven’t ever personally experienced any problems and it was always at the bottom of my list to look at. Roy’s recent thread spurred me into deciding that in future no MD array I created would have a BBL.
Currently the only way to remove a BBL from an array component is to stop the array and then assemble it with an argument like this:
There are two ways to remove the BBL from the devices of existing arrays.
Fail and re-add each device with update
It doesn’t seem to be documented anywhere, but you can fail a device out of an array and re-add it with an update to remove the BBL on that device, like this:
# mdadm --fail /dev/md0 /dev/sdb1 \
        --remove /dev/sdb1 \
        --re-add /dev/sdb1 \
        --update=no-bbl
mdadm: set /dev/sdb1 faulty in /dev/md0
mdadm: hot removed /dev/sdb1 from /dev/md0
mdadm: re-added /dev/sdb1
# mdadm --fail /dev/md0 /dev/sdb1 \
--remove /dev/sdb1 \
--re-add /dev/sdb1 \
--update=no-bbl
mdadm: set /dev/sdb1 faulty in /dev/md0
mdadm: hot removed /dev/sdb1 from /dev/md0
mdadm: re-added /dev/sdb1
This will only work if your array has a bitmap, otherwise it will refuse to re-add. Most arrays do get a bitmap, but small arrays won’t by default. Fortunately you can easily add a bitmap like this:
# mdadm --grow --bitmap=internal /dev/md0
# mdadm --grow --bitmap=internal /dev/md0
The downside of this approach is that your array will have reduced redundancy while it rebuilds. It should rebuild pretty quickly though as the bitmap will cause only changed parts to be rewritten.
The other way to remove BBL from devices is to stop the array and assemble it manually like this:
# mdadm --assemble /dev/mdX --update=no-bbl
# mdadm --assemble /dev/mdX --update=no-bbl
The big problem with this is that stopping the array obviously causes downtime for whatever is using it. If your root filesystem is on an MD array (and why wouldn’t it be, if you use MD?) then that means the entire server, and you’re having to do this from sort of rescue environment.
I have suggested that a config option be added to remove a BBL on assembly, so that this will happen the next time the machine is rebooted. This does not appear to have provoked any interest.
This method is quicker since it operates on all devices and doesn’t require a rebuild, but personally I usually find downtime more painful so I’d be inclined to schedule an “at-risk” maintenance window and do it the re-add way.
So if the BBL cannot be easily removed, at least it can be prevented from ever existing, right? When Neil Brown, the previous MD maintainer, was asked in 2016 if the feature could be defaulted to off, Neil said that putting this in the config file was as good as that:
CREATE bbl=no
CREATE bbl=no
The thing is, it’s not as good as disabling it by default when you consider what many users’ experience is of running the mdadm command: they don’t run mdadm, something else runs it for them. I’d go as far as to say that the majority of uses of mdadm are done by helper scripts and installers, not by human beings.
If it’s a program that is running mdadm for you then you are going to have to find out how to set that mdadm.conf before it reads it.
Take for example my own process of installing Debian. I do it by booting the Debian Installerby PXE. I have some pre-seeding done to answer a lot of the installer questions, but actually I do still do the disk partitioning stage in the installer’s text interface.
So there I was thinking this is actually going to be quite simple, because the Debian Installer is really lovely about letting you execute a shell and poke around. Surely all I am going to need to do is open a shell once and edit /etc/mdadm/mdadm.conf and then go back into the mdcfg menu and carry on, right? Oh dear me no.
You can read the details of my wild ride that involved me uploading a binary of strace into the d-i to run mdadm under to work out what was going on, but just the relevant discoveries are in this article for those who’d rather not.
mdadm in d-i uses a config file at /tmp/mdadm.conf
(At this point a number of people responded, “that’s because everything else will be set read-only.” That’s not the case with debian-installer which runs entirely off of a tmpfs. It’s all writeable.)
If you’re on something with multiple virtual consoles (like if you’re sitting in front of a conventional PC) then you could switch to one of those after you’ve entered the MD configuration part and modify /tmp/mdadm.conf then. I don’t have that option because I’m on a serial console.
I thought I didn’t have that option because I’m on a serial console, but it was pointed out to me that when the Debian installer detects it’s running in a serial console it runs itself under GNU Screen. So, by using the usual screen commands of ctrl+a n or ctrl+a p, one can switch backwards and forwards through the different virtual consoles. Neat!
There is also an earlier option to load an installer component that enables one to continue the installation process over SSH. If you select that then you can SSH in to the running installer system so if you do that after you’ve entered the MD configuration bit in your main console then I guess you can then edit the config file and continue.
By one of those methods of getting a shell, after you’ve already entered the array configuration part but before you’ve actually created any arrays, I think you could edit /tmp/mdadm.conf to have “CREATE bbl=no” and the installer’s mdadm binary would respect that when you switch back.
Alternatively you could just use the shell to create your arrays instead of using the Ddebian installer to do it. If it’s a simple case where you’ve just got an sda and an sdb disk identically partitioned and you want to make a bunch of arrays on them, it can be a fairly legible shell session like:
~ # mkdir -vp /etc/mdadm && echo "CREATE bbl=no" > /etc/mdadm/mdadm.conf
~ # for part in 1 2 3 5; do \
      mdadm --create \
            -v \
            --config=/etc/mdadm/mdadm.conf \
            /dev/md${part} \
            --level=1 \
            --raid-devices=2 \
            /dev/sd[ab]${part}; \
    done
~ # mkdir -vp /etc/mdadm && echo "CREATE bbl=no" > /etc/mdadm/mdadm.conf
~ # for part in 1 2 3 5; do \
mdadm --create \
-v \
--config=/etc/mdadm/mdadm.conf \
/dev/md${part} \
--level=1 \
--raid-devices=2 \
/dev/sd[ab]${part}; \
done
Do not try this until you understand exactly what it is doing.
It iterates the list 1, 2, 3, 5 (I use the 4th partition for something else) and makes arrays called mdX out of sdaX and sdbX. The mdadm binary is forced to use our config file that disables creation of a BBL.
You can verify that a BBL does not exist on any of the array components like this:
~ # mdadm --examine-badblocks /dev/sda1
No bad-blocks list configured on /dev/sda1
~ # mdadm --examine-badblocks /dev/sda1
No bad-blocks list configured on /dev/sda1
You should get identical output for every component. If a component did have a BBL it would output something like this:
~ # mdadm --examine-badblocks /dev/sda1
Bad-blocks list is empty in /dev/sda1
~ # mdadm --examine-badblocks /dev/sda1
Bad-blocks list is empty in /dev/sda1
You can then exit the d-i shell and go back to the disk partitioning section. You won’t need the MD configuration part now but even if you do go into it, it should detect all your manually-created arrays.
All of this isn’t great but at least it’s fairly easy to pause the Debian installer and take some manual action. I suspect users of other Linux distributions may not be so lucky, and so I too think it would be a good idea if this buggy feature was disabled by default, or at least if there were a way to tell mdadm to remove the BBL on assembly.
In fact I would very much like to be able to tell it to remove the BBL on assembly so that I can disable the BBL feature on all my existing servers.
mdadm actually gets called by udev from inside the initramfs in incremental assembly mode, so I think the incremental assembly code needs to look in the config file for this “remove all the BBLs” directive and do it then during assembly as if update=no-bbl had been specified on a command line.
It should be possible to write a script that:
Looks in /sys/block/md* to find device components of all arrays.
Checks each one to see if it has a BBL.
If any are found, add a bitmap if necessary.
Do the fail/remove/re-add trick on each one in turn, waiting for the array to go back into sync each time.
i.e. it should be possible to automate this and run it at the end of an install so the entire install process can remain automated, or run it on a host any time after it’s been provisioned.
Sometime in late December (2019) I noticed that when I clicked on a tag in Shotwell, the photo management software that I use, it was showing either zero or hardly any matching photos when I knew for sure that there should be many more.
(When I say “tag” in this article it’s mostly going to refer to the type of tags you generally put on an image, i.e. the tags that identify who or what is in the image, what event it is associated with, the place it was taken etc. Images can have many different kinds of tags containing all manner of metadata, but for avoidance of doubt please assume that I don’t mean any of those.)
I have Shotwell set to store the tags in the image files themselves, in the metadata. There is a standard for this called Exif. What seems to have happened is that Shotwell had removed a huge number of tags from the files themselves. At the time of discovery I had around 15,500 photos in my collection and it looked like the only way to tell what was in them would be by looking at them. Disaster.
Here follows some notes about what I found out when trying to recover from this situation, in case it si ever useful for anyone.
Shotwell still had a visible tag hierarchy, so I could for example click on the “Pets/Remy” tag, but this brought up only one photo that I took on 14 December 2019. I’ve been taking photos of Remy for years so I knew there should be many more. Here’s Remy.
I knew this must have happened fairly recently because I’d have noticed quite quickly that photos were “missing”. I had a look for a recent photo that I knew I’d tagged with a particular thing, and then looked in the backups to see when it was last modified.
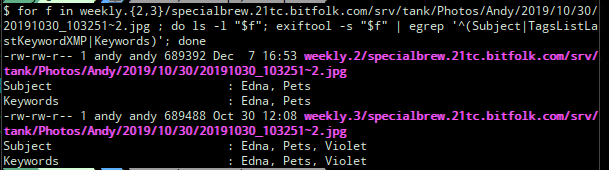
As an example I found a photo that was taken on 30 October 2019 that should have been tagged “Pets/Violet” but no longer was. It had been modified (but not by me) on 7 December 2019.
(Sorry about the text-as-images; I’m reconstructing this series of events from a Twitter thread, where things necessarily had to be posted as screenshots.)
What the above shows is that the version of the photo that existed on 30 October 2019 had the tags “Pets“, “Edna“, and “Violet” but then the version that was written on 7 December 2019 lost the “Violet” tag.
Here I used the exiftool utility to display EXIF tags from the photo files. You can do that like this:
$ exiftool -s $filename
$ exiftool -s $filename
Using egrep I limited this to the tag keys “Subject“, “Keywords“, and “TagsListLastKeywordXMP” but this was a slight mistake: “TagsListLastKeywordXMP” was actually a typo, is totally irrelevant and should be ignored.
“Subject” and “Keywords” were always identical for any photo I examined and contained the flattened list of tags. For example, in Shotwell that photo originally had the tags:
Pets/Edna
Pets/Violet
It seems that Shotwell flattens that to:
Pets
Edna
Violet
and then stores it in “Subject” and “Keywords“.
The tags with hierarchy are actually in the key “TagsList” like:
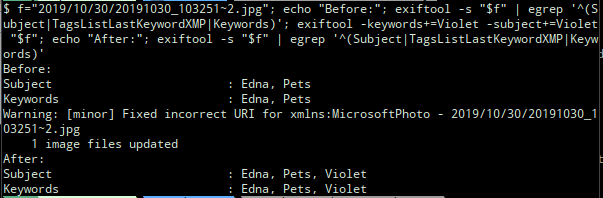
This shows that the “Violet” tag is now back in the current version of the file. After restarting Shotwell and doing a free text search for “Violet”, this photo now shows up whereas before it did not. It still did not show up when I clicked on “Pets/Violet” in the tag hierarchy however. It was then that I realised I also needed to put “Pets/Violet” into the “TagsList” key.
I ended up using a script to do this in bulk fashion, but individually I think you should be able to do this like:
It was relatively easy to work out which files had been screwed with, because thankfully I didn’t make any other photo modifications on 7 December 2019. So any photo that got modified that day was probably a candidate.
I haven’t mentioned what actually caused this problem yet. I don’t know exactly. At 16:53 on 7 December 2019 I was importing some photos into Shotwell, and I do seem to recall it crashed at some point, either while I was doing that or shortly after.
The photos from that import and all others afterwards had retained their tags correctly, but many that existed prior to that time seemed to be missing some or all tags. I have no idea why such a crash would cause Shotwell to do that but that must have been what did it.
Running this against my backups identified 3,721 files that had been modified on 7 December 2019:
$ cd weekly.2/specialbrew.21tc.bitfolk.com/srv/tank/Photos/Andy
$ find . -type f \
  -newermt "2019-12-07 00:00:00" \! \
  -newermt "2019-12-07 23:59:59" > ~/busted.txt
$ cd weekly.2/specialbrew.21tc.bitfolk.com/srv/tank/Photos/Andy
$ find . -type f \
-newermt "2019-12-07 00:00:00" \! \
-newermt "2019-12-07 23:59:59" > ~/busted.txt
The next thing I did was to check that each of these file paths still exist in the current photo store and in the known-good backups (weekly.3).
After transferring tags.yaml back to my home fileserver it was time to use it to stuff the tags back into the files that had lost them.
One thing to note while doing this is that if you just add a tag, it adds it even if the same tag already exists, leading to duplicates. I thought it best to first delete the tag and then add it again so that there would only be one instance of each one.
16m53s of runtime later, it had completed its work… 🙌 2020 will definitely be the year of Linux on the desktop¹.
¹ As long as you know how to manipulate EXIF tags from a programming language and have a functioning backup system and even then don’t mind losing some stuff
Unfortunately there were some things I couldn’t restore. It was at this point that I discovered that Shotwell does not ever put tags into video files (even though they do support EXIF tags…)
That means that the only record of the tags on a video file is in Shotwell’s own database, which I did not back up as I didn’t think I needed to.
I am now backing that up, but should this sort of thing happen in the future I’d need to know how to manipulate the tags for videos in Shotwell’s database.
Shotwell’s database is an SQLite file that’s normally at $HOME/.local/share/shotwell/data/photo.db. I’m fairly familiar with SQLite so I had a poke around, but couldn’t immediately see how these tags were stored. I had to ask on the Shotwell mailing list.
Here’s how Shotwell does it. There’s a table called TagTable which stores the name of each tag and a comma-separated list of every photo/video which matches it:
sqlite>.schema TagTable
CREATETABLE TagTable (id INTEGERPRIMARYKEY, name TEXT UNIQUENOTNULL, photo_id_list TEXT, time_created INTEGER);
sqlite> .schema TagTable
CREATE TABLE TagTable (id INTEGER PRIMARY KEY, name TEXT UNIQUE NOT NULL, photo_id_list TEXT, time_created INTEGER);
The photo_id_list column holds the comma-separated list. Each item in the list is of the form:
“thumb” or “video-” depending on whether the item is a photo or a video
16 hex digits, zero padded, which is the ID value from the PhotosTable or VideosTable for that item
a comma
Full example of extracting tags for the video file 2019/12/31/20191231_121604.mp4:
$ sqlite3 /home/andy/.local/share/shotwell/DATA/photo.db
SQLite version 3.22.0 2018-01-2218:45:57
Enter ".help"FOR usage hints.
sqlite>SELECT id
FROM VideoTable
WHERE filename LIKE'%20191231%';
553
sqlite>SELECT printf("%016x",553);
0000000000000229
sqlite>SELECT name
FROM TagTable
WHERE photo_id_list LIKE'%video-0000000000000229,%';
/Places
/Places/London
/Places/London/Feltham
/Pets
/Places/London/Feltham/Bedfont Lakes
/Pets/Marge
/Pets/Mandy
$ sqlite3 /home/andy/.local/share/shotwell/data/photo.db
SQLite version 3.22.0 2018-01-22 18:45:57
Enter ".help" for usage hints.
sqlite> select id
from VideoTable
where filename like '%20191231%';
553
sqlite> select printf("%016x", 553);
0000000000000229
sqlite> select name
from TagTable
where photo_id_list like '%video-0000000000000229,%';
/Places
/Places/London
/Places/London/Feltham
/Pets
/Places/London/Feltham/Bedfont Lakes
/Pets/Marge
/Pets/Mandy
If that is not completely clear:
The ID for that video file is 553
553 in hexadecial is 229
Pad that to 16 digits, add “video-” at the front and “.” at the end (even the last item in the list has a comma at the end)
Search for that string in photo_id_list
If a row matches then the name column is a tag that is attached to that file
I don’t exactly know how I would have identified which videos got messed with, but at least I would have had both versions of the database to compare, and I now know how I would do the comparison.
Exif exists for the purpose of storing tags like this.
When I move my photos from one piece of software to another I want it to be able to read the tags. I don’t want to have to input them all over again. That would be unimaginably tedious.
When I moved from F-Spot to Shotwell the fact that the tags were in the files saved me countless hours of work. It just worked on import.
If there wasn’t a dedicated importer feature then it would be so much work that really the only way to do it would be to extract the tags from the database and insert them again programmatically, which is basically admitting that to change software you need to be an expert. That really isn’t how this should work.
If the only copy of my tags is in the internal database of a unique piece of cataloging software, then I have to become an expert on the internal data store of that piece of software. I don’t want to have to do that.
I’ve been forced to do that here for Shotwell because of a deficiency of Shotwell in not storing video tags in the files. But if we’re only talking about photos then I could have avoided it, and could also avoid having to be an expert on every future piece of cataloging software.
Even if I’m not moving to a different cataloging solution, lots of software understands Exif and it’s useful to be able to query those things from other software.
I regard it very much like artist, album, author, genre etc tags in the metadata of digital music and ebooks, all of which are in the files; you would not expect to have to reconstruct these out of the database of some other bit of software every time you wanted to use them elsewhere.
It was a mistake not to backup the Shotwell database though; I thought I did not need it as I thought all tags were being stored in files, and tags were the only things I cared about. As it happened, tags were not being stored in video files and tags for video files only exist in Shotwell’s database.
Having backups was obviously a lifesaver here. It took me ~3 weeks to notice.
Being able to manipulate them like a regular filesystem made things a lot more convenient, so that’s a property I will want to keep in whatever future backup arrangements I have.
I might very well switch to different photo management software now, assuming I could find any that I prefer, but all software has bugs. Whatever I switch to I would have to ensure that I knew how to extract the tags from that as well, if it doesn’t store them in the files.
I don’t want to store my photos and videos “in the cloud” but it is a shortcoming of Shotwell that I can basically only use it from my desktop at home. Its database does not support multiple or remote access. I wonder if there is some web-based thing that can just read (and cache) the tags out of the files, build dynamic galleries and allow arbitrary searches on them…
Shotwell’s database schema and its use of 16 hexadecimal digits (nibbles?) means I can only store a maximum of 18,446,744,073,709,551,615 (1.844674407×10¹⁹ -1) photos or videos of dogs. Arbitrary limits suck so much.
Today I had a look at a customer’s problem. They had a Perl application that connects to a third party API, and as of sometime today it had started failing to connect, although the remote site API still seemed to be responding in general.
The particular Perl module for this service (doesn’t really matter what it was) wasn’t being very verbose about what was going on. It simply said:
Failed to POST to https://api.example.com/api/v1/message.json
I started by writing a small test program using LWP::UserAgent to do a POST to the same URI, and this time I saw:
500 Can’t connect to api.example.com:443 (SSL connect attempt failed with unknown errorerror:14094410:SSL routines:ssl3_read_bytes:sslv3 alert handshake failure)
So, it’s failing to do a TLS handshake. But this was working yesterday. Has anything changed? Yes, the remote service was under a denial of service attack today and they’ve just moved it behind a CDN. TLS connections are now being terminated by the CDN, not the service’s own backend.
And oh dear, the customer’s host is Debian squeeze (!) which comes with OpenSSL 0.9.8. This is badly out of date. Neither the OS nor the OpenSSL version is supported for security any more. It needs to be upgraded.
Unfortunately I am told that upgrading the OS is not an option at this time. So can we update Perl?
Well yes, we could build our own Perl reasonably easily. The underlying issue is OpenSSL, though. So it would be an upgrade of:
OpenSSL
Perl
Net::SSLeay
IO::Socket::SSL
LWP, as the app’s HTTP client is using that
It’s not actually that bad though. In fact you do not need to build a whole new Perl, you only need to build OpenSSL, Net::SSLeay and IO::Socket::SSL and then tell Perl (and the system’s LWP) to use the new versions of those.
Of course, everything else on the system still uses a dangerously old OpenSSL, so this is not really a long term way to avoid upgrading the operating system.
After downloading and unpacking the latest stable release of OpenSSL, the sequence of commands for building, testing and installing it look like this:
$ ./config --prefix=/opt/openssl \
           --openssldir=/opt/openssl \
           -Wl,-rpath,'$(LIBRPATH)'
$ make
$ make test
$ sudo make install
$ ./config --prefix=/opt/openssl \
--openssldir=/opt/openssl \
-Wl,-rpath,'$(LIBRPATH)'
$ make
$ make test
$ sudo make install
The rpath thing is so that the binaries will find the libraries in the alternate path. If you were instead going to add the library path to the system’s ld.so.conf then you wouldn’t have to have that bit, but I wanted this to be self-contained.
When I did this the first time, all the tests failed and at the install step it said:
ar: /opt/openssl/lib/libcrypto.so: File format not recognized
Ultimately the customer’s Perl application needed to be told to use these new modules. This could be done with either the PERL5LIB environment variable or else by putting:
use lib '/opt/perl/cpanm/lib/perl5';
use lib '/opt/perl/cpanm/lib/perl5';
At the top of the main script.
The application was then once more able to talk TLS to the CDN and it all worked again.
The customer could maybe consider putting the application into a container on a new install of the operating system.
That way, the kernel and whole of the OS would be modern and supported, but just this application would be running with a terribly outdated userland. Over time, more of the bits inside the container could be moved out to the modern host (or another container), avoiding having to do everything at once.
Fail2Ban is a piece of software which can watch log files and take an arbitrary action when a certain number of matches are found.
It is most commonly used to read logs from an SSH daemon in order to insert a firewall rule against hosts that repeatedly fail to log in. Hence Fail → Ban.
Wherever possible, it is best to require public key and/or multi-factor authentication for SSH login. Then, it does not matter how many times an attacker tries to guess passwords as they should never succeed. It’s just log noise.
Sadly I have some hosts where some users require password authentication to be available from the public Internet. Also, even on the hosts that can have password authentication disabled, it is irritating to see the same IPs trying over and over.
Putting SSH on a different port is not sufficient, by the way. It may cut down the log noise a little, but the advent of services that scan the entire Internet and then sell the results has meant that if you run an SSH daemon on any port, it will be found and be the subject of dictionary attacks.
The usual firewall on Linux is iptables. By default, when Fail2Ban wants to block an IP address it will insert a rule and then when the block expires it will remove it again.
iptables Interaction With Configuration Management ^
I’ve had all my hosts in configuration management for about 10 years now, and that includes the firewall setup. First it was Puppet but these days it is Ansible.
That worked great when the firewall rules were only managed in the config management, but Fail2Ban introduces firewall changes itself.
Now, it’s been many years since I moved on from Puppet so perhaps a way around this has been found there now. At the time though, I was using the Puppetlabs firewall module and it really did not like seeing changes from outside itself. It would keep reverting them.
It was possible to tell it not to meddle with rules that it didn’t add, but it never did work completely correctly. I would still see changes at every run.
I never did manage to come up with a way to control the firewall rules in Puppet but still allow Fail2Ban to add and remove its rules and chains, without there being modifications at every Puppet run.
Instead I sidestepped the problem by using the “route” action of Fail2Ban instead of the “iptables” action. The “route” action simply inserts a blackhole route, as if you did this at the command line:
# ip route add blackhole 192.168.1.1
# ip route add blackhole 192.168.1.1
That blocks all traffic to/from that IP address. Some people may have wanted to only block SSH traffic from those hosts but in my view those hosts are bad actors and I am happy to drop all traffic from/to them.
Fail2Ban isn’t just restricted to processing logs for one service. Taken together, the criteria for banning for a given time over a given set of log files is called a jail, and there can be multiple jails.
When using iptables as the jail action this isn’t much of an issue because the rules are added to separate iptables chains named after the jail itself, e.g. f2b-sshd. You can therefore have the same IP address appearing in multiple different chains and whichever is hit first will ban it.
A common way to configure Fail2Ban is to have one jail banning hosts that have a short burst of failures for a relatively short period of time, and then another jail that bans persistent attackers for a much longer period of time. For example, there could be an sshd jail that looks for 3 failures in 3 minutes and bans for 20 minutes, and then an sshd-hourly jail that looks for 5 failures in an hour and bans for a day.
This doesn’t work with the “route” action because there is only one routing table and you can’t have duplicate routes in it.
Initially you may think you can cause the actual execution of the actions to still succeed with something like this:
actionban   = ip route add blackhole <ip> || true
actionunban = ip route del blackhole <ip> || true
actionban = ip route add blackhole <ip> || true
actionunban = ip route del blackhole <ip> || true
i.e. force them to always succeed even if the IP is already banned or already expired.
The problem now is that the short-term jails can remove bans that the long-term jails have added. It’s a race condition as to which order the adds and removes are done in.
As I say, I switched to Ansible quite a while ago, and for firewalling here I chose the iptables_raw module.
This has the same issues with changed rules as all my earlier Puppet efforts did.
The docs say that you can set keep_unmanaged and then rules from outside of this module won’t be meddled with. This is true, but still Ansible reports changes on every host every time. It isn’t actually doing a change, it is just noting a change.
I think this is because every time iptables_raw changes the rules, it uses iptables-save to save them out to a file. Then Fail2Ban adds and removes some rules, and next time iptables_raw compares the live rule set with the save file that it saved out last time. So there’s always changes (assuming any Fail2Ban activity).
So I am still looking for a way to manage Linux host firewalls in Ansible that can ignore some chains and not want to be in sole control of all rules.
Paul mentioned that from Ansible he uses ferm, which writes rules to files before actioning them, so doesn’t suffer from this problem.
That is a possibility, but if I am going to rewrite all of that I think I should probably do it with something that is going to support nftables, which ferm apparently isn’t.
Routes can have metrics. The metric goes from 0 to 9999, and the lower the number the more important the route is.
There can be multiple routes for the same destination but with different metrics; for example if you have a metric 10 route and a metric 20 route for the same destination, the metric 10 route is chosen.
That means that you can use a different metric for each jail, and then each jail can ban and unban the same IPs without interfering with other jails.
Here’s an action file for the action “route-metric”:
[Definition]
actionban   = ip route add blackhole <ip> metric <metric>
actionunban = ip route del blackhole <ip> metric <metric>
[Definition]
actionban = ip route add blackhole <ip> metric <metric>
actionunban = ip route del blackhole <ip> metric <metric>
On Debian you might put that in a file called /etc/fail2ban/action.d/route-metric.conf and then in a jail definition use it like this: