Here’s how to install Debian jessie on a Supermicro server using PXE boot and the IPMI serial-over-LAN.
Using these instructions you will be able to complete an install of a remote machine, although you will initially need access to the BIOS to configure the IPMI part.
BIOS settings ^
This bit needs you to be in the same location as the machine, or else have someone who is make the required changes.
Press DEL to go into the BIOS configuration.
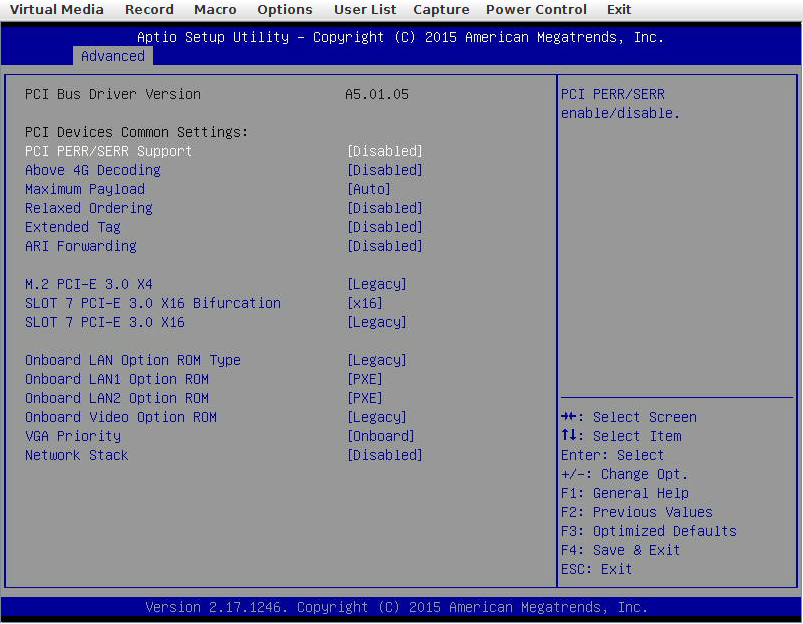
Under Advanced > PCIe/PCI/PnP Configuration make sure that the network interface through which you’ll reach your PXE server has the “PXE” option ROM set:
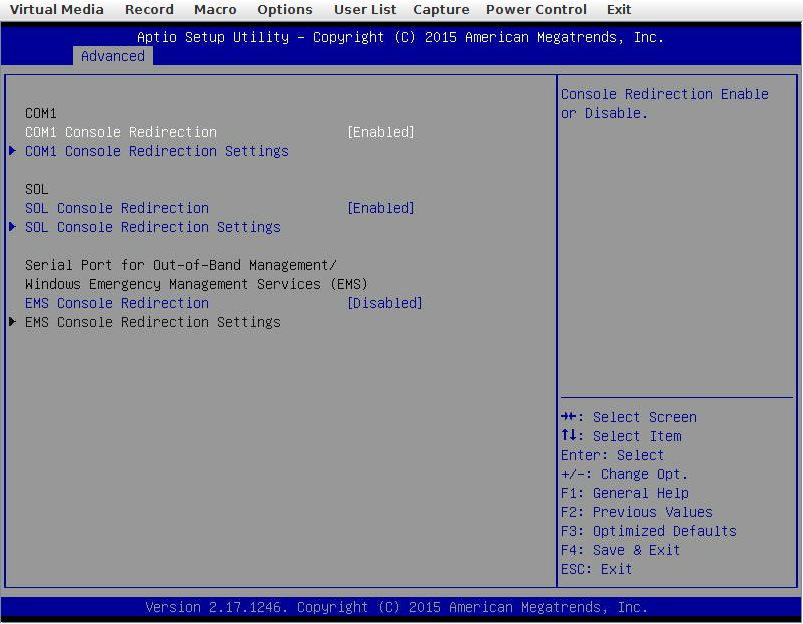
Under Advanced > Serial Port Console Redirection you’ll want to enable SOL Console Redirection.
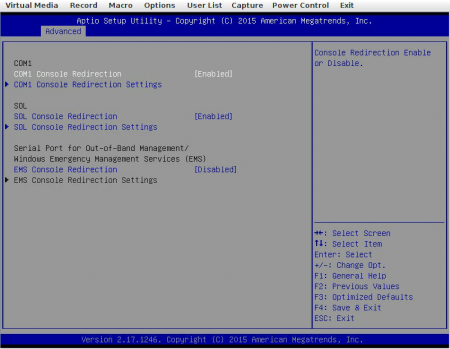
(Pictured here is also COM1 Console Redirection. This is for the physical serial port on the machine, not the one in the IPMI.)
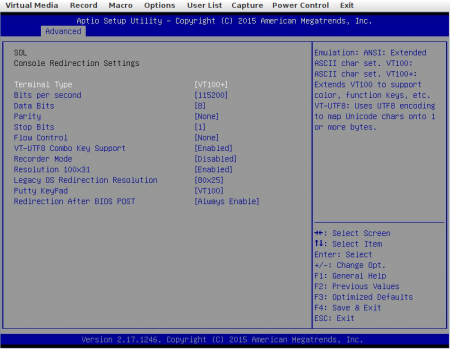
Under SOL Console Redirection Settings you may as well set the Bits per second to 115200.
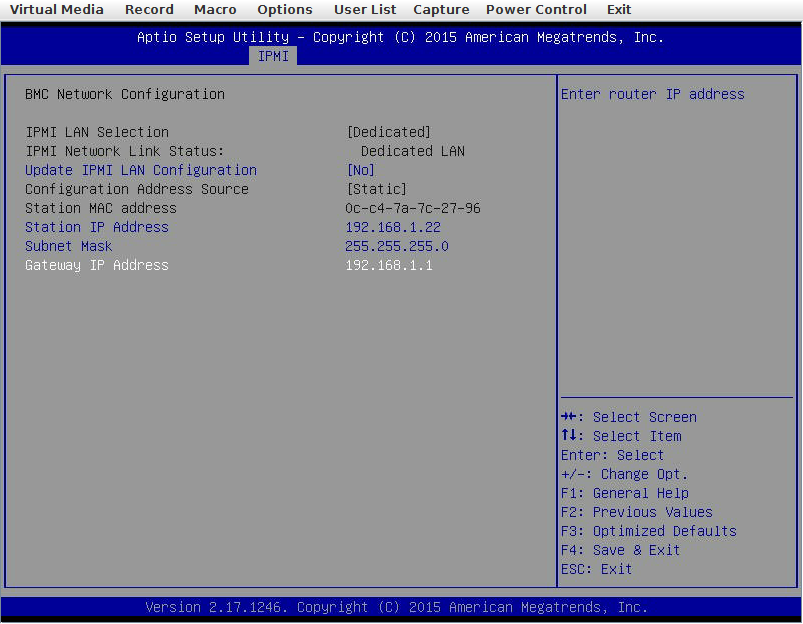
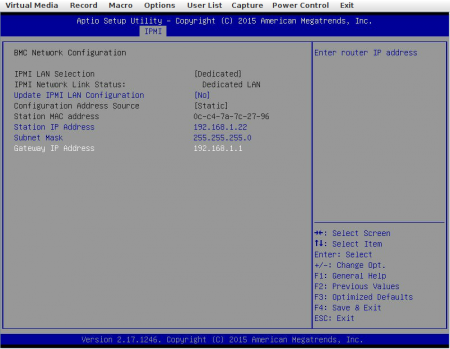
Now it’s time to configure the IPMI so you can interact with it over the network. Under IPMI > BMC Network Configuration, put the IPMI on your management network:
Connecting to the IPMI serial ^
With the above BIOS settings in place you should be able to save and reboot and then connect to the IPMI serial console. The default credentials are ADMIn / ADMIN which you should of course change with ipmitool, but that is for a different post.
There’s two ways to connect to the serial-over-LAN: You can ssh to the IPMI controller, or you can use ipmitool. Personally I prefer ssh, but the ipmitool way is like this:
$ ipmitool -I lanplus -H 192.168.1.22 -U ADMIN -a sol activate |
$ ipmitool -I lanplus -H 192.168.1.22 -U ADMIN -a sol activate
The ssh way:
$ ssh ADMIN@192.168.1.22
The authenticity of host '192.168.1.22 (192.168.1.22)' can't be established.
RSA key fingerprint is b7:e1:12:94:37:81:fc:f7:db:6f:1c:00:e4:e0:e1:c4.
Are you sure you want to continue connecting (yes/no)?
Warning: Permanently added '192.168.1.22,192.168.1.22' (RSA) to the list of known hosts.
ADMIN@192.168.1.22's password:

ATEN SMASH-CLP System Management Shell, version 1.05
Copyright (c) 2008-2009 by ATEN International CO., Ltd.
All Rights Reserved


-> cd /system1/sol1
/system1/sol1

-> start
/system1/sol1
press <Enter>, <Esc>, and then <T> to terminate session
(press the keys in sequence, one after the other) |
$ ssh ADMIN@192.168.1.22
The authenticity of host '192.168.1.22 (192.168.1.22)' can't be established.
RSA key fingerprint is b7:e1:12:94:37:81:fc:f7:db:6f:1c:00:e4:e0:e1:c4.
Are you sure you want to continue connecting (yes/no)?
Warning: Permanently added '192.168.1.22,192.168.1.22' (RSA) to the list of known hosts.
ADMIN@192.168.1.22's password:
ATEN SMASH-CLP System Management Shell, version 1.05
Copyright (c) 2008-2009 by ATEN International CO., Ltd.
All Rights Reserved
-> cd /system1/sol1
/system1/sol1
-> start
/system1/sol1
press <Enter>, <Esc>, and then <T> to terminate session
(press the keys in sequence, one after the other)
They both end up displaying basically the same thing.
The serial console should just be displaying the boot process, which won’t go anywhere.
DHCP and TFTP server ^
You will need to configure a DHCP and TFTP server on an already-existing machine on the same LAN as your new server. They can both run on the same host.
The DHCP server responds to the initial requests for IP address configuration and passes along where to get the boot environment from. The TFTP server serves up that boot environment. The boot environment here consists of a kernel, initramfs and some configuration for passing arguments to the bootloader/kernel. The boot environment is provided by the Debian project.
DHCP ^
I’m using isc-dhcp-server. Its configuration file is at /etc/dhcp/dhcpd.conf.
You’ll need to know the MAC address of the server, which can be obtained either from the front page of the IPMI controller’s web interface (i.e. https://192.168.1.22/ in this case) or else it is displayed on the serial console when it attempts to do a PXE boot. So, add a section for that:
subnet 192.168.2.0 netmask 255.255.255.0 {
}

host foo {
    hardware ethernet 0C:C4:7A:7C:28:40;
    fixed-address 192.168.2.22;
    filename "pxelinux.0";
    next-server 192.168.2.251;
    option subnet-mask 255.255.255.0;
    option routers 192.168.2.1;
} |
subnet 192.168.2.0 netmask 255.255.255.0 {
}
host foo {
hardware ethernet 0C:C4:7A:7C:28:40;
fixed-address 192.168.2.22;
filename "pxelinux.0";
next-server 192.168.2.251;
option subnet-mask 255.255.255.0;
option routers 192.168.2.1;
}
Here we set the network configuration of the new server with fixed-address, option subnet-mask and option routers. The IP address in next-server refers to the IP address of the TFTP server, and pxelinux.0 is what the new server will download from it.
Make sure that is running:
# service isc-dhcp-server start |
# service isc-dhcp-server start
DHCP uses UDP port 67, so make sure that is allowed through your firewall.
TFTP ^
A number of different TFTP servers are available. I use tftpd-hpa, which is mostly configured by variables in /etc/default/tftp-hpa:
TFTP_OPTIONS="--secure"
TFTP_USERNAME="tftp"
TFTP_DIRECTORY="/srv/tftp"
TFTP_ADDRESS="0.0.0.0:69" |
TFTP_OPTIONS="--secure"
TFTP_USERNAME="tftp"
TFTP_DIRECTORY="/srv/tftp"
TFTP_ADDRESS="0.0.0.0:69"
TFTP_DIRECTORY is where you’ll put the files for the PXE environment.
Make sure that the TFTP server is running:
# service tftpd-hpa start |
# service tftpd-hpa start
TFTP uses UDP port 69, so make sure that is allowed through your firewall.
Download the netboot files from your local Debian mirror:
$ cd /srv/tftp
$ curl -s http://ftp.YOUR-MIRROR.debian.org/debian/dists/jessie/main/installer-amd64/current/images/netboot/netboot.tar.gz | sudo tar zxvf -
./
./version.info
./ldlinux.c32
./pxelinux.0
./pxelinux.cfg
./debian-installer/
./debian-installer/amd64/
./debian-installer/amd64/bootnetx64.efi
./debian-installer/amd64/grub/
./debian-installer/amd64/grub/grub.cfg
./debian-installer/amd64/grub/font.pf2
… |
$ cd /srv/tftp
$ curl -s http://ftp.YOUR-MIRROR.debian.org/debian/dists/jessie/main/installer-amd64/current/images/netboot/netboot.tar.gz | sudo tar zxvf -
./
./version.info
./ldlinux.c32
./pxelinux.0
./pxelinux.cfg
./debian-installer/
./debian-installer/amd64/
./debian-installer/amd64/bootnetx64.efi
./debian-installer/amd64/grub/
./debian-installer/amd64/grub/grub.cfg
./debian-installer/amd64/grub/font.pf2
…
(This assumes you are installing a device with architecture amd64.)
At this point your TFTP server root should contain a debian-installer subdirectory and a couple of links into it:
$ ls -l .
total 8
drwxrwxr-x 3 root root 4096 Jun  4  2015 debian-installer
lrwxrwxrwx 1 root root   47 Jun  4  2015 ldlinux.c32 -> debian-installer/amd64/boot-screens/ldlinux.c32
lrwxrwxrwx 1 root root   33 Jun  4  2015 pxelinux.0 -> debian-installer/amd64/pxelinux.0
lrwxrwxrwx 1 root root   35 Jun  4  2015 pxelinux.cfg -> debian-installer/amd64/pxelinux.cfg
-rw-rw-r-- 1 root root 61 Jun 4 2015 version.info |
$ ls -l .
total 8
drwxrwxr-x 3 root root 4096 Jun 4 2015 debian-installer
lrwxrwxrwx 1 root root 47 Jun 4 2015 ldlinux.c32 -> debian-installer/amd64/boot-screens/ldlinux.c32
lrwxrwxrwx 1 root root 33 Jun 4 2015 pxelinux.0 -> debian-installer/amd64/pxelinux.0
lrwxrwxrwx 1 root root 35 Jun 4 2015 pxelinux.cfg -> debian-installer/amd64/pxelinux.cfg
-rw-rw-r-- 1 root root 61 Jun 4 2015 version.info
You could now boot your server and it would call out to PXE to do its netboot, but would be displaying the installer process on the VGA output. If you intend to carry it out using the Remote Console facility of the IPMI interface then that may be good enough. If you want to do it over the serial-over-LAN though, you’ll need to edit some of the files that came out of the netboot.tar.gz to configure that.
Here’s a list of the files you need to edit. All you are doing in each one is telling it to use serial console. The changes are quite mechanical so you can easily come up with a script to do it, but here I will show the changes verbosely. All the files live in the debian-installer/amd64/boot-screens/ directory.
ttyS1 is used here because this system has a real serial port on ttyS0. 115200 is the baud rate of ttyS1 as configured in the BIOS earlier.
adtxt.cfg
From:
label expert
        menu label ^Expert install
        kernel debian-installer/amd64/linux
        append priority=low vga=788 initrd=debian-installer/amd64/initrd.gz ---
include debian-installer/amd64/boot-screens/rqtxt.cfg
label auto
        menu label ^Automated install
        kernel debian-installer/amd64/linux
append auto=true priority=critical vga=788 initrd=debian-installer/amd64/initrd.gz --- quiet |
label expert
menu label ^Expert install
kernel debian-installer/amd64/linux
append priority=low vga=788 initrd=debian-installer/amd64/initrd.gz ---
include debian-installer/amd64/boot-screens/rqtxt.cfg
label auto
menu label ^Automated install
kernel debian-installer/amd64/linux
append auto=true priority=critical vga=788 initrd=debian-installer/amd64/initrd.gz --- quiet
To:
label expert
        menu label ^Expert install
        kernel debian-installer/amd64/linux
        append priority=low console=ttyS1,115200n8 initrd=debian-installer/amd64/initrd.gz ---
include debian-installer/amd64/boot-screens/rqtxt.cfg
label auto
        menu label ^Automated install
        kernel debian-installer/amd64/linux
append auto=true priority=critical console=ttyS1,115200n8 initrd=debian-installer/amd64/initrd.gz --- quiet |
label expert
menu label ^Expert install
kernel debian-installer/amd64/linux
append priority=low console=ttyS1,115200n8 initrd=debian-installer/amd64/initrd.gz ---
include debian-installer/amd64/boot-screens/rqtxt.cfg
label auto
menu label ^Automated install
kernel debian-installer/amd64/linux
append auto=true priority=critical console=ttyS1,115200n8 initrd=debian-installer/amd64/initrd.gz --- quiet
rqtxt.cfg
From:
label rescue
        menu label ^Rescue mode
        kernel debian-installer/amd64/linux
append vga=788 initrd=debian-installer/amd64/initrd.gz rescue/enable=true --- quiet |
label rescue
menu label ^Rescue mode
kernel debian-installer/amd64/linux
append vga=788 initrd=debian-installer/amd64/initrd.gz rescue/enable=true --- quiet
To:
label rescue
        menu label ^Rescue mode
        kernel debian-installer/amd64/linux
append console=ttyS1,115200n8 initrd=debian-installer/amd64/initrd.gz rescue/enable=true --- quiet |
label rescue
menu label ^Rescue mode
kernel debian-installer/amd64/linux
append console=ttyS1,115200n8 initrd=debian-installer/amd64/initrd.gz rescue/enable=true --- quiet
syslinux.cfg
From:
# D-I config version 2.0
# search path for the c32 support libraries (libcom32, libutil etc.)
path debian-installer/amd64/boot-screens/
include debian-installer/amd64/boot-screens/menu.cfg
default debian-installer/amd64/boot-screens/vesamenu.c32
prompt 0
timeout 0 |
# D-I config version 2.0
# search path for the c32 support libraries (libcom32, libutil etc.)
path debian-installer/amd64/boot-screens/
include debian-installer/amd64/boot-screens/menu.cfg
default debian-installer/amd64/boot-screens/vesamenu.c32
prompt 0
timeout 0
To:
serial 1 115200
console 1
# D-I config version 2.0
# search path for the c32 support libraries (libcom32, libutil etc.)
path debian-installer/amd64/boot-screens/
include debian-installer/amd64/boot-screens/menu.cfg
default debian-installer/amd64/boot-screens/vesamenu.c32
prompt 0
timeout 0 |
serial 1 115200
console 1
# D-I config version 2.0
# search path for the c32 support libraries (libcom32, libutil etc.)
path debian-installer/amd64/boot-screens/
include debian-installer/amd64/boot-screens/menu.cfg
default debian-installer/amd64/boot-screens/vesamenu.c32
prompt 0
timeout 0
txt.cfg
From:
default install
label install
        menu label ^Install
        menu default
        kernel debian-installer/amd64/linux
append vga=788 initrd=debian-installer/amd64/initrd.gz --- quiet |
default install
label install
menu label ^Install
menu default
kernel debian-installer/amd64/linux
append vga=788 initrd=debian-installer/amd64/initrd.gz --- quiet
To:
default install
label install
        menu label ^Install
        menu default
        kernel debian-installer/amd64/linux
append console=ttyS1,115200n8 initrd=debian-installer/amd64/initrd.gz --- quiet |
default install
label install
menu label ^Install
menu default
kernel debian-installer/amd64/linux
append console=ttyS1,115200n8 initrd=debian-installer/amd64/initrd.gz --- quiet
Perform the install ^
Connect to the serial-over-LAN and get started. If the server doesn’t have anything currently installed then it should go straight to trying PXE boot. If it does have something on the storage that it would boot then you will have to use F12 at the BIOS screen to convince it to jump straight to PXE boot.
$ ssh ADMIN@192.168.1.22
ADMIN@192.168.1.22's password:

ATEN SMASH-CLP System Management Shell, version 1.05
Copyright (c) 2008-2009 by ATEN International CO., Ltd.
All Rights Reserved


-> cd /system1/sol1
/system1/sol1

-> start
/system1/sol1
press <Enter>, <Esc>, and then <T> to terminate session
(press the keys in sequence, one after the other)

Intel(R) Boot Agent GE v1.5.13
Copyright (C) 1997-2013, Intel Corporation

CLIENT MAC ADDR: 0C C4 7A 7C 28 40  GUID: 00000000 0000 0000 0000 0CC47A7C2840
CLIENT IP: 192.168.2.22  MASK: 255.255.255.0  DHCP IP: 192.168.2.252
GATEWAY IP: 192.168.2.1

PXELINUX 6.03 PXE 20150107 Copyright (C) 1994-2014 H. Peter Anvin et al


                 ┌───────────────────────────────────────┐
                 │ Debian GNU/Linux installer boot menu  │
                 ├───────────────────────────────────────┤
                 │ Install                               │
                 │ Advanced options                    > │
                 │ Help                                  │
                 │ Install with speech synthesis         │
                 │                                       │
                 │                                       │
                 │                                       │
                 │                                       │
                 │                                       │
                 │                                       │
                 └───────────────────────────────────────┘


              Press ENTER to boot or TAB to edit a menu entry


  ┌───────────────────────┤ [!!] Select a language ├────────────────────────┐
  │                                                                         │
  │ Choose the language to be used for the installation process. The        │
  │ selected language will also be the default language for the installed   │
  │ system.                                                                 │
  │                                                                         │
  │ Language:                                                               │
  │                                                                         │
  │                               C                                         │
  │                               English                                   │
  │                                                                         │
  │     <Go Back>                                                           │
  │                                                                         │
  └─────────────────────────────────────────────────────────────────────────┘


<Tab> moves; <Space> selects; <Enter> activates buttons |
$ ssh ADMIN@192.168.1.22
ADMIN@192.168.1.22's password:
ATEN SMASH-CLP System Management Shell, version 1.05
Copyright (c) 2008-2009 by ATEN International CO., Ltd.
All Rights Reserved
-> cd /system1/sol1
/system1/sol1
-> start
/system1/sol1
press <Enter>, <Esc>, and then <T> to terminate session
(press the keys in sequence, one after the other)
Intel(R) Boot Agent GE v1.5.13
Copyright (C) 1997-2013, Intel Corporation
CLIENT MAC ADDR: 0C C4 7A 7C 28 40 GUID: 00000000 0000 0000 0000 0CC47A7C2840
CLIENT IP: 192.168.2.22 MASK: 255.255.255.0 DHCP IP: 192.168.2.252
GATEWAY IP: 192.168.2.1
PXELINUX 6.03 PXE 20150107 Copyright (C) 1994-2014 H. Peter Anvin et al
┌───────────────────────────────────────┐
│ Debian GNU/Linux installer boot menu │
├───────────────────────────────────────┤
│ Install │
│ Advanced options > │
│ Help │
│ Install with speech synthesis │
│ │
│ │
│ │
│ │
│ │
│ │
└───────────────────────────────────────┘
Press ENTER to boot or TAB to edit a menu entry
┌───────────────────────┤ [!!] Select a language ├────────────────────────┐
│ │
│ Choose the language to be used for the installation process. The │
│ selected language will also be the default language for the installed │
│ system. │
│ │
│ Language: │
│ │
│ C │
│ English │
│ │
│ <Go Back> │
│ │
└─────────────────────────────────────────────────────────────────────────┘
<Tab> moves; <Space> selects; <Enter> activates buttons
…and now the installation proceeds as normal.
At the end of this you should be left with a system that uses ttyS1 for its console. You may need to tweak that depending on whether you want the VGA console also.